** If you would like to see an image on our blog in a larger format, just click on it to enlarge.
Note: Links to products within this post are either links to our website or affiliate links.
Welcome to Day 2 of the Oliver+S Fairy Tale Dress sew along!
If you do not have your pattern yet you can purchase it from the shop. It is in PDF format so you can print today and be ready to start. You can also purchase a kit as well from the shop. It has everything you need, other than thread, to make a gorgeous dress.
Before you begin today's lesson please read all of the pattern directions first. During today's lesson we will be sewing the bodice (main and lining), making the skirt, and adding the invisible zipper. Do not worry if you do not have an invisible zipper presser foot, you can use a regular zipper presser foot as I did. I will go over each step for the invisible zipper installation, so there will be lots of pictures today.

1. We are going to transfer the darts on the pattern pieces to the wrong side of the bodice main and bodice lining pieces. To do this mark the dot and bottom part of the dart onto the fabric. Then, using a quilting ruler (or anything with a nice straight edge) draw a line to connect the two. I used a fabric marker to mark the darts onto the lighter colored fabric and a chalk pencil to mark the darts onto the darker fabric. Do this with both the front and back bodice pieces.

2. If you are making View A, mark the dots onto the right side of the sleeve pattern pieces. Be sure to mark the correct side as the pieces are mirrored. The back side of the sleeve has two notches and the front side has one notch. Do the very same with the sleeve lining pieces.

3. Stay stitch the main bodices. (I also stay stitch my lining bodices as well, but it does not have to be done, it's only my preference.) This stitch will be a 3/8" seam allowance.

4. Onto sewing the darts. Fold your bodice piece with right sides together along the dart lines you made. I first pin at the bottom with both darts lines lined up and then pin the very top of the dart. I work my way from the top of the dart down to the bottom using straight pins to push through both sides on the dart line to help line up both sides perfectly. Pin in place as you go.
(See two pictures below)

This is a picture of the back side of the picture above. I make sure that the pin goes through both the front and back side of the dart line for even stitching.

Before we sew the dart, set your sewing machine's stitch length to a shorter stitch. I normally sew with a 2.5 on my machine and I set my machine to a 2 length for sewing darts.
5. Starting sewing at the raw edge of the bottom of the bodice, locking your stitches here. Begin sewing the dart along the dart line you made, up to the top of the dart. At the top of the dart Do Not lock your stitches! Instead, sew to the very edge of your fabric and leave a long tail of threads for hand tying a knot.

6. Take your long threads and hand tie a knot right next to the bodice. Tie a few and make sure they are snug next to the fabric, but be careful not to pull the threads tight on your bodice.

7. Trim the threads short, then repeat with all the darts on the main and lining bodice pieces.

8. Press your dart while it is still folded to "set" the threads on the dart.

9. Then, press the dart to the center of the bodice. (The back bodice will be pressed to the center back.)

Now we have a beautiful dart on the front side with no puckers! Repeat with all remaining darts on both back and front bodice pieces.

10. On the right side of your main back bodice pieces mark a ½" seam allowance down the center back. Do this on each main back bodice piece.

11. Take the top of your main back bodice pieces only and mark down 7/8" from the top. This will help us with our zippers later on.

For View A Skip Down to Step 17.
12. For View B Only - Take your sash piece and fold it in half with right sides together. Pin in place along the slanted edge and the long edge leaving the short straight edge unpinned. Sew along the slanted edge and the long edge but leave the short end un-sewn for turning.

13. Trim the corner, then turn and press. Repeat with your second sash.

14. Sew two rows of gathering stitches along the short end of the sash to gather.

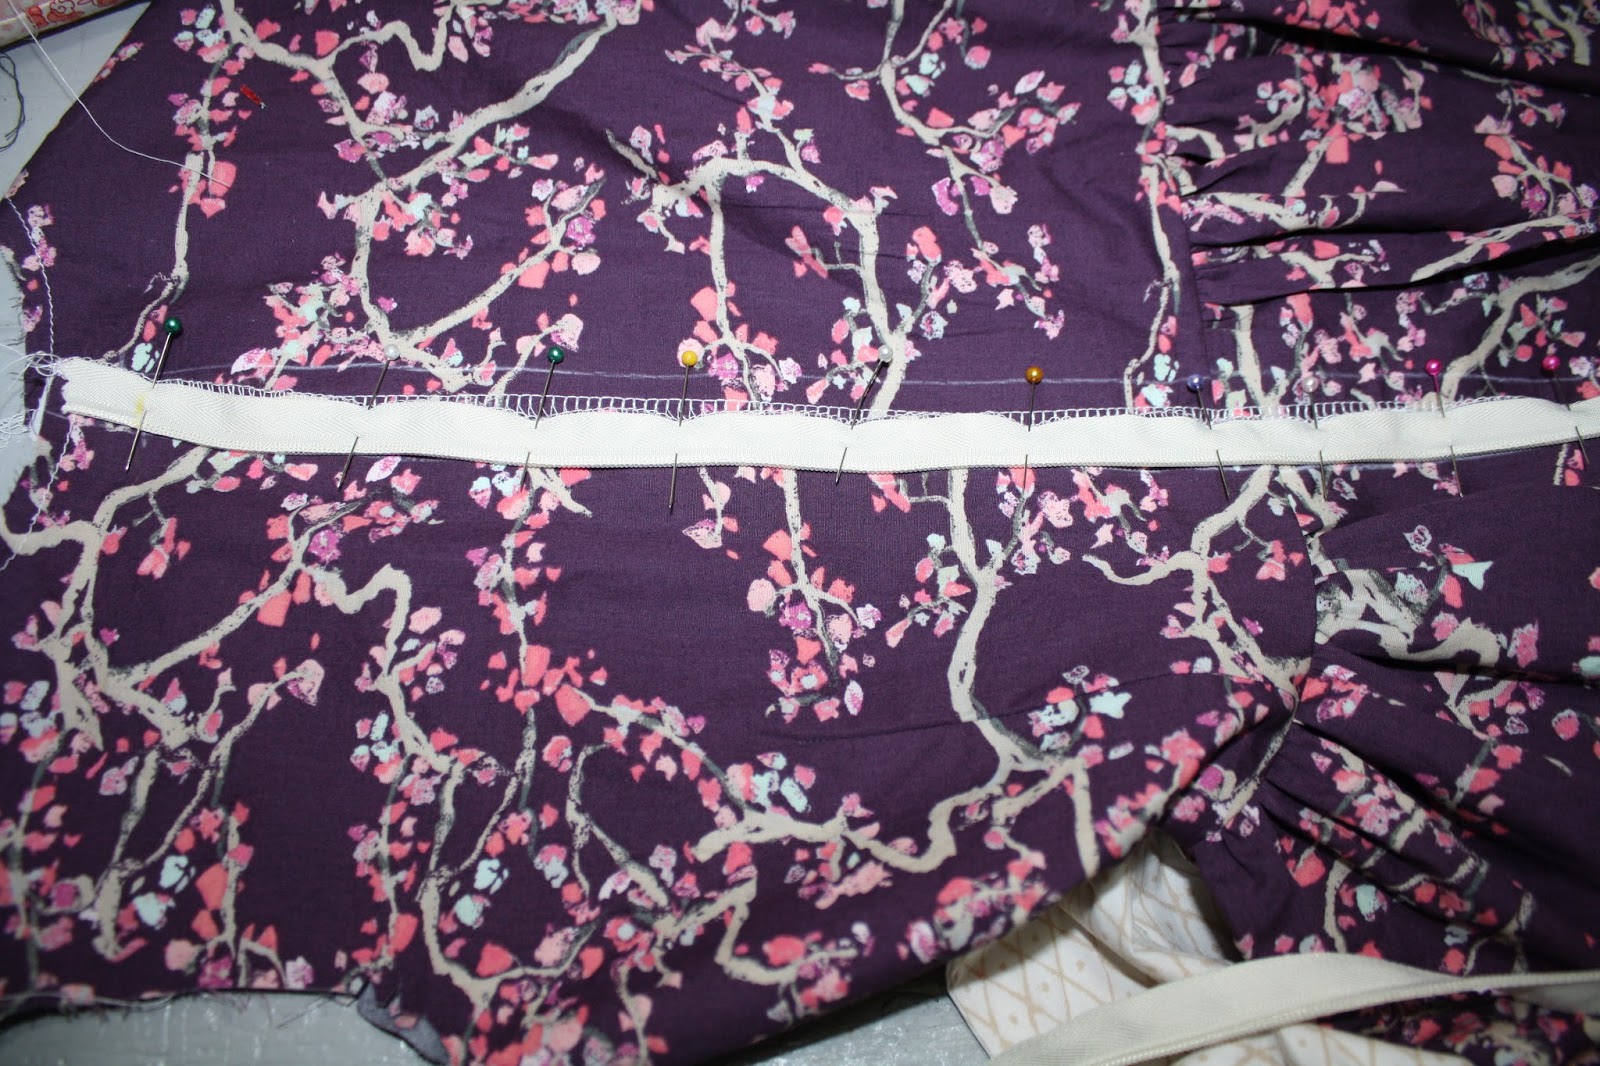
15. Before we attach the sash to the side of the dress bodice, measure up a ½" form the bottom and mark. This is were we will sew our sash above the seam allowance of the bodice/skirt area.

16. Slightly gather the sash's short end. Pin the sash starting at the bottom of the sash and at the ½" mark you made at the bottom of the bodice. Pin the sash in place and baste on using a ½" seam allowance. Repeat with the second sash.

17. For All Views - Take your back bodice pieces and front bodice pieces and place them right sides together, matching up the raw edges of the side of the bodice and the shoulder of the bodice. Pin in place.

18. Stitch with a ½" seam allowance. I finish all my seam allowances here with a serger. Press the seams. Repeat with the second side of the main bodice and both sides of the lining bodice pieces.

19. Press the lining of the back center bodice over 5/8" on both sides.

20. Take your main skirt center back and transfer the dot on the pattern to the right side of the skirt. Mark a ½" seam allowance from the top of the skirt to the dot your just transferred.

21. Pin your main skirts with right sides together, only pinning at the sides. (Only sew the main skirt together at this point and not the lining skirt.) Stitch the sides up, then finish the seam allowance on both sides.

22. Sew a gathering stitch across the top of the skirt and pin the skirt to our main bodice, right sides together, matching up the notches on the pattern pieces of the skirt to the notches and darts along the bottom of the bodice. Gather the skirt up evenly and pin in place. Then, stitch the skirt onto the bodice.

23. Finish the skirt/bodice seam you have just sewn with either a serger or trim & finish with a narrow zig zag stitch. Press this seam up towards the bodice.

24. Cut your back interfacing piece and attach it to your dress at the raw edge of the center back, starting at the dot you transferred from the pattern on the skirt. Repeat with second side.

25. Take both of your back edges and finish the raw edge with either your serger or a narrow zig zag stitch. Be careful not to trim any of the fabric along the back edge at all.

Now, we will install our invisible zipper! If you have not sewn with one before I will break this down into every step along the way. I have included lots of photos that I hope will help you out.
26. First, open your zipper up and press it flat from the back side of the zipper. The pressing will take the "curl" out of the zipper to help you sewn it in nicely. Be sure to press the zipper flat with a low setting so you do not melt your zipper teeth.
27. Mark the top of your zipper tape on the wrong side where the zipper sits when fully closed.

28. I find this next tip helpful. I lay the zipper on top of my dress as if it was already sewn in properly. That way I can see where it needs to be to be pinned and sewn to the dress correctly. This helps me keep from twisting my zipper as I sew it in. I have done that before...more than once...on the same dress... Now, starting at the the top of your zipper, match the marking you made on the zipper up to the marking on the top of the dress. Pin in place.

29. Continue to pin the zipper all the way down until the dot you transferred from the pattern piece on the skirt. You can baste the zipper in place but I only pin mine. I use lots of pins to hold it in place well.
30. Now, using a zipper foot, stitch the zipper as close to the zipper teeth as you can being careful not to sew over the teeth of the zipper itself. Stop sewing at the dot on the skirt you transferred from the pattern piece. When you are finished sewing the zipper in place, zip the zipper closed to make sure you have sewn as close to the zipper as you could. If a place or two is not sewn close enough, you can go back and sew these places a bit closer.

31. With the zipper closed again, mark on the wrong side of the zipper, on the side of the zipper that isn't sewn to the dress yet, where the waist line seam is located. Unzip the zipper.

32. Taking this mark you just made, match it to the back side of the dress where the center seam is at. Double check at this point that your zipper is in place correctly. Now, pin the top of the zipper with the top zipper marking and the top dress marking. Continue to pin the rest of the zipper in place.
33. Sew in place as you did the other side of the zipper. Zip the dress up to double check your zipper is sewn in properly and press the zipper area of the back of the dress.

34. To finish the back of the dress skirt, pin the skirt back seam together under where the zipper was sewn in. For this step I switch back to my regular presser foot to sew the seam.

35. Start stitching ¼" above the stitching on the bottom of the zipper, being sure to lock your stitches. While sewing with a ½" seam, sew all the way down to the bottom of the skirt.

36. Press your seam open and press the right side of the dress again.

37. If your zipper is too long it is a super easy fix. First mark 2" down from where the zipper is sewn in the dress. Stitch over the zipper at this mark many times, locking your stitches.

38. Cut the zipper just below where you stitched.

39. Now, for both a zipper that has been shortened and one that has not been shortened, sew the zipper to the seam allowance of the back skirt only on both sides. (See the next three photos of this step.) Be careful not to sew the dress skirt onto the zipper on this step.


40. Our last step for today! Fold the top of the zipper out to the raw edge and stitch in place on both back bodice pieces.

At this point we have what is starting to look like a real dress! Happy sewing and see you tomorrow for Day Three.
Sharon
* If you would like to earn entries into the prize drawing, please make sure to submit a photo of your completed Lesson Two to this Facebook Album by 12:00 noon CST, Thursday, December 10th. If you have any questions the Facebook Group is a great place to ask.
Danielle Storm
www.whimsicalfabric.com
No comments:
Post a Comment