Thursday, October 30, 2014

Sew-Along #18 - Penelope Dress / Top Pattern for Women - Lesson #3

The Penelope by Modkid

If you have any questions, suggestions, or tips to share; please make sure to post them on our Facebook group.  Also, if you would like to see any of the images posted in this blog larger, just click on them.  It might be helpful in some steps.   

Hello and welcome to day three of the sew along!  Today I am going to go over how to make the infinity scarf that I showed with my Penelope. It is really simple and quick; you'll want to make these over and over!

I am slowing getting into wearing scarves and I really like the ones that are already in a loop for you so they don't get lopsided during the day.  They are really quick and easy to  make and can take a summer top to fall and winter in a matter of seconds.  Plus, when your entire wardrobe is made up of mostly yoga pants, a scarf is a good way to distinguish between any old day and a special occasion ;)

So here is what I did.  I cut a strip of fabric the entire width of the fabric and 18" long.  I folded that in half, longways & right sides together, and sewed the long edge (leave the two short edges open).  

You will basically have a long tube.  Then I turned the tube right sides out and pressed it.  

Then I matched the cut edges (short edges) at the seam allowance. You could add a twist to the tube before matching the edges, but I did not do that since I was planning to wear it looped anyway.  

Another view of this step.

Then I used the sewing machine to sew the raw edges together as far as I could get.  You should be able to sew all but about 2-3 inches together by sewing and readjusting the fabric as you go around.  

Once I sewed around as far as I could with the sewing machine, I ironed my seam and then topstitched the open part closed.  You could also whip stitch the hole closed by hand.  And then you have a scarf to wear with you Penelope or anything else! 

I like to loop mine so it is double layered.  Kind of like a faux-cowl.  But have fun with it and wear it how it suits you!  

Thanks so much for joining me on this sew along!  I hope you love everything you made and enjoy wearing it for a long time.

* If you would like to enter the prize drawing, please make sure you submit a picture of your completed lesson three to the Facebook Album by 12:00 noon CT, Monday, November 3rd.  Also, if you have any questions the Facebook Group is a great place to ask.

Until next time!
Sarah 

Wednesday, October 29, 2014

Sew-Along #18 - Penelope Dress / Top Pattern for Women - Lesson #2

The Penelope by Modkid

If you have any questions, suggestions, or tips to share; please make sure to post them on our Facebook group.  Also, if you would like to see any of the images posted in this blog larger, just click on them.  It might be helpful in some steps.   

Please read the Penelope pattern directions all the way through before you begin.  It's probably a good idea to read through this lesson once before you begin also.


Hello ladies!  This is Sarah again and I am here with day 2 of the Penelope Sew Along. Today is an exciting day because we are going to sew this gal up!  So let's get started!

The first thing I will tell you is that I do not always follow the workflow laid out in the pattern. This pattern is really well written and if you are a rule follower (which I am in almost every area except sewing!) and want to go by the steps in the order of the pattern, that is great too and you should not have any problems. If you want to be a sewing rebel with me, then let's go...

A. Ironing Hems

The first step I like to take is folding and ironing my hems.  I do not sew them into place, I just iron them with the hem allowance so that when it is time to sew them, I already have a pressed line in place that I can turn up.  I just find it easier to iron them in when I have a flat fabric surface.  

I LOVE my multi-sided measuring gauge (affiliate link) and use it whenever I can (find it)...if not, I use the traditional slider gauge (affiliate link).  Either one, or even a heavy piece of paper with a line drawn on it (careful not to burn it!) will work to iron in a nice even hem.  


I simply measure the hem allowance and then press it, leaving a nice fold in the fabric.  

I did this for both of my sleeve edges and the bottom hem of the tunic (or dress or shirt).  I did a 1/2 hem on the sleeves, and a 1" hem on the bottom of the tunic.  If you are adding a ruffle to the bottom, you can skip ironing in the hem of the bottom edge.  

See? Nice pressed hem just waiting to be sewn in!

B. Gathering The Bodice Front

After pressing in my hems, I took my tunic to the sewing machine and ran a quick basting stitch between the dots on the front bodice piece.  I did one row of basting stitches because I am lazy it is just a small area I was gathering, but you can do 2 if you want.  I usually set my stitch length and its maximum and my tension at about 2.  This makes it nice and easy to pull the threads and gather.  

Your basting should look like this.  

Once the basting stitches are in, I like to put a pin in one side and loop my thread in a figure 8 around my pin.  This keeps the thread from being pulled out accidentally when you start gathering it (NOT that I have ever done that...) Then I pull the opposite side until I get the desired gather.  In this case, you want the area between the dots to be gathered to a width of about an inch.  Once it is gathered the correct amount, I put a pin in the second side and loop the thread around it in another figure 8.  

Close up of the pin looping. 

Now that we have the neckline gathered, I am going to skip a step again.  I like to put my neck binding on after the shoulder seams have been sewn.  I have an easier time getting the correct tension on my neckband that way.  Some people really prefer doing it in the flat, and that is described in step 4 of the pattern.  But if you are game, follow along and I will show you the way I do it.  

C. Gathering The Bust Area (Penelope Plus Only!)

Danielle here.  Before we sew up the shoulder seams I'm going to show you a few extra things.  The first is some extra gathering that is included on the Penelope Plus pattern.  This is to help create ample room for the bust.  If you are not making the Penelope Plus you can skip down to part D below.

You will notice the two markings under the arms on the front panel piece.

Sew two lines of basting stitches on the front panel piece between these two markings.  Make sure to keep them within the ½" seam allowance.  Repeat on both the left and right sides.

 You will be gathering these stitches . . .

 .  .  . so that the markings line up with the two markings on both the left and right sides of back panel piece.


D. Adding a Stabilizer To The Shoulders and Underarms (Optional)

The second thing I would like to cover is an optional step that you can take that will help stabilize your shoulder and underarm seams.  This will help keep the knit from stretching out with wear and while hanging on a hanger.

If you purchased a kit you receive Mobilon (lastin) which is a clear stretchy elastic.  Mobilon is awesome to add to seams while sewing with knits.  You have enough in your kit to add to both the shoulders and the underarm seams if you wish.  If you didn't purchase a kit and don't have any lastin, you can use ¼" ribbon or seam binding.  Those two items will reduce the amount of stretch your garment will have in the areas you apply it, but they will work nicely to stabilize the seams if you do not have lastin.

I find it easiest to secure the Mobilon to the fabric before I start pinning the seams together.  You can do this by applying some washable glue stick to your fabric.  I like to use Washaway Wonder Tape (affiliate link).  I love that stuff and use it ALL the time anymore.  

Then, just stick your Mobilon/ribbon/seam binding to your fabric. 

You can also just baste the the lastin to your fabric edge with your sewing machine.  Whatever you decide to use and however you decide to attach it, just make sure that it is fully within your ½" seam allowance.  If it isn't it will show when you finish your seams and you DO NOT want that.

E. Sewing Up Your Seams

Back to Sarah!   

If you are sewing on a sewing machine, you will want to use a stretch stitch and a ballpoint needle to sew up your garment.  On my machine, the stretch stitches are the yellow ones (those are hard to see, sorry!) and my length gets set to a specific spot, lower than 0, that looks like a yellow triangle.  Yours probably has setting for stretch stitches as well.  They usually look like a little lightening bolt or sets of three dashed or zig-zag lines.  

I used my serger for the rest of my garment and, if you have one, I'd encourage you to use it.  That is one GREAT thing about knits; you can sew almost the entire garment on the serger.  Just make sure you are using the 4 thread so you have a nice, strong seam.  I like to run a test seam on some of my scraps so I can make sure my differential feed is set correctly.  Sometimes knits can ripple when they are pulled through the serger.  I set my differential feed at about 1.5 for this garment.  

Once my setting were all good, I sewed the shoulder seams together from the neckline to the bottom of the sleeve.  Then I sewed the side seams together from the hemline, under the arm and to the hem of the sleeve.  You will want to make sure your ironed in hem allowances are unfold when you sew the seams.  

F. Neckband

Ok, so now we head back to the neckband.  The first thing you will need to do is sew the two short edges together, right sides together.  I used my sewing machine to this because I wanted to reduce the bulk of the seam, but you can do it with the serger as well.  

Once that is sewn together, I folded the neckband piece in half, wrong sides together, and pressed the neckband.  

It will look like this. 

Now, I use my Pilot brand FriXion ball pen (affiliate link) to mark my neckband into 4 equal parts.  You could also use a disappearing ink pen or even pins to mark it.  I use the friction pen because the ink disappears when you iron it (try it! It works!) and I really love the convenience of that.

I typically start by folding my band in half, folding the band where the seam I sewed is. Then I mark the fold on the opposite side (where my finger is).  You can see that below. 
I realized after I was done and writing this, that I did not take good pictures of this process, so I took some pictures with a scrap piece of fabric to show you guys :)

 Then I match the seam and the marked spot together and fold in half the opposite way.
 

You can see the center seam and marked seam matched below.  I mark where the pen is and where my finger is.  

This is what you will have when you are done.  

I follow the same process to mark the neckband of the garment. Mark the center front and back, then match those and mark the resulting sides.  
Center front and center back.
Center front and back matched, resulting sides are marked. 
These are the markings on shoulder sides.  

That looked like a lot of steps, but it is a really quick process (I promise!)

Once all of your quarters are marked, you simply match the markings on the neckline and the neckband pieces.  You want the neckband matched to the right side of the garment and you will want to make sure your center seam on the neckband is in the back. 

I pin my binding to the garment at each of the 4 marks.  You will notice that the binding is shorter than the neckline.  That is fine, you want it like that.  

Then I start at the center back and start sewing.  

I like to start it at the machine and just sew enough to catch the fabric and hold it.  I try to always have my binding piece on the bottom so I can see that I am not stretching my neckline piece.  You can see that the neck binding is shorter than the neckline.  

I grasp the neckline and binding at the next pinned section.  Pulling on the neck binding, I stretch the binding until it is just the length of the neckline to the next marked portion, making sure I am only stretching the binding and not the neckline.  

Then I sew that section of the neck binding to the neckline.  I repeat the process around the neckline.  

When you are done, you may still be able to see the basting stitches in front.  That is fine, they are easy to remove with a seam ripper.  

Press your neckline nice and flat, pressing the seam towards the dress.  

G. Hemming

Now for hemming.  I used my overstitch to hem mine, but you can use a stretch stitch, a rolled hem, a double needle or even leave it raw!  These options are all laid out in the pattern. Patty Young (the MODKID designer) also has some great videos on YouTube about hemming knits, if you want some additional direction.  
Since you already ironed in your hems, you can just fold those over now and hem the sleeves and bottom edge.  Then you are done!

But wait, there's more!  Come back on Day 3 and I will be showing you how to make an infinity scarf to go along with your top (or tunic or dress).  Yay for bonus techniques!

* If you would like to enter the prize drawing, please make sure you submit a picture of your completed lesson twp to the Facebook Album by 12:00 noon CT, Friday, October 31th.  Also, if you have any questions the Facebook Group is a great place to ask.

Happy sewing!
Sarah

Tuesday, October 28, 2014

Sew-Along #18 - Penelope Dress / Top Pattern for Women - Lesson #1

The Penelope by Modkid

If you have any questions, suggestions, or tips to share; please make sure to post them on our Facebook group.  Also, if you would like to see any of the images posted in this blog larger, just click on them.  It might be helpful in some steps.   

Please read the Penelope pattern directions all the way through before you begin.  It's probably a good idea to read through this lesson once before you begin also.


Hello everyone!  Welcome to day one of the Penelope Sew Along! I am Sarah and I blog over at BlogsLikeAMother.  I will be hosting the sew along and hopefully giving you a few tips you can use along the way.  

It is always exciting to start on a project for myself, although if I were honest, I'd say exciting mixed with a little trepidation.  So often when I sew for myself I have a great plan in place, but it doesn't turn out "just so" and I end up not wearing it.  Well, never  fear with this one ladies! This is super easy AND flattering and you will not be sorry!  So let's get started...

Today we are doing our fabric prep and cutting.  

A.The first step is fabric prep.  

I always wash my fabric before I use it.  Always. In fact, I put it in the wash as soon as I get it and before I put it away (who are we kidding, I mean before I add it to the stacks around my sewing room!) That way, I am always ready when sewing inspiration strikes.  With knits, it is especially important that you prewash because they tend to shrink up a bit.  So I would highly encourage you to wash your fabrics before you get started.  

If you haven't washed your fabrics, let's do that now.  

B. While the fabric is washing, let's get our pattern ready.  

This is a paper pattern, so no printing and cutting required!  You will need to decide what length you want to do and the size you want to make. I went with my measurements and found the pattern to be very true to size.  

When I use paper patterns, I will often use freezer paper to trace out my pattern.  That way, if I want to make another on in a different size, I haven't cut away those sizes.  On this one, I decided to just cut out my size.  I do not sew for other people, so I feel pretty confident this is the only size I will need to make out of this pattern.  If you would like to do the freezer paper method and are not sure how to do it just follow along.  If you are not going to use freezer paper skip down to step 2 below.

1. Creating Freezer Paper Pattern Pieces

 Hi everyone.  This is Danielle and I also made the Penelope.  As you might already know, I LOVE freezer paper so I went ahead and used it to trace my Penelope.

First I fussy cut around all of my pattern pieces.

 Then, I ironed out the pattern pieces to make sure they were smooth.

Next, I rolled out my freezer paper to cover my pattern.  As you can see my freezer paper wasn't wide enough to cover the whole pattern.

Since my freezer paper wasn't wide enough I used a scrap piece to lay over the arm.

I taped the extra piece down with masking tape.  You don't want to use scotch tape because if you accidentally hit it with your iron it will melt.

Using a Sharpie marker trace over all of the lines and markings.  Make sure to write all of the information on your freezer paper pattern pieces.

When I have everything traced I then fussy cut around my freezer paper pattern pieces. 

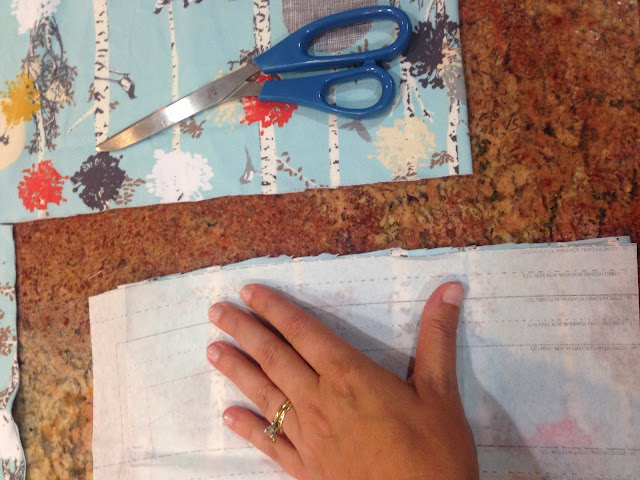
To use your freezer paper pattern pieces you simply lay the paper, shiny side down onto your fabric.  Take your iron and iron over the pattern piece.   

DO NOT touch the iron to the glossy side of your freezer paper! It will melt and make a mess of your iron. The freezer paper will temporarily stick to your fabric making it super easy to cut your pieces out. You will want to skip over ironing where you have your masking tape.  If you iron touches the masking tape it will not instantly melt, but you don't really want to iron back and forth over it either.  Do iron the rest of the pattern area onto your fabric though. 

Now, back to Sarah!

2.  Cutting out your fabric.  

If you are using the regular length or the dress length, go ahead and select your size and cut it out using your preferred method.  If you want to alter it to a tunic length, this is how I did that.  
Note: The Penelope Plus pattern does have a cutting line for a long tunic length on the pattern pieces already.
First I measured how long I wanted it from my underarm to hem.  I find the underarm to hem measurement is easier to do when I am measuring myself, but you could certainly do the center back or center front measurement if you want.  I marked that length on my pattern pieces.  Then I cut out the dress length pattern. 

Once my dress length pattern was cut out, I folded the pattern piece at my measured tunic length and laid it out on the fabric.   

I cut along the straight edge of the bottom of the pattern (along, but not through the fold) and just slightly past the folded edge.  

The I unfolded my pattern piece (so that I did not cut into it and could see the pattern piece) and cut the rest of the piece out.  

Once the piece was cut out, I aligned the bottom of the dress piece (it is slightly curved) with the straight edge I cut along the bottom of the tunic.  Since the curved hem line is a cute feature of the pattern, I wanted to preserve that.  Lining up the folded corner of the cut piece with the pattern piece, I cut along the original curved hem line.  

You will notice that the piece does not line up on the side opposite of the fold.  That is fine! It is because the hem of the dress is wider than the tunic length will be.  But it still gives a nice curved hem for the tunic.  

I repeated that process for the other piece and cut out my neck band.  If you are doing a ruffle, you will want to cut that out as well.  

And then you are done for Day 1!  Not so bad, right?  Come join us for Day 2 and we will sew this right up!  

* If you would like to enter the prize drawing, please make sure you submit a picture of your completed lesson one to the Facebook Album by 12:00 noon CT, Thursday, October 30th.  Also, if you have any questions the Facebook Group is a great place to ask.

See you soon!
Sarah
#navbar-iframe{ display:none !important;}