* If you need to see more detail in any of the pictures please click on them to enlarge.
All right - can you see the end of our destination - we are so close!!! Today we are going to whip on that waistband, add some elastic and then put this WHOLE outfit on our kiddos.
Now quick question: did you make sure to preshrink your interfacing along with your fabric? You don't want your interfacing to shrink after you have sewn it in and make your gorgeous waistband all wonky!!!
*If you are sewing with all one fabric, keep reading, if you are using contrasting fabrics, skip down to the break where the fabrics switch to red and pink.
Prepping the Front Waistband: (All One Fabric)
- Lay out your 2 front waistband sections and your one waist band interfacing.
- Attach your interfacing to the WRONG side of your waistband B (* the
side of the interfacing that is bumpy or shinny is the side that should
go against the fabric - read your interfacing directions if you can't
tell).

- Press your interfacing to the fabric to secure the adhesive - this is now your Waistband Facing.

- Pin the front waistband and waistband facing RST along the top edge.


- Sew together with a 1/2 inch seam allowance.
- Trim the seam allowance to 1/8 inch.
- Press the seam allowance towards the interfacing.


Attaching the Waistband: (All One Fabric)
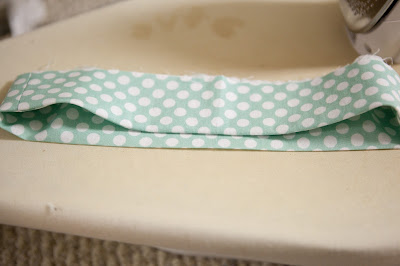
- Lay your front waistband and your back waistband RST (the back
waistband is BIGGER than your front because it will have elastic in it).


you can see I've gathered the back excess to the middle so that the edges match
- Make sure your two dots are clearly marked on your front facing.
- Pin the sides together and sew with a 1/2 inch seam allowance from the
top to the first dot and then from your second dot to the bottom. Make sure to leave a gap in your stitching between your two dots - this is the place you will feed in your elastic!

- Press the seam allowance open.
- Fold the waistband in half with Wrong Sides together and press along the fold.

- Topstitch around the top (folded edge) of the waist band 1/4 inch in from the fold.


- Open the waistband, and finish the inside edge of the waistband
(side with the interfacing) by serging the edge or using a zig zag
stitch.

- Press the finished edge up to the wrong side 1/4 inch.


- With RST, attach the waist band to the shorts (raw edges together)
*the seamed waistband is the front, and the folded waistband is the back.
- Pin, making sure to match up your waistband side seams with the notch you cut at the top of the back shorts section.


- Stitch with a 1/2 inch seam allowance.
- Trim your seam allowance to 1/4 inch and press up toward the waistband
(press both the wrong side and right side to make sure you have a clean
seam edge).


- Fold your waistband over to the inside of the shorts. Press to
make sure it is laying flat and pin in place (the folded edge inside
will cover the seam between the shorts and waistband).

- With the right side of your shorts up, stitch in the ditch (line
your needle up with the seam between the waistband and the shorts). *If
your inside waistband seems to long on the inside and the folded edge
isn't caught in your stitching, remove the stitching - press your inner
finished edge up 1/2 inch and restitch*

- Top stitch 1/4 inch up from your seam to match the top stitching you did at the top of the waistband.


Threading Your Elastic: (All One Fabric)
- Take your 1/2 inch elastic and cut it to 1/2 your child's waist measurement. (so if your child's waist is 22, you will cut 11 inches) EEEEEEKKKKK!!!!!!!!! What if I don't have a child available to measure???? Fear not adventurers!!! On page 2 in your pattern there is a chart that has body measurements on it. Take the waist measurement for your size, and divide by 2. It will at least be close, and since it is elastic, it is pretty forgiving!
- Take a safety pin and pin it through your elastic at one end.

- Thread the elastic through the opening in the side seam (did you
mistakenly sew that closed??? Don't worry, take your seam ripper and
open enough stitches to slide your elastic through.... I 'ahem' may have
done that once. ;op)

- Stitch your elastic in place by sewing from the top of the waistband
to the bottom of the waist band 1/8 from the seam. (*for added
security, and to get two lines of stitching without extra visible lines,
I sew down the the bottom and then back stitch my way back up to the
top along the same line).


- Repeat for the other end of elastic (if you have your child nearby,
test the fit first to see if you need to nip in the elastic a bit
first).

- Tuck the ends of your elastic into the waistband and stitch the opening closed by hand if wanted (not necessary).


- then.....


There is no more thens - YOU ARE DONE!!!!
Here's my baby girl:

Now show me some pictures because I want to see all the gorgeous outfits that you have created. I hope you have loved being a part of this sew along as much as I have, and maybe we'll meet here again in the future. Until that time, happy sewing, and don't forget to upload your pictures so that you can win a PRIZE: today's prize is 2 Yards of Riley Black Knit Basics!!! And there is a grand prize too: A $50 gift certificate to Whimsical Fabric!!!!
Suzanne
----------------------------------------------------
Prepping the Front Waistband: (Two Different Fabrics)
- Lay out your 2 front waistband sections and your one waist band interfacing.

- Attach your interfacing to the WRONG side of your waistband B (* the
side of the interfacing that is bumpy or shinny is the side that should
go against the fabric - read your interfacing directions if you can't
tell).

- Press your interfacing to the fabric to secure the adhesive - this is now your Waistband Facing.

- Pin the front waistband and waistband facing RST along the top edge.

- Sew together with a 1/2 inch seam allowance.
- Trim the seam allowance to 1/8 inch.

- Press the seam allowance towards the interfacing.


Attaching the Waistband: (Two Different Fabrics)
- Lay your front waistband and your back waistband RST (the back
waistband is BIGGER than your front because it will have elastic in it).

- Make sure your two dots are clearly marked on your front facing.

- Pin the sides together and sew with a 1/2 inch seam allowance.
Make sure to leave a gap between your two dots - this is the place you will feed in your elastic! - Press the seam allowance open.

- Fold the waistband in half with Wrong Sides together and press along the fold.

- Topstitch around the top (folded edge) of the waist band 1/4 inch in from the fold.

- Open the waistband, and finish the inside edge of the waistband
(side with the interfacing) by serging the edge or using a zig zag
stitch.

- Press the finished edge up to the wrong side 1/4 inch.


- With RST, attach the waist band to the shorts (raw edges together)
*the seamed waistband is the front, and the folded waistband is the back.

- Pin, making sure to match up your waistband side seams with the notch you cut at the top of the back shorts section.

- Stitch with a 1/2 inch seam allowance.
- Trim your seam allowance to 1/4 inch and press up toward the waistband
(press both the wrong side and right side to make sure you have a clean
seam edge).


- Fold your waistband over to the inside of the shorts. Press to
make sure it is laying flat and pin in place (the folded edge inside
will cover the seam between the shorts and waistband).


- With the right side of your shorts up, stitch in the ditch (line
your needle up with the seam between the waistband and the shorts). *if
your inside waistband seems to long on the inside and the folded edge
isn't caught in your stitching, remove the stitching - press your inner
finished edge up 1/2 inch and restitch*

- Top stitch 1/4 inch up from your seam to match the top stitching you did at the top of the waistband.


Threading Your Elastic: (Two Different Fabrics)
- Take your 1/2 inch elastic and cut it to 1/2 your child's waist measurement. (so if your child's waist is 22, you will cut 11 inches) EEEEEEKKKKK!!!!!!!!! What if I don't have a child available to measure???? Fear not adventurers!!! On page 2 in your pattern there is a chart that has body measurements on it. Take the waist measurement for your size, and divide by 2. It will at least be close, and since it is elastic, it is pretty forgiving!
- Take a safety pin and pin it through your elastic at one end.

- Thread the elastic through the opening in the side seam (did you
mistakenly sew that closed??? Don't worry, take your seam ripper and
open enough stitches to slide your elastic through.... I 'ahem' may have
done that once. ;op)


- Stitch your elastic in place by sewing from the top of the waistband
to the bottom of the waist band 1/8 from the seam. You want to make
sure your elastic is extending past the seam about 1/2 inch so that you
don't loose it! (*for added security, and to get two lines of stitching
without extra visible lines, I sew down to the bottom and then back
stitch my way back up to the top along the same line).


- Repeat for the other end of elastic (if you have your child nearby, test the fit first to see if you need to nip in the elastic a bit first - I work primarily while my children or napping or sleeping, so I just went with my gut).
- Tuck the ends of your elastic into the waistband and stitch the opening closed by hand if wanted (not necessary).


- then.....


There is no more thens - YOU ARE DONE!!!!
Here's My baby girl:
 |
| For my second top, I made some modifications including: faux piping at the yoke, lengthened hem by just doing a 1/4 inch rolled hem, lengthened sleeves by binding with bias trim and not hemming, added pocket using this Welcome to the Mouse House Bubble Pocket Tutorial. I love how different it can be with simple changes!!! |
Suzanne