Welcome to the Dapper and Riley sew-along. I want to remind everyone that I am not a "professional" seamstress, nor was I formally taught. I'm just a girl who loves fabric, sewing, and pretty much everything related to those two things. If you have any questions, suggestions, or tips to share; please make sure to post them on our Facebook group.
Today we are going to create the Dapper bow tie and suspenders. Please read the Dapper tutorial all the way through before you begin. It's probably a good idea to read through this lesson once before you begin also.
If you would like to see any of the images larger that are posted in this blog, just click on them. It might be helpful in some steps. Let's begin now.
A. Prepping Your Fabric and Cutting Out Your Pieces
1. When working with straight edges, like the Dapper calls for, it's always a good idea to tear your fabric on the grain. You do this by making a small snip in the salvage edge.

2. Then, just grab the fabric and tear it.

3. It will rip along the grain, forming a straight edge. You might want to iron this edge before moving on.

4. Once you have a straight edge to work with, cut or tear pieces of fabric according to the tutorial instructions. Then, iron all of your pieces well.

B. Creating the Bow.
1. Grab two of your bow pieces and place them right sides together. Using a ¼" seam allowance, stitch along all four sides leaving a 1" opening at the bottom edge of the bow, in the very center of the side.
Note: When pivoting at the corners you can create a sharper corner if you pivot your fabric 45°. Then, using your hand wheel, making one stitch across the corner. This stitch forces the seam allowances into the corner, creating a sharper corner.

2. Turn your bow right side out and push out your corners.

3. Repet with the other two bow pieces.
4. Next, fold your bow center in half with right sides together along the long edges. Again, using a ¼" seam allowance, stitch to form a tube. Press open the seam allowance.

5. Turn your bow center right side out with a tube turner.

6. Press so that the seam is centered in the back

7. Take this time to press your bows well, making sure to fold in the open seams on the bottom. I don't stitch these open seams closed like the instructions mention. You can if you wish. I find that they don't show when you wrap the bow center around the bow.

8. Then, fold each bow piece in half and each press well.

9. Open them up. They should both be creased down the center like the picture below.

10. Stack your smaller bow on top of your larger bow. Measure across the whole set of bows. Using a fabric pen or chalk, mark the bow into quarters by placing three dots equal distances apart along the center crease. For instance, my set of bows here is 70cm wide from edge to edge. Therefor, I placed a mark at 17.5cm, 35cm, and 52.5cm.

11. Thread a needle with thread. I like to use hand quilting thread for bows since it is stronger. Tie a knot in the end. Starting from the back, poke your needle up through the very edge of the outside bow right along the crease. Do not pull your needle all the way through. We are going to stack the folds onto the needle.

12. Then, poke your needle down through the very edge of the top bow.

13. Up through the first mark.

14. Down at the halfway point between the two marks.

15. Up through the center mark.

16. Down at the halfway point between the center and last mark.

17. Up through the last mark.
18. Down through the very edge of the top bow.

19. Then up through the very edge of the back bow.

20. Now squeeze the fold down onto the needle like the picture below. Hold them firmly.

21. Pull the needle through while still holding the fold firmly.

22. Now, wrap the center tightly with the thread. I wrap it probably 6-8 times.

23. Next, poke the needle down through the center fold on the front of the bow.

24. Flip your bow over and pull your needle through.

25. Pull tightly, but don't break your thread. Knot and cut your thread off.

26. Flip your bow back over and fluff you folds until they are exactly how you want them. I pull the edges at the center crease so they are flipped forward.

27. Grab your bow center and take it to your iron. On the back side, fold back the edges of both sides like so.

28. Press well.

29. Then fold back again and press well. Repeat for the other side.


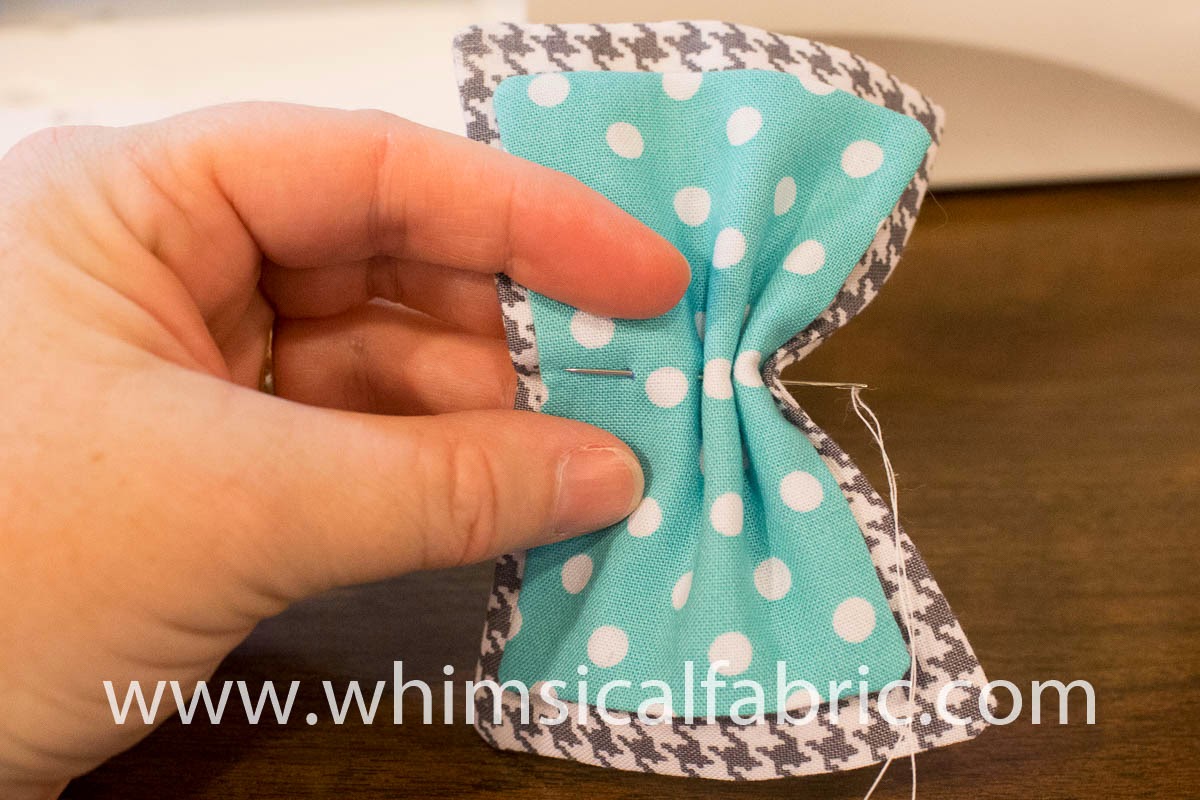
31. Wrap the bow center around your bow. Stitch the ends of the bow center together being very careful not to catch up the bow in your stitching. You will be threading your strap through the back of the bow here and if you stitch your bow to your bow center you will not be able to get the strap through. I sometimes use pliers to help me push and pull the needle through since the fabric can be a bit thick.

32. I push my needle through to the underside to tie my knot so it is hidden. And no, I'm not the best hand stitcher. Just ignore how crooked they look. ;)

33. I like to add a bit of Aleene's Flexible Fabric Glue to the front of my bow so that it doesn't slide around. Squeeze your bow like so, creating a gap in the front. Then, carefully add just a drop. Then, set your bow aside to dry.

C. Creating the Bow Tie Strap and Putting the Bow Tie Together.
1. Fold your bow tie strap in half the long way with right sides together. Stitch the seam using a ¼" seam allowance.

2. Press the seam open. Turn using a tube turner. Press so that the seam in centered in the back.

3. Using a safety pin, thread the strap through the back of the bow.

4. Fold and press the edges of both ends of your strap like we did for the bow center.

5. Thread your bow tie hook so that the hook is on the top of the strap. This pictures shows the underside. Sorry I didn't take a picture of the front side.

6.Fold the strap over the back side of the hook and stitch in place. I stitch over this twice to make sure it is good and secure. Also, make sure that the hook is facing to the back of the strap like shown in the picture below. When worn the hook should face in toward the neck.

7. Thread the bow tie tri-glide onto the other side of the strap. This is the underside of the bow tie.

8. This is the top side of the bow. Slide the tri-glide about half way up the strap.

9. Slide the bow tie eye onto the strap. This is the backside of the bow tie.

10. Pull the strap to form a loop above the tri-glide.

11. Thread the end of the strap up through the back of the tri-glide.

12. Then back down through the other side of the tri-glide.

13. It should look like this from the back.
14. And this from the front.

15. Flip the bow over and fold the end of the strap over the tri-glide. Stitch in place. Again, I stitch over this a couple of times to make sure it is really secure.

16. Your strap should look like this when stitched correctly.

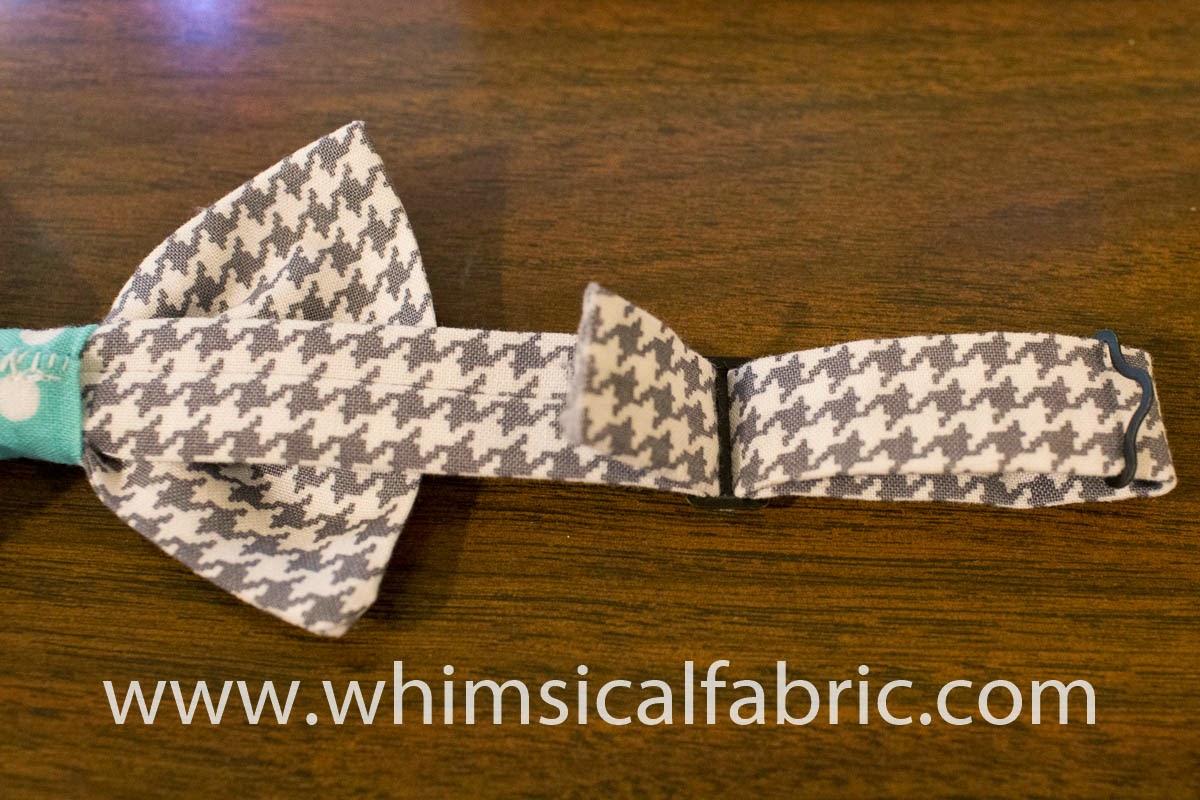
17. And your finished bow tie will look something like this.

D. Creating the Suspenders
1. With wrong sides together fold your suspender straps in half the long way. Press.

2. Open up the strap and fold each raw edge in toward the center crease.

3. Fold again along center crease, encasing the raw edges of the fabric. Press well.

4. If you would like to add a tag, now is the time to do it. Unfold the strap and stitch it onto the backside of one of the straps.

5. Refold the strap and then topstitch down each side.

6. Flip your strap upside down and place one of your tri-glide on like so.

7. Thread the strap back through the other side of the tri-glide. Again, this shows the strap with the bottom or backside facing up.

8. Flip your strap over. This is what the topside of your strap should look like.

9. Now, flip your strap back over. Fold the strap ends like we did for the bow tie. Press the ends well.

10. Fold the strap over the center back bar of the tri-glide.

11. Stitch in place. Just as I do for the bow tie, I also stitch over the suspender straps a couple of times to ensure they are secure.

12. Your strap should look like this from the front.

13. Flip your strap upside down again and grab one of your clips.

14. Slide your clip on like shown in the picture below.

15. Now, thread the strap right side up through the tri-glide.


16. Flip your strap right side up.

17. Place the last clip on like shown below.

18. The top side of the strap is up.

19. Fold the edge of the strap over.


20. Stitch securely in place.

21. Your first suspender is complete. Repeat to create the second suspender.

And that's it for the Dapper. Great job. Some little guy (or big guy) is going to looks so handsome with his new bow tie and suspenders!
Please come back here tomorrow for Lesson #2, the first part of the Riley Dress.
Thanks for sewing with me,
Danielle Storm
www.whimsicalfabric.com
Very nice - thank you for a great sew along.
ReplyDeleteLinda
I found that site very usefull and this survey is very cirious, I ' ve never seen a blog that demand a survey for this actions, very curious... youth compound bow
ReplyDeleteThanks for posting this info. I just want to let you know that I just check out your site and I find it very interesting and informative. I can't wait to read lots of your posts. Archery
ReplyDeleteGood job!
ReplyDeleteadventurefootstep