** If you would like to see an image on our blog in a larger format, just click on it to enlarge.This might be VERY helpful for the section on embroidering the yoke.
Note: Links to products within this post are either links to our website or affiliate links.
Welcome to Day 1 of the Mamie dress sew-along!! I am excited to teach you some techniques that might be new to you. While sewing this dress I will teach you how to hand embroidery the yoke (optional, so don't worry if you are not wanting to add it your dress), how to make piping, and how to add rick rack to trim the sleeves. I hope you are as excited as me! Let's get started.

This pattern is rated for 3 out of 4 in difficulty as Ambitious, but don't worry, it will not be as hard as you think. I will show you some tips for the difficult parts so hopefully it will make it easier to sew. I really enjoyed sewing this one up.
Before starting today's lesson and the other lessons be sure to read the whole pattern first.
If you have not done so yet, wash and dry your fabrics. Be sure to give the fabric a good press too. Check the back of the pattern to see which size you need to make. What I love about this pattern is that all the sizes are printed alone so you can trace the size you are using or you can cut the pattern pieces out.

For cutting out you will need
* One Front Skirt (cut on fold)
*Two Back Skirts
*Two Front Yokes (1 Main and 1 Lining - Lining is the White/Cream in Fabric Kits) **Note, if hand embroidering the front yoke do not cut it out just yet**
*Four Back Yokes (2 Main and 2 Lining)
*One Front Yoke Interfacing
*Two Back Yokes Interfacing
*Four Sleeves (2 Main and 2 Lining) **Be sure to cut mirrored pieces on these. There is a front and back on the sleeves. You might want to mark the front and back.**
* Two Bias Strips 20" Long (This was longer than I needed for a size 5 but the extra will be trimmed off when sewing)
Be sure to transfer all the dots and stars from the pattern onto the fabric cut pieces.
If you are hand embroidering the front yoke proceed on to the next steps if not your are all done for today!
Now
for that front yoke! Trace the front yoke onto a large rectangle piece
of fabric with a washable fabric marker or chalk pencil; make sure to
keep the grain line correct. Find the center of the yoke and mark it
straight down the center. Then measure the center of the yoke and mark
the middle. This will help you to center your embroidery pattern onto
your yoke.

This is the way I trace my pattern onto my yoke, I find this works the best for me. I tape the pattern onto a sunny window first.

I then tape my fabric over the pattern, making sure to center the embroidery pattern onto the center of the yoke. Then I trace my pattern with a washable fabric maker. (I find this easier to trace the lines better) Then add interfacing to the back of the fabric according to the package directions. Now you are ready to start hand stitching.

First we will be making what is called a back stitch around the entire deer outline. Take the floss and cut a length about 24" then take and separate 2 stands of the floss. Then thread the needle and "run" the needle up and down the thread to make sure all the twists are out of the thread. Knot one end of the thread.

Insert the needle along the outline of the deer and pull thread up until the knot is taught along the back side, but do not pull to tight.

Then take you needle and insert into the fabric about a 16th of inch. Pull thread through.

Take the needle from the back side and re-insert the needle about a 16th of an inch from the last you made and pull thread through.

Re-insert the needle back at the beginning of the last stitch made and pull thread through to the back side.
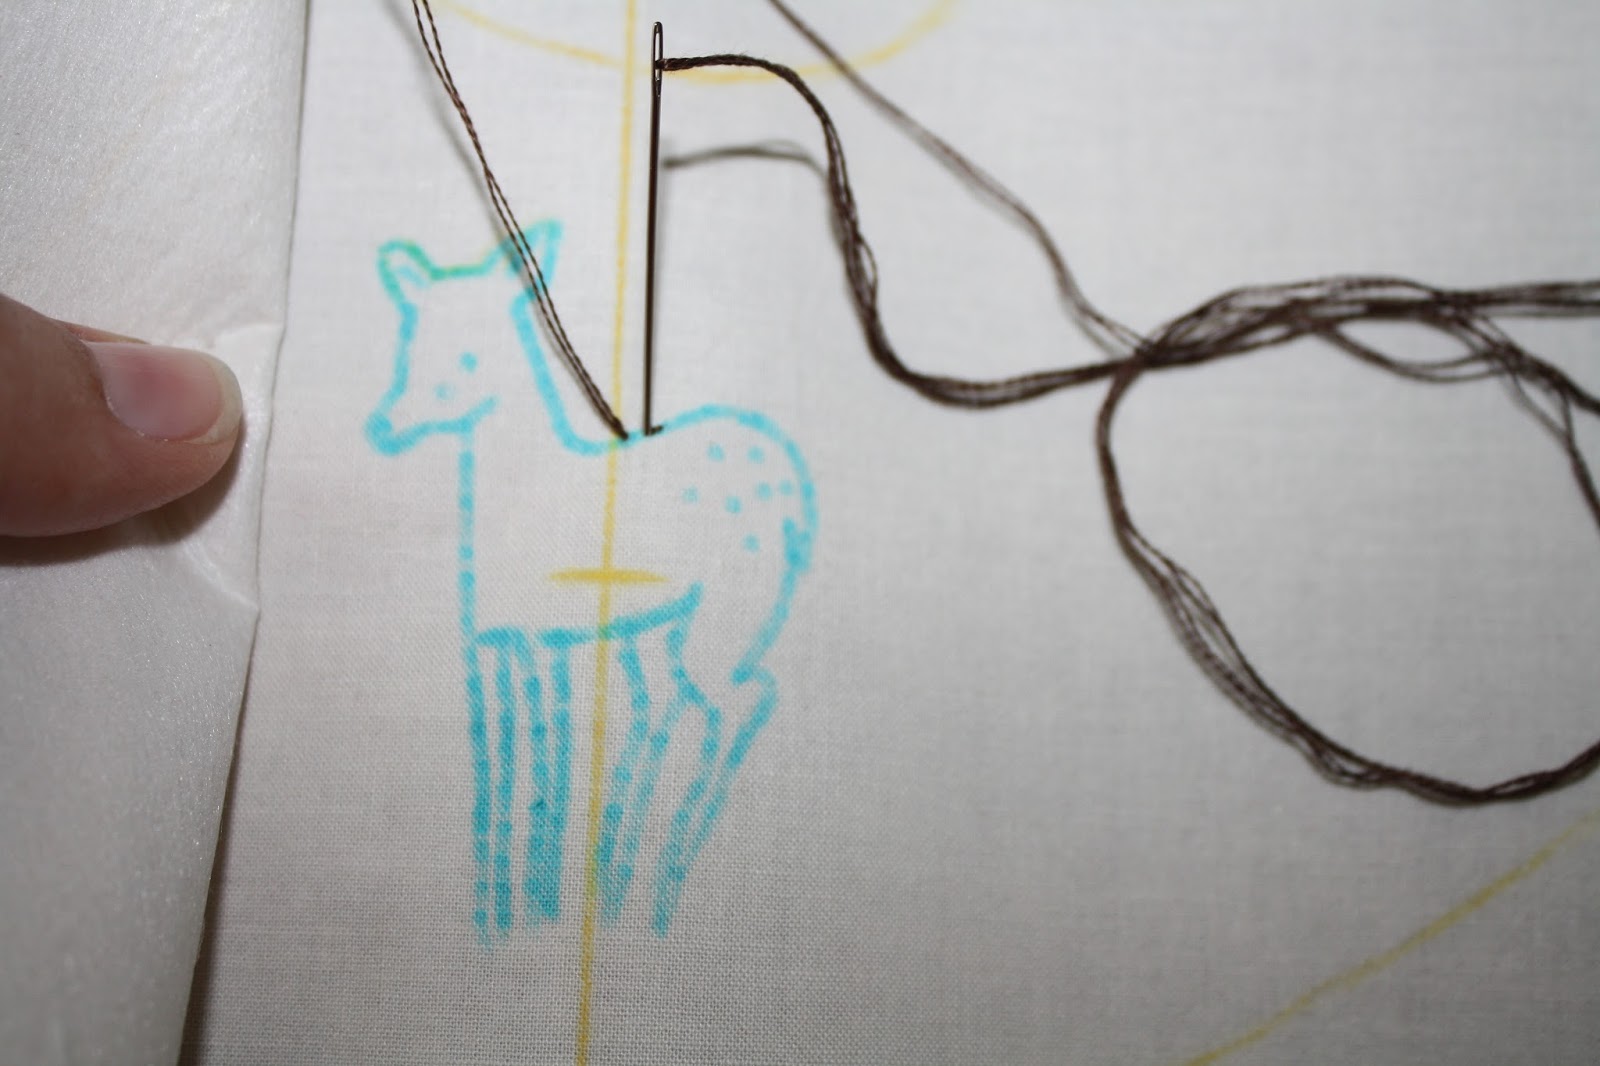
Take your needle and insert it gain in the fabric about 16th of an inch from the beginning of the last stitch that was made and repeat around until the entire outline is done. You will need to "run" the needle up and down the thread ever so often to keep the threads from twisting up and tangling.

Next up is the deer's spots, eye and nose. These are all made with french knots. Take and cut about 16" of floss and take three strands of the floss. Be sure to separate each strand first before threading your needle and again "run" your needle up and down the thread before knotting the end of the thread.

Insert the needle in one of the spots on the deer's back. Hold the thread taught in your left hand with the needle in front of the thread close to the fabric. Wrap the needle with the thread using your left hand going towards your body twice, keeping the threads towards the bottom of the needle. (be sure to keep the thread taught in the left hand after wrapping until the needle is pulled through the back side of the fabric) Insert the needle into the fabric again a stitch or two away form where the needle was first at. Pull the needle though the back side, while still holding the thread taught in the left hand, as the thread is pulled through as it is making the knot.

Finish up with the rest of the spots and the deer's nose and eye in same manner.

Onto the pink cheek of the deer. We will doing a satin stitch for this. Take four standards of the floss and insert in the bottom of the "center" of the cheek circle. re-insert the needle into the "top" of the cheek circle pulling the thread taught.

Re-insert the needle into the cheek "circle" again but this time insert the needle just a tiny bit up. (this stitch will be shorter than the last one made on both top and bottom.) Re-insert the needle with it not going as high as the last stitch. This will give the it a circle appearance to it.

Repeat this same stitch on the opposite side of the center cheek stitch. (The cheek will have three stitches to it).

For the grass we will be making satin stitches as well in longer lengths but each stitch will be alone. I just randomly placed these to match the fabric.


Lastly to add the flowers, they are the French knots that we made before but I used 3 strands of floss to make them then I did another french knot with only one strand in the center of the french knot to give it the flower look. After you finish this up cut out the front yoke along the outer lines. I washed out my blue lines here too because I was excited to see my deer.

That is it for day 1! Lesson 2 we will make those lovely sleeves trimmed in rick rack.
Sharon
* If you would like to earn entries into the prize drawing, please make sure to submit a photo of your completed lesson one to this Facebook Album by 12:00 noon CST, Wednesday, August 19th. If you have any questions the Facebook Group is a great place to ask.
Danielle Storm
www.whimsicalfabric.com
No comments:
Post a Comment