If you have any questions, suggestions, or tips to share; please make sure to post them on our Facebook group.
Note: If you would like to see any of the images larger just click on them.
Please read the directions in your Sketchbook pattern all the way through before you begin. It's also a good idea to read through this sew-along lesson before starting.
Today we start working on the oxford. I think I've already mentioned that I love oxfords.... I make a lot of them! But I'll confess a secret - I typically up-cycle them so that I don't have to sew all those button holes and buttons. I love saving time!!!! But in this class I'm teaching you every step, and don't let button holes scare you - I don't have a fancy machine and I can still whip them out pretty fast. To all of you who have programmable button hole stitches I send you a big slobbery raspberry bpbpbpbpbpbpppppppp! (it is just my jealousy coming through - love you all!)
Okay - we have all of our pieces cut and laid out. Today we are going to focus on the back yoke, the front placket, and pocket. Make sure your iron is hot and you have all your materials ready.
(*I may occasionally go out of order from the written instructions, but only in order to complete one logical stage at a time.)
Let's Get Started:
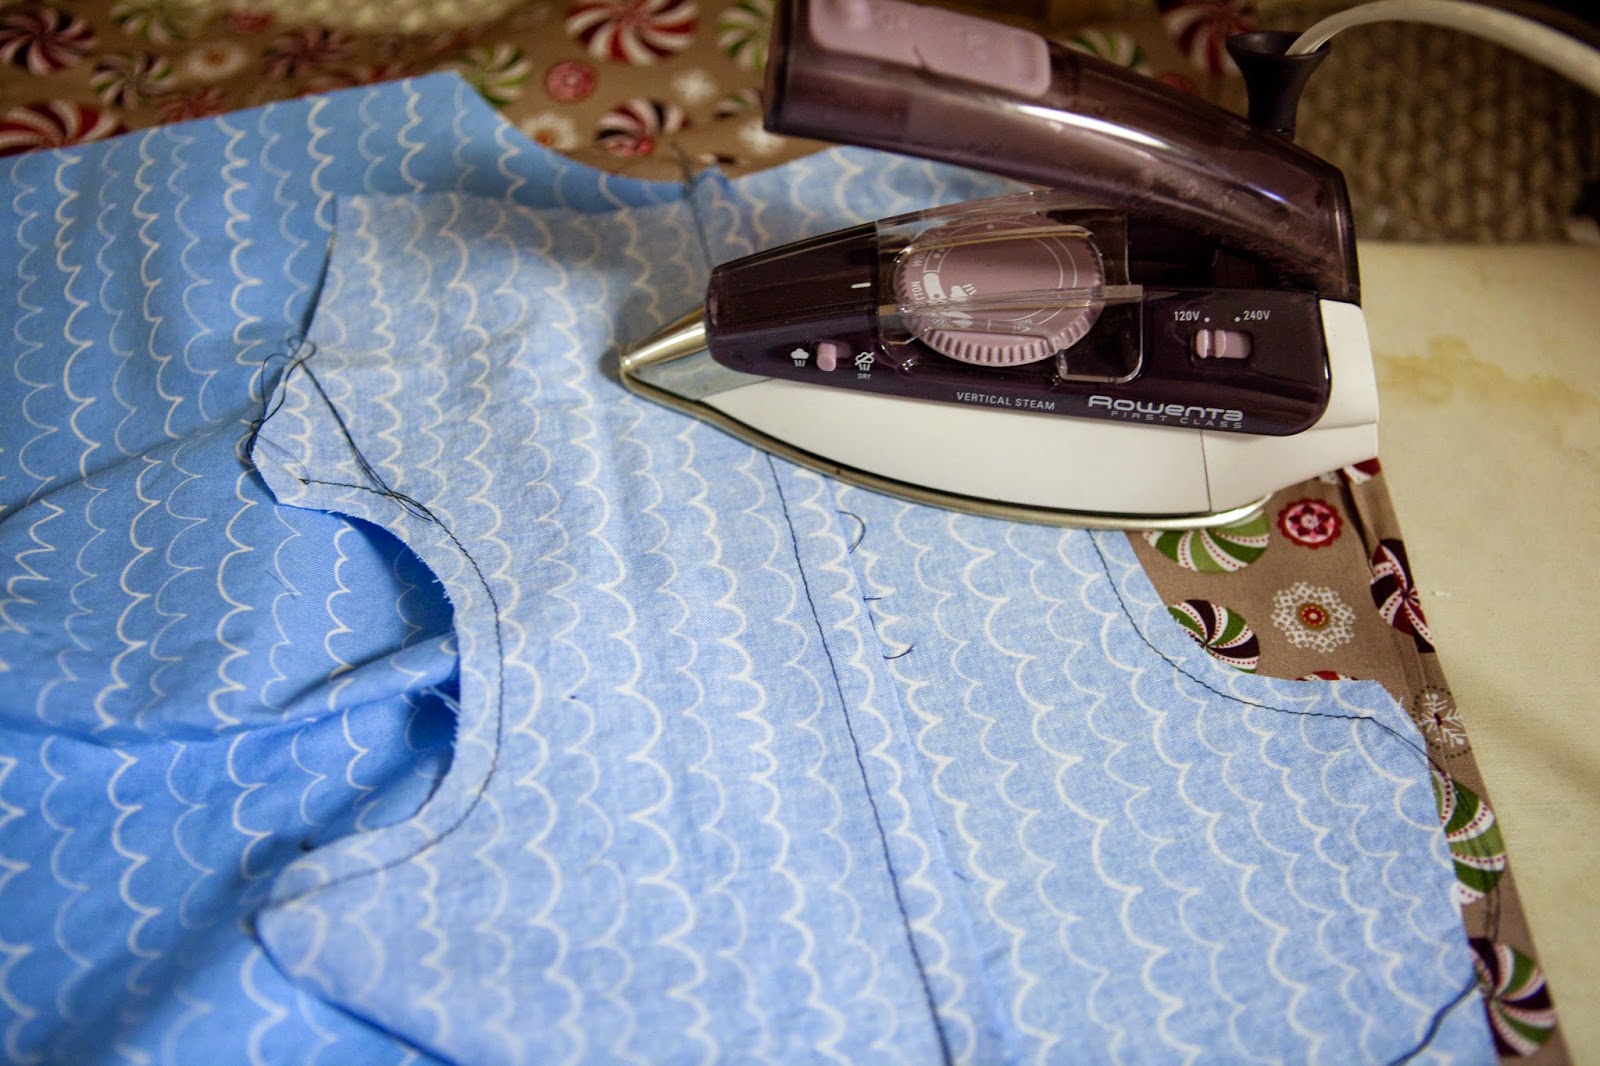
- Before we start sewing different pieces together, we are going to stay stitch the neck line on both of the front and both of the back yoke pieces. *This prevents the neck line from stretching out when we attach the collar later on.
Front Placket:
- Cut a 1 inch wide strip of fusible interfacing the same length as your placket.

- Press this in place 1/2 inch in from the edge of the placket (make sure the shinny side is face down on the WRONG side of your fabric.)
- Press the placket in half.


- Unfold your placket and press the edge 1/2 inch toward the center.


- Line up the raw edge of your placket with the raw edge of your shirt, right sides together.

- Pin in place and stitch.


- Press the placket away from the shirt with the seam allowance facing the placket.


- Flip the placket back toward the shirt along the center fold line and press in place.

- You will secure the placket by edge stitching 1/16 from the seam -
move your needle all the way to the left or right to achieve this small
stitch allowance (*this stitching is visible, so I recommend using
matching thread - I used navy thread so that it would show better in
this tutorial and because I like contrasting top stitching, but it means
that every flaw will show.)


- Edge stitch the folded edge of the placket to complete.

- Repeat on the other side.

- Take your pocket piece and lay it out - make sure that you have transferred your markings from the pattern onto the fabric.
- Turn the top edge to the WRONG side 1/2inch and press.

- Turn that edge to the RIGHT side 1inch and press.

- Stitch along the sides from the top of the pocket to the folded edge
using a 1/2 seam allowance, make sure to back stitch at each end.

- Turn the fold out to the right side and push out the corners using a chopstick or turning tool.

- Press the top edge. The sides are being pulled in 1/2" - press these as well, and fold the bottom up a 1/2 inch and press.


- Top stitch the top fold along the inner folded edge.

- To get clean bottom corners, turn the bottom corner in to create a diagonal and press.

- Re-fold your side and bottoms in and press well giving you a very clean corner.

- You will line up the pockets with the markings for your size.

- Pin in place.


- Sew the pocket along the outer side edges and bottom edge, plant your needle and pivot to turn the corners.

- I chose to do two rows of stitching for an added detail, and to do an angled stitch at the corner - these details are optional, but I feel give more of that professional finish.
Now let's get started on the Back Yoke:
- Set your front aside and take your 2 back yokes and your main back piece and lay them out on your work space.
- Take your main back piece and fold it in half WRONG sides together.
You are going to pin it together at the point that you transferred
markings from your pattern.

- Sew a baste stitch along your marking line.


- Lay your back out flat with the right side facing up.
- Match the center of your fold with the stitching line and press the pleat flat - this creates what is called a 'Box' pleat.

- Baste along the top edge of your pleat to hold it in place

In attaching the Yoke, we are going to encase the back and
shoulder seams, creating a beautifully finished interior. This might
sound complicated, but really it isn't!
- Take both of those back yokes, and lay them out Right Sides Together
- Take your Back piece and sandwich it between the two yokes - it will
be right side together to one yoke and right to wrong sides together
with the other yoke.

- Pin in place and sew them together.


- Press your seam allowance up toward the yoke.
- Flip your outer yoke up and press the seam well.

That is it for today - tomorrow we will start making this look like a SHIRT!
* If you would like to enter the prize drawing, please make sure you submit a picture of your completed Lesson 2 to the Facebook Album by 12:00 noon CT, Friday, July 11th.
Suzanne
No comments:
Post a Comment