Sunday, March 23, 2014

Sew-Along #13 - Stella Dress - Lesson #1

The Stella Dress View B by Izzy & Ivy Designs

Welcome to the Stella Dress sew-along.  If you have any questions, suggestions, or tips to share; please make sure to post them on our Facebook group.

Please read the instructions in your Stella Dress pattern all the way through before you begin sewing.  It's probably a good idea to read through this lesson once too before you begin.

*All seams for the Stella are ½" unless otherwise stated.

I also want to remind everyone that if you would like to see any of the images posted in this blog larger, just click on them. Let's begin now.


Day 1 - Tracing Your Pattern and Cutting Your Fabrics

Hello Everyone!  This is Sarah and I am so happy to be here to guide you through the sew along for the Izzy & Ivy Stella dress.  This is a really cute dress! I made one for my older daughter which ended in my younger daughter having a fit because she didn't have one.  So I might be sewing along as well to remedy that :)

This dress is a simple peasant design, but with some added flair.  While it is pretty simple to sew up, the details it has add a bit more work than a plain peasant dress.  No worries though! We will go through it together and before you know it, you'll be done!  So lets get started...

With all of my paper patterns (and many of my pdf ones too!) I trace the pattern out with freezer paper.  I do this for a couple of reasons.  For one, I don't want to cut them up so I can reuse them later.  Another reason I trace is because I have 2 different sized kiddos and want to be able to use the patterns for both of them.  The third benefit to tracing is that I can iron on my freezer paper tracings and that makes cutting a breeze!

To trace the pattern, I start with freezer paper that I bought in the food storage section at my local grocery store. I also use a sharpie and a ruler, because I am not always good about tracing my lines straight. 

To trace the pieces, I simply lay the freezer paper (shiny side down) over the pattern.  It is transparent enough that you can see the lines through it. 

Then, using the sharpie, and the ruler if I need it, I trace along the lines for the size I am making.  In this case I am making the size 7.  

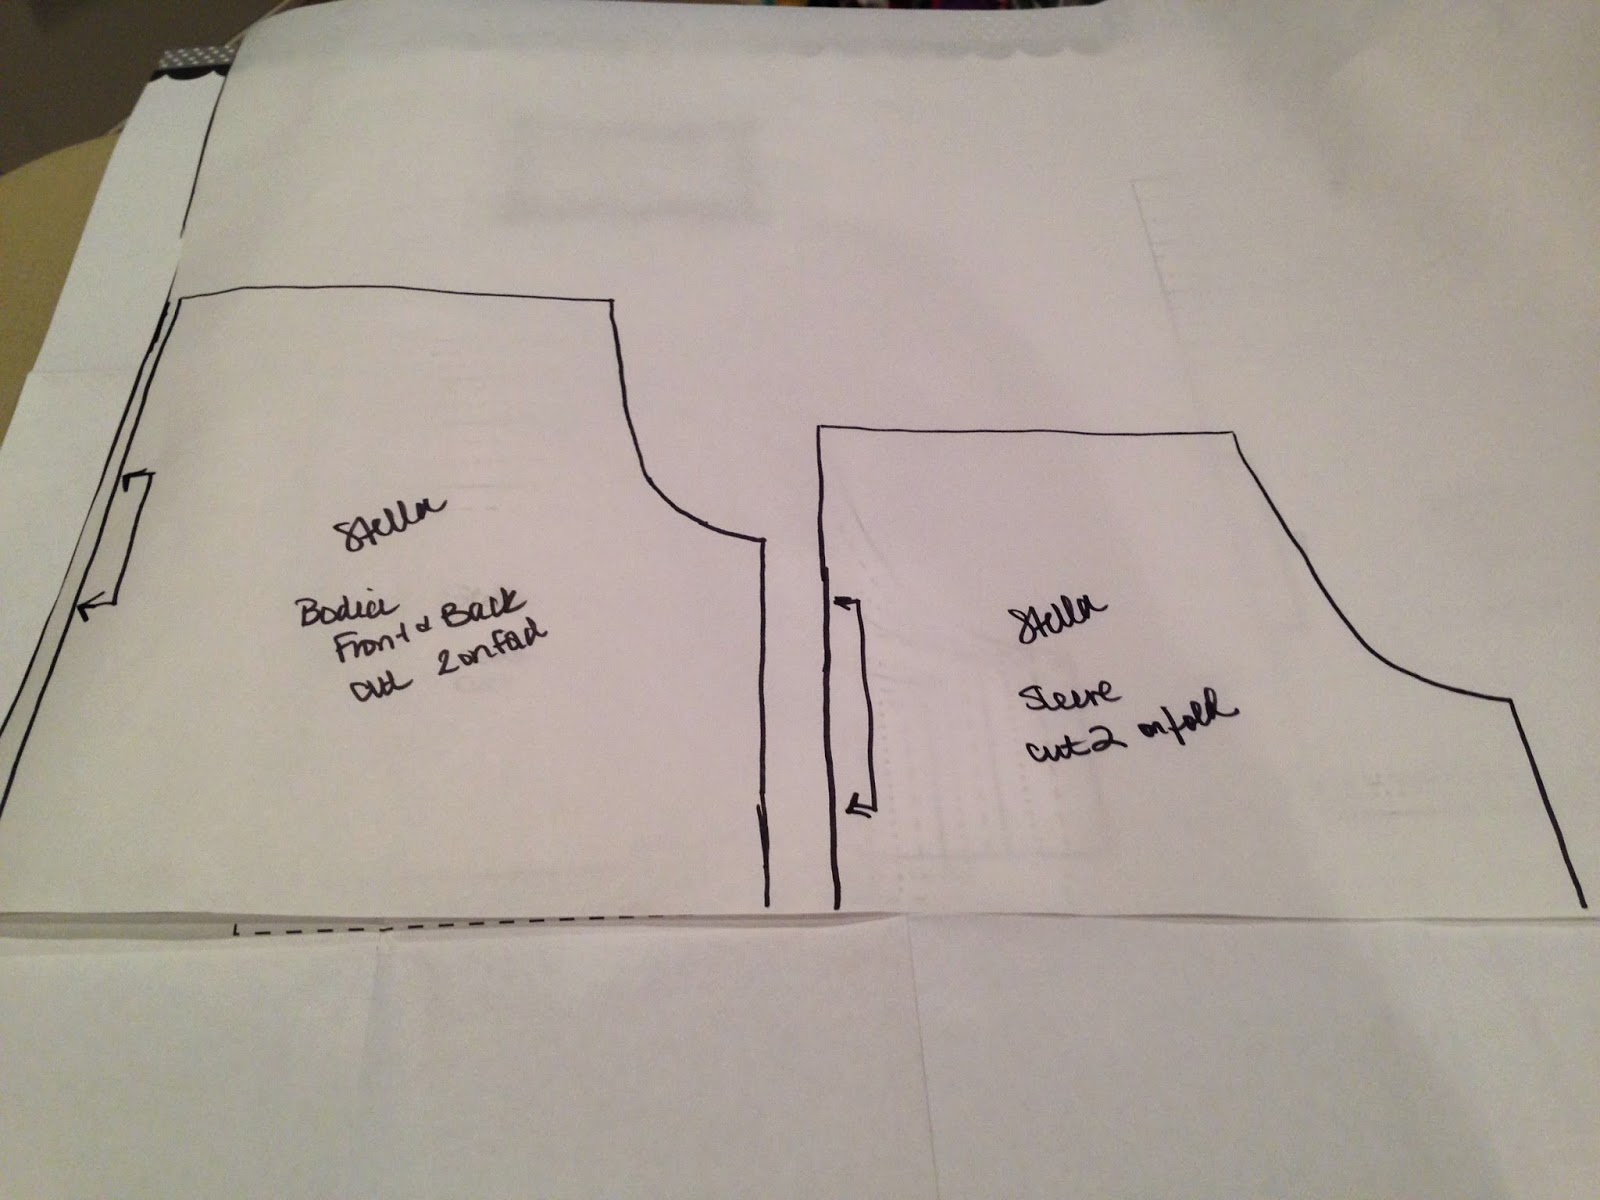
I also transfer any markings, like the "cut on fold" indicators, and the pattern name and piece.  

There are only two pattern pieces for this pattern, so the tracing is easy! Once they are both traced, I just cut out the piece along my markings.  

The next step is to iron the freezer paper pieces onto the fabric and cut out your pieces.  I like to iron my fabric before I cut, just to make sure it is nice and smooth. Then I fold the fabric along one side to start laying out my pieces. 

***NOTE: I used a directional print.  If you are using one too, make sure you are cutting the pieces in the correct direction. 

I place the piece, shiny side down, onto the edge of the fold. 

Then, using the iron, I iron the freezer paper onto the fabric.  It adheres slightly to the fabric.

***This is an especially useful process for cutting out knits too!

Once the freezer paper is ironed on, I simply cut around the piece as I normally would.  I did one bodice and one shoulder sleeve together, cut them out, then did a second round.  The freezer paper can be reused several times and still adhere to the fabric.

Once the pieces are cut, I just peel it right off.

You will have 2 bodice pieces and 2 sleeve pieces.
 

Now we are going to get the rest cut.  The additional pieces are all strips and squares.  The requirements are listed in the pattern instruction booklet according to size.  Locate your size and the measurements.  I like to highlight the measurements I am going to be using.  You can also see I made a little note on mine.  That is because my size 7 daughter is tall, so I wanted to do the size 8 length.  I just jotted down the revised length measurement so I wouldn't forget and didn't have to keep looking at the other measurements.

I like to tear my fabric whenever possible if I am making straight cuts.  You could also use a rotary cutter and mat, or just use scissors if you prefer.  The first thing I always do is snip close to the edge and tear a straight edge to make sure I am on the straight of grain.  

***NOTE: I noticed on my darker fabric, the tearing caused some pulling of the fibers along the edges.  It was all contained in the seam allowance for the fabrics I used, but some people might prefer to just cut their fabric if that occurs.

 As you can see from this piece, one edge was a lot wider than the other when I ripped off along the grain line.

Using a ruler or measuring tape, I measure out the dimensions I need for each piece.  Then I snip the edge of the selvedge at the required cut width.  Once it is snipped, I rip the fabric quickly to the other selvedge.

I will sometimes clip the other selvedge edge if it doesn't tear easily. 

Working through each fabric, I clip and tear all of the required pieces; the skirt strips, the ruffle strips and the sash and hem pieces. After I am done tearing all of my pieces, I give it all a quick iron again to make sure it is ready to sew.

That's a lot of pieces (24 strips/rectangles and 4 bodice/sleeve pieces!) BUT we are done and ready to sew tomorrow!

* If you would like to enter the prize drawing, please make sure you submit a picture of your completed lesson to the Facebook Album by 8:00 AM CT, Tuesday, March 25th. Also, if you have any questions the Facebook Group is a great place to ask.

Sarah 
My Blog

Sew-Along #13 - Stella Dress - Preparations

The Stella Dress View B by Izzy & Ivy Designs

Before we begin the sew-along on Monday, March 24th, I first want to share with you who will be leading us.  I'm super excited to tell you that Sarah Unthank will be teaching us again!  Sarah last taught the Naomi Dress.  She did a FANTASTIC job and I'm really excited to have her back.  You can read more about Sarah here.

On to the items you need to gather and things you need to do.

Items to Collect
  1. You must have the Stella dress pattern by Izzy and Ivy Designs to complete this project.  If you have not yet purchased it, please do so here.
  2. If you do not have fabric for the project you will want to purchase that also.  At the time of this writing we do have a some fabric kits available.  We also have lots of fun fabric selections on our website.  
  3. You will need coordinating thread to complete this project.  The project kits did not come with thread, so please make sure you have some. 
  4. The Stella dress requires 1.5 yards of 1/4" wide elastic for the neck and sleeves.  We stock a great quality 1/4" wide knitted elastic which is perfect for this.  The kits do come with this so if you purchased a kit from us you are good to go.
  5. You will need some sort of fabric marking instrument.  You can use chalk, a marking pencil, washable fabric pen; even a bar of soap will work.
  6. And finally, you will need pins, a sewing machine, a good iron (a steam iron is preferable for sewing), a pair of fabric shears or a rotary cutter and mat, and a ruler.  

Optional Items to Collect - The following items are totally optional.

  1. During the sew-along Sarah will be showing us how to use cording to gather this very large skirt to fit onto the bodice.  You might want to grab some cording for this step.  We did include cording in all of the kits. 
  2. Though not necessary, a ruffler foot for your sewing machine will help you create your ruffle panels quickly.  If you have a ruffler foot and are interested in a great, free tutorial; check out this one here.

    https://www.youcanmakethis.com/products/featured-products/free-the-ruffler-unruffled.htm?cxaaffrefcodea=1039335180
  3. Sarah will be tracing her pattern pieces onto freezer paper.  I highly recommend this method.  In addition to keeping your original pattern pieces intact, it also makes cutting out your fabric super simple. You can find freezer paper at most grocery stores where the wax paper and aluminum foil. 
  4. A sharpie or other permanent marker for tracing your pattern pieces onto the freezer paper is helpful.  I recommend a black sharpie as the colored ones, though more fun, can tend to transfer onto your fabrics when you iron over them.  Ack!  Had that happen recently and I was so sad.

Things to Do
  1. Make sure to prewash and preshrink all of your fabrics.  I wash my fabrics on warm/hot and then I dry my fabrics in the dryer with no softeners.  I always preshrink this way when I am using fabric for clothing construction.  I would hate to work hard on something only to have it shrink and not fit when I was done.
  2. Press your fabrics well.  I try to do this straight out of the dryer so that the wrinkles come out easier.  
  3. If you haven't already, join our Facebook Sew-Along Group so you can post your progress pictures.
Happy Sewing,
Danielle Storm
www.whimsicalfabric.com

Friday, February 28, 2014

Sew-Along #12 - Olivia Top and Girly Skirt - Lesson #4

The Olivia Top and Girly Skirt 

If you have any questions, suggestions, or tips to share; please make sure t o post them on our Facebook group.  Also, if you would like to see any of the images larger, just click on them. 


Day 4 - Shirring the Top

We start today with the following:
  • Finished skirt
  • Top put together
  • Ready to shirr

This is what you leave with today!  (Not the cute girl, the cute outfit!)

When would you use shirring?  I am using it today on my Olivia Top, but there are other instances when you may use shirring.  Shirring can be used for waistbands, sleeves, legging ruffles, necklines, etc.  Shirring does not work on thick fabrics, it's best with woven cotton and light weight fabrics.

The most important supply we need today is elastic thread.  There are many brands to choose from and some people prefer specific brands.  I bought Dritz from JoAnn and it is fine.  The elastic thread will only be used in the bobbin and will only appear on the bottom of the garment.

When using elastic thread, you must wind the bobbin by hand.  Try to keep an even and smooth motion as you go.  Pull the thread to stretch it just a little, but not too much.  So, the thread should not be loose on the bobbin but pulled slightly tight.

Shirring requires adjusting the stitch length to the longest stitch.  I leave the tension at a normal setting (or you can turn it one less than normal) and only adjust the stitch length.  Below, you can see that my stitch length is at the longest setting.  All machines are different, so you will have to play a little if these settings don't work for you.

The elastic thread on the bottom of the stitch allows the garment to stretch. Before sewing on good fabric, practice on a scrap piece.  Stitch a short row and make sure the elastic thread is pulling the fabric a little.  The fabric doesn't have to pull tight, just a bit of pull.

When you feel good about the thread length, begin to sew the waistband.  Begin by using the topstitching as a guide and sew a straight line.  I like to backstitch at the beginning and end of each row, just to be sure my stitching stays in place.  If you prefer not to backstitch, you can tie off the beginning and ending threads.

The first row of stitching will not pull tight, that is okay.  As you continue to sew rows, the elastic will start to pull the fabric.

In order to make the elastic thread pull tighter, you need to sew multiple rows. Continue to use the previous line of stitching as a guide for your current row of stitching.  Go slow so you can be sure that your stitching is as straight as possible.  My lines are NOT perfect, perfect is boring!

Four or five rows is enough.  I used 5 rows on the neckline and waistline of the Top and 4 rows on the sleeves.  
Note: If you choose to make the ¾ sleeves you can add the shirring to the middle of the upper arm area to create the bell sleeve look.  I measured up to where I wanted the shirring to fall.  I then used a water soluble marker to make a line all the way around that I could follow for the first row of shirring.  You can also add extra shirring to the chest area to give the top a closer fit.  I again measured up to where I wanted the shirring and marked a line all the way around the top to follow.
You can see that my stitching has pulled a little, but it's not as tight as I want it. No worries!

The trick to pulling the thread tight and creating a smocked look is to steam the stitching.  Take the garment over to the ironing board, steam the stitching and watch the fabric draw up to the perfect neckline.  Do the same for the bottom of the bodice to create a waistline and sleeves.

Can you believe it???  We are finished!  Fast, right?  

Congratulations on making a precious outfit in just a few days!  I hope your "little" is just as happy as mine.

I hope you have enjoyed sewing with me!  I would love to hear from you.
  
* If you would like to enter the prize drawing, please make sure you submit a picture of your completed lesson to the Facebook Album by 8:00 AM CT, Monday, March 3rd. Also, if you have any questions the Facebook Group is a great place to ask.

Thursday, February 27, 2014

Sew-Along #12 - Olivia Top and Girly Skirt - Lesson #3

The Olivia Top and Girly Skirt 

Welcome to the Olivia Top and Girly Skirt sew-along.  If you have any questions, suggestions, or tips to share; please make sure t o post them on our Facebook group.  Also, if you would like to see any of the images larger, just click on them. 

** Please read the directions in your Olivia Top all the way through before you begin.  It's probably a good idea to read through this lesson once also before you begin.**


Day 3 - Sewing the Top

Yesterday we finished the precious Girly Skirt.  Love that!  Today we will work on the Olivia Top and get very close to finishing the top. 

You should have the pattern pieces for the Olivia Top cut already.  Here is what you are starting with today:

  • Top front (1) and back (1) pieces cut on fold
  • 2 sleeves
  • Ruffle (optional)
3

The pattern directions explain how to attach the sides first and then the arms.  I am going to give a different technique for assembling the bodice and sleeves that I like to use.  It is so simple, it may just be cheating to do it this way.

Start with one front panel.  Place the sleeve on the bodice piece right sides together.  Match up the armhole curve on the bodice and the armhole curve on the sleeve.  Pin and attach.  

Now let's attach the sleeve to the bodice back. If you place the bodice pieces stacked on top of each other, right sides together, you can see where the sleeve needs to attach to the bodice back piece.  

Here are the bodice pieces, RST, and how the sleeves attach to the bodice. You will sew four seams to attach the sleeves. Each sleeve attaches to the front and back bodice pieces at the armhole seam.  Finish armhole seams.  Your top should look like the picture below.
   
Pin the side seams together.  Sew all the way from the sleeve to the bottom of the bodice.  Finish seams.  You should have an almost complete Olivia Top.

Let's work on the hem.  You have a couple of choices at this point.  You can make a rolled hem or finish the hem.  I chose to finish the hem on the neckline and sleeves.  If you roll hem, you will need to roll hem the neckline, sleeves and bodice bottom.

If you choose to finish the hem, continue on.  Use a handy fold guide to help get a consistent hem.  Start at the neckline and fold down a 1/4in and  iron, fold another 1/4in. and iron.  Do the same with the sleeve ends.

After the neckline and sleeve hems are ironed into a nice hemline, topstitch. Here is what your neckline and sleeves should look like.  If you choose to hem the bottom of the bodice, follow the same directions and skip the ruffle steps.

If you are making a bottom ruffle, roll hem the bottom edge of the ruffle. The thread can match the fabric color or contrast with the fabric.  As you can see, I chose a contrasting thread that coordinates with the fabric.

Gather the ruffle and make sure it matches the length of the bodice front or back.  Attach the ruffle to the bodice and finish seam.  Iron the seam up toward the bodice and topstitch on the bodice.  Here is what you should have completed at this point.  

We will shirr tomorrow so take a break tonight and go relax!  Tomorrow you will have a precious outfit that your "little" can wear all spring and summer.  If you are unsure about shirring, don't worry because I'll give you directions tomorrow.
 

* If you would like to enter the prize drawing, please make sure you submit a picture of your completed lesson to the Facebook Album by 8:00 AM CT, Friday, February 28th. Also, if you have any questions the Facebook Group is a great place to ask.

Tuesday, February 25, 2014

Sew-Along #12 - Olivia Top and Girly Skirt - Lesson #2

The Olivia Top and Girly Skirt 

Welcome to the Olivia Top and Girly Skirt sew-along.  If you have any questions, suggestions, or tips to share; please make sure to post them on our Facebook group.  Also, if you would like to see any of the images larger, just click on them.


Day 2 - Sewing the Skirt

Yesterday we cut all of the pattern pieces.  Today we will complete the skirt. You will feel very productive at the end of this sewing lesson!

We made sure the skirt panels matched up the best we could.  The instructions say to sew the two short sides of the skirt panels, right sides together.  I prefer to only sew one side of the panels and leave the other unfinished (this makes it easier to attach the hem band). Finish seam(s) with serger or zig zag stitch. Set aside.

With the hem band piece RST, sew one short end together.  At this point the skirt piece and hem band have one seam, and the opposite end is open when laying flat.

There is no need to finish the hem band seam.  Fold the hem band wrong sides together, lengthwise and iron.  You can see the hem band on top of the skirt panel below.  Pin the hem band at the bottom edge of the skirt panel and sew together(I have no idea why my picture below shows the skirt peeking out below the hem band.  The hem band should be even with the skirt edge.)  

Finish seam where hem band and skirt are attached.  At this point you have one long skirt piece with the hem band attached.

Press the seam up toward the skirt panel.  Topstitch the seam on the skirt panel.  Now sew the side seam of the skirt to make a continuous loop - place the skirt panel right sides together at the two short sides.  Finish seam, at the bottom of the skirt and be sure to secure the tail of the serger thread.

Sew short sides of waistband RST to form a tube.  Finish seam.
   
Gather the top of the skirt panel by adjusting stitch length to the longest setting and tension to the highest number.  Be sure the gathered edge is the same length as the waistband piece (it doesn't have to be exactly perfect, just don't make the skirt piece shorter than the waistband).

We're almost finished!!!!  Yippee!  Wowza that was fast.

Insert skirt piece into waistband RST and attach. Finish seam. Iron seam up toward waistband, topstitch.  

Make the casing for the elastic by ironing top edge under ¼" toward wrong side.  Fold down (WST) again 1" and iron.  Stitch the casing down leaving a one inch opening to insert elastic.  (I know the pattern calls for a larger casing but the elastic I have is ¾in.  You can make the casing whatever size you need it to be.)

Insert elastic into opening and push it through to the end.  I thought I took a picture of the tool I use to thread my elastic through the casing, but I guess I didn't.  I use a Bobkin and it makes a big difference (it's so much easier).  You can also use a safety pin to thread the elastic through the casing.

Stitch the elastic together, be sure the elastic is nice and secure.  Stitch the elastic opening closed.  Ignore the little part on the top left of the elastic.  I accidentally caught the elastic while I was sewing.  Oh well, no one will ever see that.

TAH-DAH!  You are finished!  Yippee!  I hope you love, love, love this adorable skirt!

This girl is happy with the skirt!  We still have snow on the ground so it will be a little while before she can wear it out of the house but she cannot wait!
  
Twirl worthy!

Come back Thursday to start the Olivia Top!  We are super close to having a complete new outfit.

* If you would like to enter the prize drawing, please make sure you submit a picture of your completed lesson to the Facebook Album by 8:00 AM CT, Thursday, February 27th. Also, if you have any questions the Facebook Group is a great place to ask.

Monday, February 24, 2014

Sew-Along #12 - Olivia Top and Girly Skirt - Lesson #1

The Olivia Top and Girly Skirt 

Welcome to the Olivia Top and Girly Skirt sew-along.  If you have any questions, suggestions, or tips to share; please make sure to post them on our Facebook group.

Please read the directions in your Olivia Top and Girly Skirt patterns all the way through before you begin.  It's probably a good idea to read through this lesson once too before you begin.

I also want to remind everyone that if you would like to see any of the images posted in this blog larger, just click on them. Let's begin now.


Day 1 - Trace and Cut

Depending on which view you chose to make, cut your pieces according to the chart below.  Too see which fabric is Fabric #1, #2, and #3 please look at the listing for the kit you purchases.  Click here to see all of the kits.

View A
View B
Girly Skirt Main - Fabric #1
Girly Skirt Hem Band - Fabric #2
Girly Skirt Hem Band - Fabric #3
Girly Skirt Waistband - Fabric #3
Olivia Top Main - Fabric #2
Olivia Top Sleeves - Fabric #1
Olivia Top Sleeves - Fabric #2
Olivia Top Ruffle (optional) - Fabric #3  
Olivia Top Ruffle (optional) - Fabric #2

The Olivia Top - Begin by either cutting the actual pattern pieces or transfer the desired size to freezer paper. If you are transferring your desired size onto freezer paper follow the steps below.
First, fussy cut around your pattern pieces.  Next, iron your pattern pieces to remove any wrinkles or creases.  Then, place the pattern pieces on a flat surface, lay the freezer paper on top with the glossy side down, and trace around the pattern.  I use a sharpie marker to trace. 
 If you are having trouble you can always use a sharpie to darken the lines on the original pattern.  I usually have to do this for tissue paper patterns.

Make sure you transfer all markings to your freezer paper pieces.  I also write all of the information I need on the freezer paper, such as pattern name, size, how many to cut, etc.
Next you will iron your freezer pattern pieces onto your fabric. Please make sure when you iron the freezer paper onto the fabric that the glossy side is down on the fabric.

DO NOT touch the iron to the glossy side of your freezer paper! It will melt and make a mess of your iron.

Run the iron along the freezer paper until it is stuck to the fabric.  Then, place your fabric on a solid surface and carefully trim off the excess fabric with a sharp pair of shears or a rotary cutter.  


The Girly Skirt - You can use a rotary cutter and mat or scissors are fine also. If you use a rotary cutter, the seams and hems are much cleaner and more accurate.  Most of the time I don't use a rotary cutter but I found it came in handy for the skirt.  Cut one skirt panel using the given measurements.
Note: If you have prewashed your fabric (which is a VERY good idea to do) your fabric might not be wide enough for what the pattern calls you to cut it on the main skirt panels and hem band pieces. For instance, a size 7 hem band is to be cut 22" wide on the fold.  Since the fabric started at 44", when folded it becomes 22".  But, when prewashed the width shrinks.  Do not worry about this.  Just cut your pieces to the width of the fabric.  I've made MANY of these skirts and they always turn out adorable even when the width is a little short.  This is a very full skirt with lots of gathers so the inch or two missing will not even be noticed.

Most of the time, it is really important to line up the pattern on the fabric.  This particular fabric is very difficult to line up perfectly because of the repeat.  If you were to line it up perfectly, you would be wasting a lot of fabric.  Let's line up the fabric the best we can.  Start with the panel of fabric that is already cut and iron a 3/8" seam.

Using the ironed edge, place it on the spot that you think looks the best.  Most of the time, I choose the exact spot where the fabric pattern matches up.  This fabric is almost impossible to match up exactly, so I placed it where I thought it looked the best.  Once you are happy with the fabric placement, cut the second skirt panel.

When the cutting is complete you will have the following.

The Girly Skirt:
Drop Waistband (1)
Main Skirt Panel (2)
Hem Band (2)
Elastic cut to size

The Olivia Top:
Sleeve (2)
Bodice Front or piece #1 (1)
Bodice Back or piece #2 (1)
Ruffle, optional (2)
Headband, optional (1)

Come back tomorrow to complete the skirt!  Yay!

* If you would like to enter the prize drawing, please make sure you submit a picture of your completed lesson to the Facebook Album by 8:00 AM CT, Tuesday, February 25th. Also, if you have any questions the Facebook Group is a great place to ask.

Friday, February 21, 2014

Sew-Along #12 - Olivia Top and Girly Skirt - Preparations

The Olivia Top and Girly Skirt by Pink Fig

Before we begin the sew-along on Monday, February 24th, you will want to gather some items and do a few things to prepare.

Items to Collect
  1. If you have not purchased the patterns yet, please do so ASAP.  You will need BOTH the Olivia Top AND the Girly Skirt patterns.
  2. If you do not have fabric for the project you will want to purchase that ASAP also.  At the time of this writing we do have a some fabric kits available.  We also have lots of fun fabric selections on our website.  
  3. You will need coordinating thread to complete this project.  The project kits did not come with thread, so please make sure you have some. 
  4. The Olivia Top also requires elastic thread for shirring.  You can find this at most any store that carries sewing supplies.
    http://www.amazon.com/gp/product/B000WME70U/ref=as_li_qf_sp_asin_il_tl?ie=UTF8&camp=1789&creative=9325&creativeASIN=B000WME70U&linkCode=as2&tag=whimsfabri-20
  5. The Girly Skirt requires 1 yard of elastic for the waistband.  We stock a great quality 3/4" wide knitted elastic which is perfect for this.
  6. You will want some sort of fabric marking instrument.  You can use chalk, a marking pencil, washable fabric pen; even a bar of soap will work.
  7. And finally, you will need pins, a sewing machine, a good iron (a steam iron is preferable for sewing), a pair of fabric shears or a rotary cutter and mat, and a ruler.  

Optional Items to Collect - The following items are totally optional.

  1. Freezer paper to trace the pattern and cut out your fabric pieces.  You can find this at most grocery stores with the wax paper and aluminum foil. 
  2. A sharpie or other permanent marker for tracing your pattern pieces onto the freezer paper.  I recommend a black sharpie as the colored ones, though more fun, can tend to transfer onto your fabrics.  Ack!  Had that happen recently and I was so sad.

Things to Do
  1. Make sure to prewash and preshrink all of your fabrics.  I wash my fabrics on warm/hot and then I dry my fabrics in the dryer with no softeners.  I always preshrink this way when I am using fabric for clothing construction.  I would hate to work hard on something only to have it shrink and not fit when I was done.
  2. Press your fabrics well.  I try to do this straight out of the dryer so that the wrinkles come out easier.  
  3. If you haven't already, join our Facebook Sew-Along Group so you can post your progress pictures.
Happy Sewing,
Danielle Storm
www.whimsicalfabric.com
#navbar-iframe{ display:none !important;}