The Exchange Dress
Welcome to the Exchange Dress sew-along. I want to remind everyone that I am not a "professional" seamstress, nor was I formally taught. I'm just a girl who loves fabric, sewing, and pretty much everything related to those two things. If you have any questions, suggestions, or tips to share; please make sure to post them on our Facebook group.
Please read the directions in your Exchange Dress booklet all the way through before you begin. It's probably a good idea to read through this lesson once too before you begin.
I also want to remind everyone that if you would like to see any of the images posted in this blog larger, just click on them. It might be helpful on some steps. Let's begin now.
Day 1 - Drafting the Pattern and Cutting Out the Fabric.
1. The first thing you will need to do is to pull out your Lucy pattern
pieces and fussy cut around the dress front and dress back for the
size you will be using. I like to iron them lightly so they lay flat.

2. Trim off the excess tissue along the Center Front pattern piece.


18. Repeat this for the other side of your pattern. Then trace over these lines with a Sharpie. Don't forget to keep a piece of scrap paper under you!

19. Now, if you know much about me and how I sew, you probably know about my love affair with freezer paper. I adore freezer paper! I trace all of my patterns out on freezer paper any time I sew. And that means I'm going to make my final pattern pieces for this dress on FREEZER PAPER!
20. If you purchased a kit you received 3 yards of freezer paper in it. This will be plenty to trace out your pattern pieces. Pull out your freezer paper so we can begin. This is the paper with the shiny back side. Smooth out your freezer paper but don't iron it. Not yet!
21. Cut off a length of your freezer paper so that it is long enough to cover the center front panel section you just created on the Swedish Drafting Paper. Give yourself an inch extra on each end. You will be adding seam allowance to this piece, so don't cut the width. Lay the freezer paper shiny side down on top of the center front panel. I used pattern weights to help hold it flat.


Neckline

Hemline


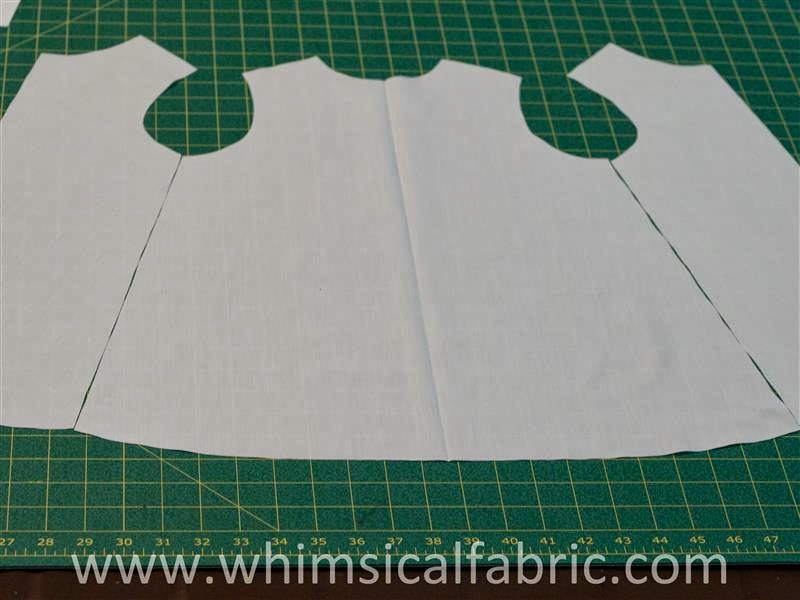
 42. You now have all three pattern pieces you need to make the Exchange Dress!


DO NOT touch the iron to the glossy side of your freezer paper! It will melt and make a mess of your iron.


53. Lastly, trim off this excess fabric. That's it. We are done with our first lesson. Next lesson, we get to sew!!
* If you would like to enter the prize drawing, please make sure you submit a picture of your completed lesson to the Facebook Album by 8:00 AM CT, Wednesday, January 29th. Also, if you have any questions the Facebook Group is a great place to ask.
Welcome to the Exchange Dress sew-along. I want to remind everyone that I am not a "professional" seamstress, nor was I formally taught. I'm just a girl who loves fabric, sewing, and pretty much everything related to those two things. If you have any questions, suggestions, or tips to share; please make sure to post them on our Facebook group.
Please read the directions in your Exchange Dress booklet all the way through before you begin. It's probably a good idea to read through this lesson once too before you begin.
I also want to remind everyone that if you would like to see any of the images posted in this blog larger, just click on them. It might be helpful on some steps. Let's begin now.
Day 1 - Drafting the Pattern and Cutting Out the Fabric.
The first page and the top of the second page in the Exchange Dress instructions give great directions for adjusting the length and hemline of the Lucy. I'm not going to be discussing those here, but it is great info to read through and use if you desire.
Skip down to the section titled "Making the Pattern" found on page 2.
2. Trim off the excess tissue along the Center Front pattern piece.
3. Now, pull out your drafting paper. If you purchased a kit you received a yard of Swedish Drafting Paper. This is the paper in the kit that feels a bit like interfacing. The Swedish Drafting Paper is wide enough that all sizes of the Lucy will fit on it and you can skip the first section of the instructions about measuring your Lucy front pattern piece. If you didn't buy a kit, you might need to extend the sides of your drafting paper if it is too narrow. Just follow the instructions provided.
4. Next, fold your drafting paper in half and crease it on the fold. Open up the drafting paper and line up your Lucy Front along the fold line. Using removable scotch tape (or painters masking tape), tape down the pattern piece lightly so it doesn't slide around.
5. Fold the drafting paper back over the top. I used some pattern weights to hold it down smooth.
6. Using a pencil or chalk, trace around the Lucy Front pattern onto the drafting paper. Make sure you don't use a writing instrument that will bleed through onto your pattern below. Also make sure to follow the lines for View A.
7. When you are done with the first side, flip the whole thing over and trace the again on the other side of your drafting paper.
8. Carefully remove the tape and your Lucy Front from the drafting paper and set aside.
9. We will next draw grain lines on your drafting paper. To do this, simply place your ruler from arm pit to arm pit.
10. Line up a number on the center line and then count over the same distance from the center line on each side. Make a mark. In my example I lined up the 10" on the center line and then counted over 6" on each side. So I made a mark at 4" and 16". You want these marks to be very close to the edge of your pattern.
11. Repeat this at the hemline making sure to make your marks the same distance as before. I laid my ruler so it was touching both corners of the hem, the center fold was on the 10" and I marked at 4" and 16" again.
12. Now, using your ruler, match up the marks on each side and draw grain lines straight down.
13. I then like to trace over my lines with a Sharpie so that I can see them well. This helps with the next step. Be careful though because a Sharpie will go straight through the Swedish Drafting Paper and onto your surface below. I always keep a piece of scrap paper under where I'm tracing.
14. When you are finished it should look something like this.
15. Now we are ready to move onto page 3 in the Exchange Dress instructions. Pick the size you are making from the list provided on page 3. You will be placing your ruler at the under arm and the hem corner according to those numbers. Note that in the picture below, I'm measuring from the right to the left on the width of my ruler for those two numbers.
16. It doesn't really matter where you measure on the length of your ruler. You are using the width marks for this so that you get the correct angle. You just want to make sure your ruler crosses the neckline and hemline if possible. If it's to short that is okay too, just make sure you center it between the neck and hem and that the under arm and hem corner match up with the numbers for your size in the instructions.
Note: If your ruler is not wide enough for the numbers given in the instructions I will give you a tip below.
17. Once you have your ruler lined up according to the measurements provided, using your pencil or chalk, trace drown the length of your ruler. If your ruler did not cross the neck or hem because it was too short just move your ruler making sure to carefully line it up along the line you just drew, and extend the line.
Is Your Ruler Not Wide Enough?
If your ruler was not wide enough to accommodate the numbers given in the instructions, you can still make this work. What you are looking for is the correct angle for your lines. You can get that by just using the difference between the two measurements given. So, let's say you have a ruler that is only 3" wide and your numbers are 4" and 5" for your size. That is a 1" difference You can place the ruler on the 2" and 3" mark and draw a line.This line will be at the correct angle, but it won't be at the correct position on your pattern. You are two inches away (4"-2"=2" and 5"-3"=2"). I drew a similar line in yellow on my pattern to show you. See the picture below. You can see that it is 2" away from the black line (the real line I need.)You can easily find the correct position by lining up that line you drew along the 2" width mark on your ruler and drawing a second line along the ruler's edge. (Just imagine my ruler nudged ⅛" to the right.)


19. Now, if you know much about me and how I sew, you probably know about my love affair with freezer paper. I adore freezer paper! I trace all of my patterns out on freezer paper any time I sew. And that means I'm going to make my final pattern pieces for this dress on FREEZER PAPER!
20. If you purchased a kit you received 3 yards of freezer paper in it. This will be plenty to trace out your pattern pieces. Pull out your freezer paper so we can begin. This is the paper with the shiny back side. Smooth out your freezer paper but don't iron it. Not yet!
22. Using a Sharpie, trace over the lines of the center front panel. If you darkened those lines with a sharpie you should be able to see them through the freezer paper. If not, you might need to move to an area with better lighting. Don't worry about the sharpie going through your freezer paper. It won't.
23. Now, taking your ruler and lining up the sides on the ¼" line on your ruler, draw parallel lines ¼" away. Extend those lines past the top and bottom.
24. Extend the neckline into the seam allowance you just created.
25. Do the same with the hemline.
26. Matching up the sides fold your pattern piece in half and crease the center.
27. Open up your pattern piece and using your ruler draw the grain line down the center where you formed your crease.
28. Fold your pattern back along the center line and cut your pattern piece out. The ensures that your pattern piece is symmetrical.
29. Make sure to label your pattern piece. Then, set it aside.
30. Grab your Swedish Drafting Paper pattern again. You should be on the bottom of page 4 of your instructions.
31. Take your ruler and line up one of your front panel side lines on the 1½" line on your ruler. Using a pencil or chalk, draw a line down the edge of you ruler from the neckline to the hemline.
32. Repeat for the other side. It's okay if your lines cross. That's normal for the smaller sizes.
33. Trace over these new lines with a sharpie. Don't forget to have a piece of scrap paper underneath.
34. Grab a section of freezer paper again. This will need to fully cover one side of the dress front on your Swedish Drafting Paper.
35. Trace along the lines and don't forget to include your grain line. I moved my grain line over a bit when I traced by using my ruler, but you don't have too. Don't forget to add all your info to your pattern piece. When your done, set it aside.
36. We are going
to trim off a bit of the seam allowance on both the neckline and the
hemline of the dress front side pattern piece. Just follow the instructions located on the top middle of page
5.
37. We are now going to trace our dress back onto freezer paper. To do this I find it easiest to first trace over the lines on my original pattern piece with sharpie. If I don't, I have a hard time seeing tissue lines through the freezer paper. Don't forget, we are using view A. Also remember to use scrap paper under your tissue or the marker will go through and stain your surface.
38. Now just lay a third length of freezer paper over the top of your back dress piece and trace. When you get to the top (strap piece), draw a dashed line across the base of the strap (below the circles) where the solid line is located on the pattern. We will not be using the strap part of the pattern, but we will be adding a seam allowance here.
39. Now, line the dashed line up along the ¼" line on your ruler.
40. Draw a line across the top of the ruler and connect the side to this line.
41. Don't forget to add all your information to your dress back pattern piece.
43. Trim off the excess freezer paper on the fold edge of the dress back pattern piece.
44. Time to cut out your fabric! Refer to the layout directions located on the bottom of page 5. If you purchased a kit with either Fabric Finders gingham or pique your fabric will be 60" wide. If you purchased a kit with the main fabric being one of the Riley Blake solid fabrics your fabric will be 44" wide. Read the instructions for laying out your fabric carefully and don't cut until you are sure. Also make sure to have your fabric lined up along the grain line.
45. The kits came with enough fabric to create at least two panels. Determine how many panels you would like to make and then cut the following.
| Dress Fabric | Lining Fabric |
| Dress Back - Cut 1 on fold. | Dress Back - Cut 1 on fold. |
| Dress Side - Cut 2. | Dress Side - Cut 2. |
| Dress Panel - Cut 2 per panel. | Dress Panel - Cut 1 per panel. |
Now, the beauty of freezer paper patterns. Have I told you how much I love this stuff? Oh, I did, didn't I.
46. Start with your dress back pattern piece and lay it on the fold of your dress fabric, shiny side down. Now, take your iron and iron over the pattern piece.
DO NOT touch the iron to the glossy side of your freezer paper! It will melt and make a mess of your iron.
47. The freezer paper will temporarily stick to your fabric making it super easy to cut your pieces out.
48. Once you have ironed on your pattern pieces go ahead and carefully cut them out. Make sure not to slide the back fabric out of line. I like to use a rotary cutter and mat as it's easier to cut without lifting the pieces this way.
49. Once you have the dress fabric cut out carefully peel off the freezer pattern pieces and apply them the same way to your lining fabric. The beautify of the freezer patterns is that you can use them over and over. Next time you are ready to make another Exchange Dress just pull out your pattern pieces, iron them on your fabric, cut, and go! How awesome is that? Don't you just love it?
50. Lastly, we are going to trim the hem of your lining fabric to keep it from poking out of your hem. Lay out your lining like so.
Please, re-read the directions right under Cutting Out on page 5 for clarification of this step! You don't want to mess it up. :)
51. Using a fabric marker or chalk and starting at the back center fold, draw a new hem about ¼" up from the original hem.
52. As you move to the front side pieces taper the line back down to the original hem.
53. Lastly, trim off this excess fabric. That's it. We are done with our first lesson. Next lesson, we get to sew!!
* If you would like to enter the prize drawing, please make sure you submit a picture of your completed lesson to the Facebook Album by 8:00 AM CT, Wednesday, January 29th. Also, if you have any questions the Facebook Group is a great place to ask.
Thanks for sewing with me,
Danielle Storm
www.whimsicalfabric.com
No comments:
Post a Comment