Macy Giggles Skinny Hem Dress
Today we are going to work on B - Preparing the Skirt, C - Preparing the Skirt Trim, and D - Assembling the Skirt. Remember that you can click on any of the images to view them larger. If you have any questions, suggestions, or tips please make sure to share them on the Facebook group. Have fun!
B - Preparing the Skirt
1. With right sides together we are going to sew the side seams (shorter sides of skirt pieces). We will use a 1/2 inch seam allowance for this. Before you sew your side seams make sure you have the fabric in the direction you want it. Check to make sure that none of the panels are upside down. You will notice in my Promenade fabric that the two flower bunches with the tape measures next to them have the flowers going all in the same direction. Look carefully to make sure your print has the same orientation as each of the other panels.


Decide which panel you want to be the front of your skirt and press all side seams to the back of the dress.

2. Find the center back of the skirt. For sizes 2-4, match up the side seams to find this. For sizes 5-14 the center back will be the seam. Place a pin along the top of the center back. Again, you might want to look at your fabric and decide which you want to be the top and which you want to be the bottom. For some fabrics (Farm Fresh) that will be easy, you don't want the animals upside down. For other fabrics, like Promenade, it is whatever you prefer. Make that decision now and place your pin at the top of the center back. For sizes 2-4 it might be a good idea to lightly press the center of the back before placing that pin. This will help you line up your facing in step 4. For sizes 5-14 you don't need to do this since you have the seam to guide you.
3. Grab your facing piece. You will want the short side of the facing at the top and the long sides at the side. Fold your facing along the center lengthwise. Give it a quick press with your iron.

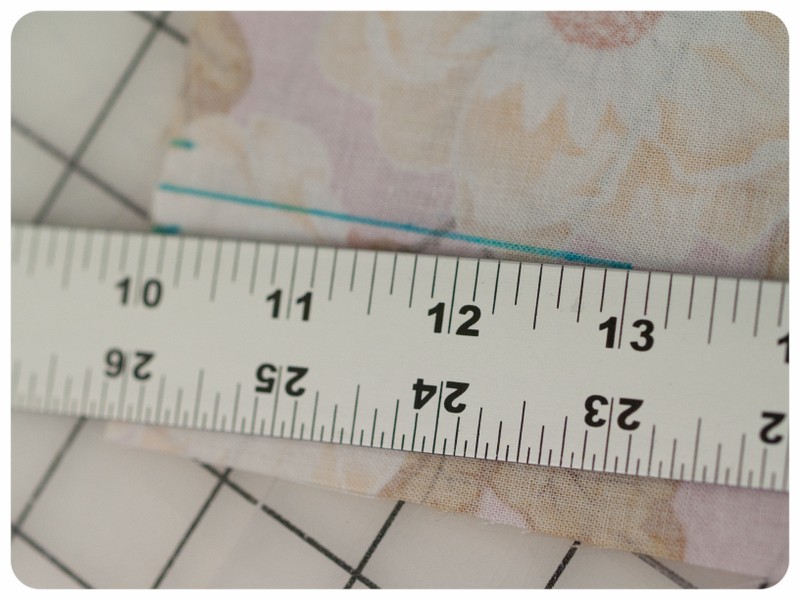
Place the facing in front of you with right side down. In the pattern the picture shows the facing right side up. You want to make sure you have it right side down. Now, take a ruler and draw a line with your marking pen from the top of the center, down the center line, 3 inches long.

Next you will make a small mark 1/4 of an inch from this center line on each side.

Then, using your ruler, connect the 1/4 inch marks with the bottom of the 3 inch line. You will be drawing diagonals. Do this carefully.

Mine looks kind of sloppy. Oops.

5. Carefully (slow your machine down) stitch down along the left side diagonal line you drew.

Stop one stitch away from the bottom of the V. With your needle down, lift up your presser foot and rotate your fabric 90 degrees so that you are stitching across the bottom of the V. Hand turning your wheel, make one stitch across the bottom of the V.

Again, leaving your needle down, lift your presser foot, rotate your fabric, and continue up the other side of the V.
6. Carefully cut down the center line. Cut all the way to the bottom stitch, being very careful not to cut any stitches. The closer you get to the bottom stitch the cleaner your facing will look when you turn it. But DO NOT clip any stitches or it will be a mess. Use a sharp pair of shears that you have very good control over. Make sure you have good lighting and you can see what you are doing well. Go slowly.

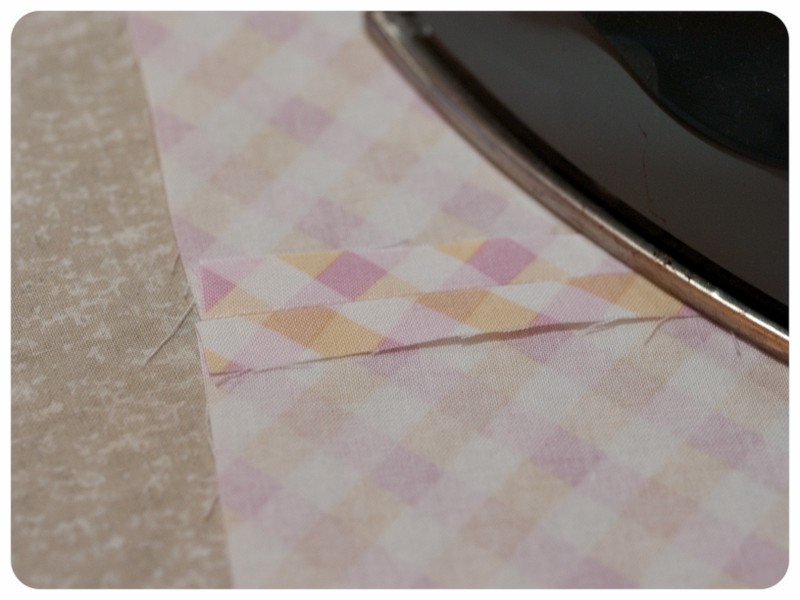
7. Now, fold the facing to the inside of the skirt and press the seams down flat. You will want to tug a bit on the bottom of the facing to get a nice clean V as you press. Be careful not to burn yourself, but if you have a steam iron this is a good time to use some steam. If you don't have a good steam iron think about getting one if you do a lot of sewing. Everything looks better when you press your seams well with a steam iron as you sew. I LOVE my steam iron. Thanks Debbie W. for recommending it to me!!

Your facing should look like this when you are done. If you don't have a distinct V you might need to clip closer to that bottom stitch. Just don't clip it. Sorry my picture is blurry. I've got a low light issue in my studio. It's located in my basement.

C - Preparing the Skirt Trim
Today we are going to work on B - Preparing the Skirt, C - Preparing the Skirt Trim, and D - Assembling the Skirt. Remember that you can click on any of the images to view them larger. If you have any questions, suggestions, or tips please make sure to share them on the Facebook group. Have fun!
B - Preparing the Skirt
1. With right sides together we are going to sew the side seams (shorter sides of skirt pieces). We will use a 1/2 inch seam allowance for this. Before you sew your side seams make sure you have the fabric in the direction you want it. Check to make sure that none of the panels are upside down. You will notice in my Promenade fabric that the two flower bunches with the tape measures next to them have the flowers going all in the same direction. Look carefully to make sure your print has the same orientation as each of the other panels.

- Sizes 2-4 only use two skirt panels, and will have two side seams.
- Sizes 5-14 use three skirt panels, and will have three seams.

Decide which panel you want to be the front of your skirt and press all side seams to the back of the dress.

2. Find the center back of the skirt. For sizes 2-4, match up the side seams to find this. For sizes 5-14 the center back will be the seam. Place a pin along the top of the center back. Again, you might want to look at your fabric and decide which you want to be the top and which you want to be the bottom. For some fabrics (Farm Fresh) that will be easy, you don't want the animals upside down. For other fabrics, like Promenade, it is whatever you prefer. Make that decision now and place your pin at the top of the center back. For sizes 2-4 it might be a good idea to lightly press the center of the back before placing that pin. This will help you line up your facing in step 4. For sizes 5-14 you don't need to do this since you have the seam to guide you.
3. Grab your facing piece. You will want the short side of the facing at the top and the long sides at the side. Fold your facing along the center lengthwise. Give it a quick press with your iron.

Place the facing in front of you with right side down. In the pattern the picture shows the facing right side up. You want to make sure you have it right side down. Now, take a ruler and draw a line with your marking pen from the top of the center, down the center line, 3 inches long.

Next you will make a small mark 1/4 of an inch from this center line on each side.

Then, using your ruler, connect the 1/4 inch marks with the bottom of the 3 inch line. You will be drawing diagonals. Do this carefully.
Mine looks kind of sloppy. Oops.

- Note: I decided to overlock around my facing so the edges were finished. The pattern does not tell you to do this. If you like finished edges, like me, you will want to do this before you sew the facing onto the skirt. I did it after, but it would have been MUCH easier to do it first. You can zigzag or orverlock and you do not need to worry about the top side since that will be caught in the seam when attaching the bodice to the skirt.
5. Carefully (slow your machine down) stitch down along the left side diagonal line you drew.

Stop one stitch away from the bottom of the V. With your needle down, lift up your presser foot and rotate your fabric 90 degrees so that you are stitching across the bottom of the V. Hand turning your wheel, make one stitch across the bottom of the V.

Again, leaving your needle down, lift your presser foot, rotate your fabric, and continue up the other side of the V.
6. Carefully cut down the center line. Cut all the way to the bottom stitch, being very careful not to cut any stitches. The closer you get to the bottom stitch the cleaner your facing will look when you turn it. But DO NOT clip any stitches or it will be a mess. Use a sharp pair of shears that you have very good control over. Make sure you have good lighting and you can see what you are doing well. Go slowly.

7. Now, fold the facing to the inside of the skirt and press the seams down flat. You will want to tug a bit on the bottom of the facing to get a nice clean V as you press. Be careful not to burn yourself, but if you have a steam iron this is a good time to use some steam. If you don't have a good steam iron think about getting one if you do a lot of sewing. Everything looks better when you press your seams well with a steam iron as you sew. I LOVE my steam iron. Thanks Debbie W. for recommending it to me!!

Your facing should look like this when you are done. If you don't have a distinct V you might need to clip closer to that bottom stitch. Just don't clip it. Sorry my picture is blurry. I've got a low light issue in my studio. It's located in my basement.

C - Preparing the Skirt Trim
- Note: The pattern doesn't tell you to change your seam allowance for this step so I stitched my trim pieces together with a 1/2 inch seam. My trim ended up being too short. I had to tear out my seams and restitch using a 1/4 inch seam. It could just be that I cut my trim pieces a bit short. I don't know. I didn't go back and measure them all to check. You might want to double check your measurements and then decide what size seam you want to make. If you use a 1/4 inch allowance and your trim is too long you can always cut some off, but then your side seams won't match up. It's up to you what you decide to do.
2. With right sides out, fold your trim in half matching up the top and bottom raw edges. Press the fold well. Again, use steam if you have it to give yourself a nice crisp fold.


D - Assembling the Skirt
1. Look at your trim and determine which side will show and which side will be on the inside of the skirt. It might not matter with some prints. Also look and decide which trim piece you want to be the front of your skirt. I liked how the plaid matched up better on one piece then the others and decided that would be my front.
2. Pin the trim to the skirt with the side you want to show facing the right side of the skirt fabric. Carefully pin all the way around the skirt, lining up seams as you go.

3. With a 1/2 inch seam allowance sew the trim to the skirt. Zigzag or overlock to finish your seam. If you overlock don't forget to either pull your thread ends back through the stitches or tuck underneath the seam.


Press the seam to the top of the skirt.

4. Pining your pockets.
- Note: I felt the pattern instructions were a bit ambiguous on this next part. It says you are supposed to pin the pockets to the side seams, which is pretty straight forward in sizes 2-4 as you have the actual seams on the side to guide you. But, for sizes 5-14, since you have 3 seams that make up the skirt, you don't have actual "side" seams. I wasn't sure if they wanted me to match up the center front with the center back and find the actual sides of the dress or if they just wanted me to use the two seams on the sides of the front panel. I choose to use those two seams as it was just easier and I actually thought I would like the pockets more to the front then on the actual sides of the dress. You could do it either way. If you are going to use the actual sides of the dress, you will want to find the sides by matching up the front center with the back center, and then lightly press so you have a line to guide you in lining up your pockets.

5. Fold your pockets in half lengthwise and crease with your fingers. You probably don't need to press with your iron, just a finger crease will suffice. Pin your pockets to your dress making sure to line up the centers carefully.


6. Sew your pockets to the dress by topstitching 1/4 inch from the edge. You will want to begin using your normal stitch length and start just one stitch before the pocket. Once you hit your topstitching on the top of the pocket you can increase your stitch length to what you normally use for topstitching. This shorter stitch length at the beginning will help to secure the pocket better. You might want to even go back over those stitches again after you finish stitching the pocket down just to reinforce them.

7. The pattern doesn't tell you to topstitch the bottom of the skirt. It's up to you. I always topstitch because I feel it gives the item a crisper, more professional look. It helps to hold those seams down and reduce bulk. I just feel like it looks so much better. If you decide to topstitch don't forget to lengthen you stitch and stitch about 1/4 inch from the seam. You want to stitch on the skirt, not the trim, catching that seam below to hold it down. If you overlocked the seam and didn't pull your threads through, don't forget to make sure you catch them under the seam as you topstitch.


7. The pattern doesn't tell you to topstitch the bottom of the skirt. It's up to you. I always topstitch because I feel it gives the item a crisper, more professional look. It helps to hold those seams down and reduce bulk. I just feel like it looks so much better. If you decide to topstitch don't forget to lengthen you stitch and stitch about 1/4 inch from the seam. You want to stitch on the skirt, not the trim, catching that seam below to hold it down. If you overlocked the seam and didn't pull your threads through, don't forget to make sure you catch them under the seam as you topstitch.

That's it. Your done for today. We'll leave the gather stitches for later. Great job!!
Thanks for sewing with me,
Danielle Storm
www.whimsicalfabric.com
Bless you! I made up all kinds of curse words going through these instructions and I'm not a beggining sewer! Thank you for the photo tutorial and explanations.
ReplyDelete