Macy Giggles Skinny Hem Dress
Today's assignment will cover E - Making the Shoulder Straps, F - Making the Button Loops, and G- Assembling the Bodice. I will not be following the exact order of the booklet, but do please read the directions in your booklet as we go along.
Also, I don't know if this confused anyone else, but I finally figured out something about these directions that has been very confusing for me. In all of the illustrations, the bird printed side of the fabric represents the wrong side (or backside) of the fabric. I have no idea why they choose to do the illustrations this way, but now that I figured it out the illustrations started to make a lot more sense.
If you have any questions, suggestions, or tips please make sure to share them on the Facebook group.
E and F - Making the Shoulder Straps and Button Loops
1. Grab your two shoulder straps to begin with. Fold under 1/4 inch along each long side. Fold the fabric towards the backside and press well with your iron. I used a pressing guide I made with a piece of white card stock.
2. Fold each long side of your shoulder straps 1/4 inch again so that the raw edges are encased in the fold and press well. Do this on both sides of each shoulder strap.

3. While you are at the iron, grab your two button loops. Fold each loop piece in half lengthwise matching raw edges with right side out. Iron to create a center crease.

4. Open up each loop and fold each long side towards the center crease you just made, lining up the raw edges along that crease. Press well.

5. With raw edges still resting on the crease, fold each loop piece along the center crease and press well again.

6. Topstitch as close as you feel comfortable to the outer edge. I didn't increase my stitch length for this since I knew there would be some stress on these loops when worn. In retrospect I wish I would have topstitched along both sides of each loop instead of just the one. I think it might have looked a little better.

7. Fold each loop in half matching up the raw edges and stitch across. The directions say to use a 1/2 inch seam, but I used a little less since I wanted these stitches to be hidden in the 1/2 inch bodice seam we will be creating later.

8. Now, grab your shoulder straps again. We are going to topstitch down the center of each fold. I used a longer stitch length for this. Do all 4 sides (two on each strap).

9. If you have a thicker weight thread go ahead and thread your machine (top and bobbin) with this thread now. We are going to sew some gathering stitches.
10. Set your machine to a basting stitch or some long stitch length. Pull some extra long thread tails out of both the bobbin and upper thread. Sew a basting stitch 1/2 inch from each short edge of both shoulder straps. Keep your thread trails longer when you cut them so you have something to pull when we gather.

11. Remember when I said we would sew in those gathering stitches for the skirt later? Now is the time. Since we already have the thicker thread in our machine, go ahead and sew a basting stitch all the way around the top of your skirt about 1/4 inch from the raw edge. Sew a second basting stitch about 1/8 inch from the first stitch (3/8 inch from the raw edge). Make sure you do not cross over the first gathering line you just sewed. Oops, mine look pretty crooked. Set your skirt aside for lesson 4.

G - Assembling the Bodice
1. Make sure to transfer all marks from your pattern to your fabrics. You need strap placements marks on your front bodice pieces. You need strap placement marks and loop placements marks on your back bodice pieces.

2. Decide which front bodice piece you will use for the front of your dress and which will be your lining. Take the front bodice piece that will be the front of your dress and pin each shoulder strap to the bodice, right sides together and matching up raw edges. Pin the straps on just one side of the strap first, lining up the edge of the strap to the strap placement markings on the bodice.
3. Next, pull the gathering threads on the strap until the strap fits neatly between the two marks. Pin the strap in place well. You don't want the gathers to move. Repeat this with the other strap.

4. Pin the other end of each strap to the bodice back pieces, right sides together, matching up raw edges, between the marks, and pulling the gathers like we did on the front. Pin in place well.

5. Sew the side seams of the bodice front to the bodice back pieces using a 1/2 inch seam allowance.
6. Take the remaining bodice pieces (1 front and 2 backs) and sew the side seams like you just did above. This will be your bodice lining.
7. Press all seams open on both the bodice and the lining.

8. Pin the loops your created on the loop placement marks. I decided to put the buttons on the right hand side of the dress back, thus my loops on the left. The raw edges of your loops need to line up with the raw edge of the bodice.

9. Pin the bodice lining to the bodice with right sides together. Make sure you tuck the shoulder straps down between the bodice and the lining. Pin all the way around the sides and the top. Leave the bottom open. Use lots of pins to hold everything well in place.

10. Carefully stitch using a 1/2 inch allowance up the side, across the top, and back down the other side, attaching the bodice to the lining. Leave the bottom open. Stitch this slowly and carefully making sure you don't stitch in any wrinkles or creases in your fabrics.
11. Clip corners,

notch hills,

and clip valleys. Do this carefully without clipping any stitches. Here is a great tutorial explaining why you need to do this.

12. Turn bodice right side out. Pull out your shoulder gathering threads and discard. Press well.


You have finished lesson 3. Only one more lesson left.
Today's assignment will cover E - Making the Shoulder Straps, F - Making the Button Loops, and G- Assembling the Bodice. I will not be following the exact order of the booklet, but do please read the directions in your booklet as we go along.
Also, I don't know if this confused anyone else, but I finally figured out something about these directions that has been very confusing for me. In all of the illustrations, the bird printed side of the fabric represents the wrong side (or backside) of the fabric. I have no idea why they choose to do the illustrations this way, but now that I figured it out the illustrations started to make a lot more sense.
If you have any questions, suggestions, or tips please make sure to share them on the Facebook group.
E and F - Making the Shoulder Straps and Button Loops
1. Grab your two shoulder straps to begin with. Fold under 1/4 inch along each long side. Fold the fabric towards the backside and press well with your iron. I used a pressing guide I made with a piece of white card stock.

2. Fold each long side of your shoulder straps 1/4 inch again so that the raw edges are encased in the fold and press well. Do this on both sides of each shoulder strap.

3. While you are at the iron, grab your two button loops. Fold each loop piece in half lengthwise matching raw edges with right side out. Iron to create a center crease.

4. Open up each loop and fold each long side towards the center crease you just made, lining up the raw edges along that crease. Press well.

5. With raw edges still resting on the crease, fold each loop piece along the center crease and press well again.

6. Topstitch as close as you feel comfortable to the outer edge. I didn't increase my stitch length for this since I knew there would be some stress on these loops when worn. In retrospect I wish I would have topstitched along both sides of each loop instead of just the one. I think it might have looked a little better.

7. Fold each loop in half matching up the raw edges and stitch across. The directions say to use a 1/2 inch seam, but I used a little less since I wanted these stitches to be hidden in the 1/2 inch bodice seam we will be creating later.

8. Now, grab your shoulder straps again. We are going to topstitch down the center of each fold. I used a longer stitch length for this. Do all 4 sides (two on each strap).

9. If you have a thicker weight thread go ahead and thread your machine (top and bobbin) with this thread now. We are going to sew some gathering stitches.
10. Set your machine to a basting stitch or some long stitch length. Pull some extra long thread tails out of both the bobbin and upper thread. Sew a basting stitch 1/2 inch from each short edge of both shoulder straps. Keep your thread trails longer when you cut them so you have something to pull when we gather.

11. Remember when I said we would sew in those gathering stitches for the skirt later? Now is the time. Since we already have the thicker thread in our machine, go ahead and sew a basting stitch all the way around the top of your skirt about 1/4 inch from the raw edge. Sew a second basting stitch about 1/8 inch from the first stitch (3/8 inch from the raw edge). Make sure you do not cross over the first gathering line you just sewed. Oops, mine look pretty crooked. Set your skirt aside for lesson 4.

G - Assembling the Bodice
1. Make sure to transfer all marks from your pattern to your fabrics. You need strap placements marks on your front bodice pieces. You need strap placement marks and loop placements marks on your back bodice pieces.

2. Decide which front bodice piece you will use for the front of your dress and which will be your lining. Take the front bodice piece that will be the front of your dress and pin each shoulder strap to the bodice, right sides together and matching up raw edges. Pin the straps on just one side of the strap first, lining up the edge of the strap to the strap placement markings on the bodice.
3. Next, pull the gathering threads on the strap until the strap fits neatly between the two marks. Pin the strap in place well. You don't want the gathers to move. Repeat this with the other strap.

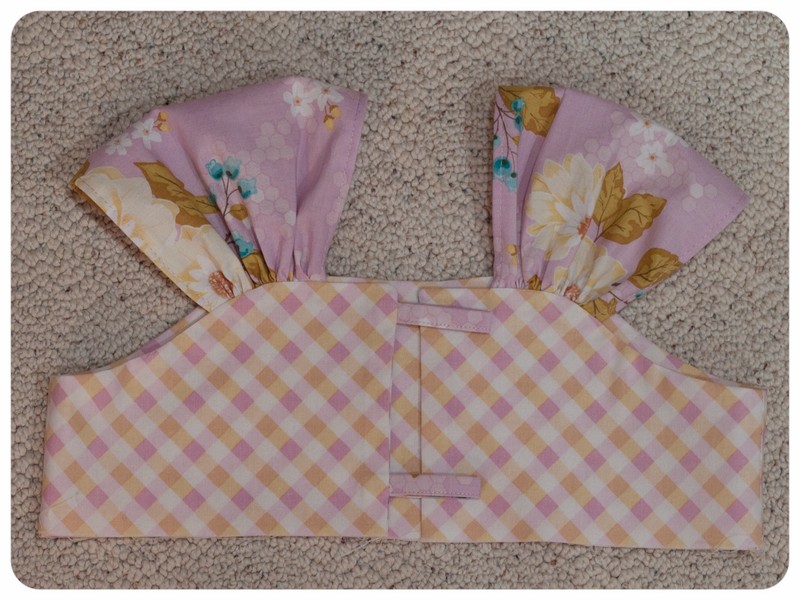
4. Pin the other end of each strap to the bodice back pieces, right sides together, matching up raw edges, between the marks, and pulling the gathers like we did on the front. Pin in place well.
- Note: This part can get a bit confusing. I'm not sure if my picture will help you or not. You need to make sure you pin the straps in the correct orientation. If you get confused, play with the pieces, pinning and flipping them around to make sure you have them pinned correctly. You can even flip it up over your own shoulder looking in a mirror to make sure the right sides of your fabric are in the right place.

5. Sew the side seams of the bodice front to the bodice back pieces using a 1/2 inch seam allowance.
6. Take the remaining bodice pieces (1 front and 2 backs) and sew the side seams like you just did above. This will be your bodice lining.
7. Press all seams open on both the bodice and the lining.

8. Pin the loops your created on the loop placement marks. I decided to put the buttons on the right hand side of the dress back, thus my loops on the left. The raw edges of your loops need to line up with the raw edge of the bodice.

9. Pin the bodice lining to the bodice with right sides together. Make sure you tuck the shoulder straps down between the bodice and the lining. Pin all the way around the sides and the top. Leave the bottom open. Use lots of pins to hold everything well in place.

10. Carefully stitch using a 1/2 inch allowance up the side, across the top, and back down the other side, attaching the bodice to the lining. Leave the bottom open. Stitch this slowly and carefully making sure you don't stitch in any wrinkles or creases in your fabrics.
11. Clip corners,

notch hills,

and clip valleys. Do this carefully without clipping any stitches. Here is a great tutorial explaining why you need to do this.

12. Turn bodice right side out. Pull out your shoulder gathering threads and discard. Press well.

You have finished lesson 3. Only one more lesson left.
Way to go,
Danielle Storm
www.whimsicalfabric.com
No comments:
Post a Comment