Wednesday, March 25, 2015

Sew-Along #23 - Addison and Addison Mini Dress - Lesson #2

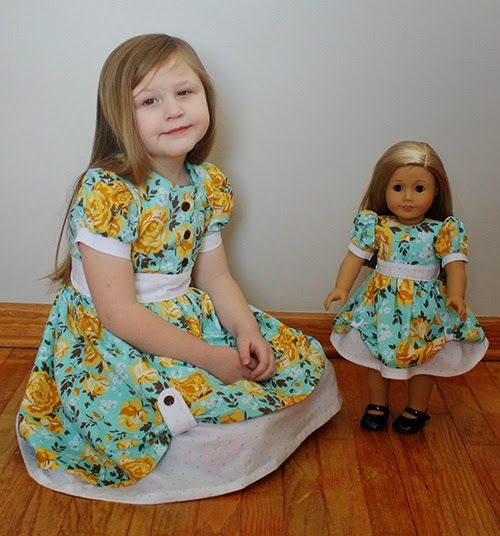
The Addison and Addison Mini Dresses by Modkid

Today we will sew our bodice and sleeves of the girl's dress. This dress ahs a beautiful vintage look to it but is fairly easy to construct.


NOTE: Please sure to read through today's lesson in the pattern before begins as well.  This girls dress also is sewn with a 1/2" seam allowance.


If you have any questions, suggestions, or tips to share; please make sure to post them on our Facebook group.  Also, if you would like to see any of the images larger that are posted in this blog, just click on them to enlarge. 

Let's get started!!


Bodice Construction: 

1. Take your  two front main bodice pieces and the two interfacing pieces. Place the interfacing onto the wrong side of bodice pieces against front edges on both sides with the interfacing shinny side down. Press onto fabric using hot dry iron. The interfacing will give extra support for the buttonholes and buttons.

2. Take your main bodice piece and lay it down with the right side facing up. Now place your main front bodice pieces onto the back bodice with right sides together matching up the shoulders. Pin the shoulders and stitch in place. *the front bodice pieces are shorter than the back bodice* Trim the shoulder seams to a 1/4" and press open. ( I trim mine to help reduce the bulk in the seam areas.) Repeat these steps with the lining bodice pieces. 

3. Place your lining sewn bodice down with right side facing up and place the main bodice over top of the lining right side down. (The right sides of both bodice main and lining are facing each other now.) Pin together along both front sides and neck line. Stitch around the front using an 1" seam allowance on the edge of the interfacing you fused onto you bodice front pieces and a 1/2" around the neck line. 

4. Trim corners and seam allowance along neck line. Clip into neck line as well so the front and neck line will lay flat when turned and pressed. Turn and press along the sewn area. 

5. Edge stitch around the front bottom edge, neckline and down the other front edge. Stitch button holes at this time and cut buttonholes open as well. 

6. Take the two front bodices and over lap the wearer's right side by an inch and pin in place. Pin the front bodice main to the front bodice lining. Pin all the way across the bottom edge of the front bodices with the main and lining bodices together. Baste these together all the way across the bottom of the front bodice. 

7. Now take the back bodice and pin together the bottom edge of the lining and main back bodice. Baste all the way across the bottom back. 

8. This is what the front and back bodice should look like now. Both front and back main/lining basted together. This way the bodice pieces will not shift in the next couple of steps sewing. 


Sewing the Waist Band:

1. Take the front waist band piece and place it with wrong side facing down. Take the interfacing piece and place it with the shinny side down. Fuse, or press onto waist band using a hot, dry iron. 

2. Take the lining waist band and main waist band with wrong sides together. Pin in place.  

3. Stitch a basting stitch across both the top and bottom of the waist band. (the two long sides only) This will keep the pieces together nicely for attaching onto the dress and the skirt. 

4. Place the waist band top onto the bottom of the front bodice with right sides together. Pin in place, stitch. Finish raw edge of this seam with either a zig zag stitch or serge edge. Press this seam towards the waist band.

5. Stitch the seam in place to the waist band by top stitching the waist band close to the edge of the waist band itself. 


Sewing the Ties:

1. Take your tie pieces and fold in half with right sides together and pin along angled edge and the long side, leaving the short straight side unpinned for turning. Stitch. Clip corners and trim, turn and press. Top stitch around the ties.

2. Pin the ties onto the front dress bodice on both sides leaving matching up the top of the ties to the top of the front band and leaving about a 1/2" on the bottom of the front bodice free, baste in place. (The 1/2" space below  the ties will be the seam allowance for attaching the skirt.) 


Sewing the Sleeves:

1. Sew a gating stitch between the dots you transferred on the top and bottom of both sleeves. 
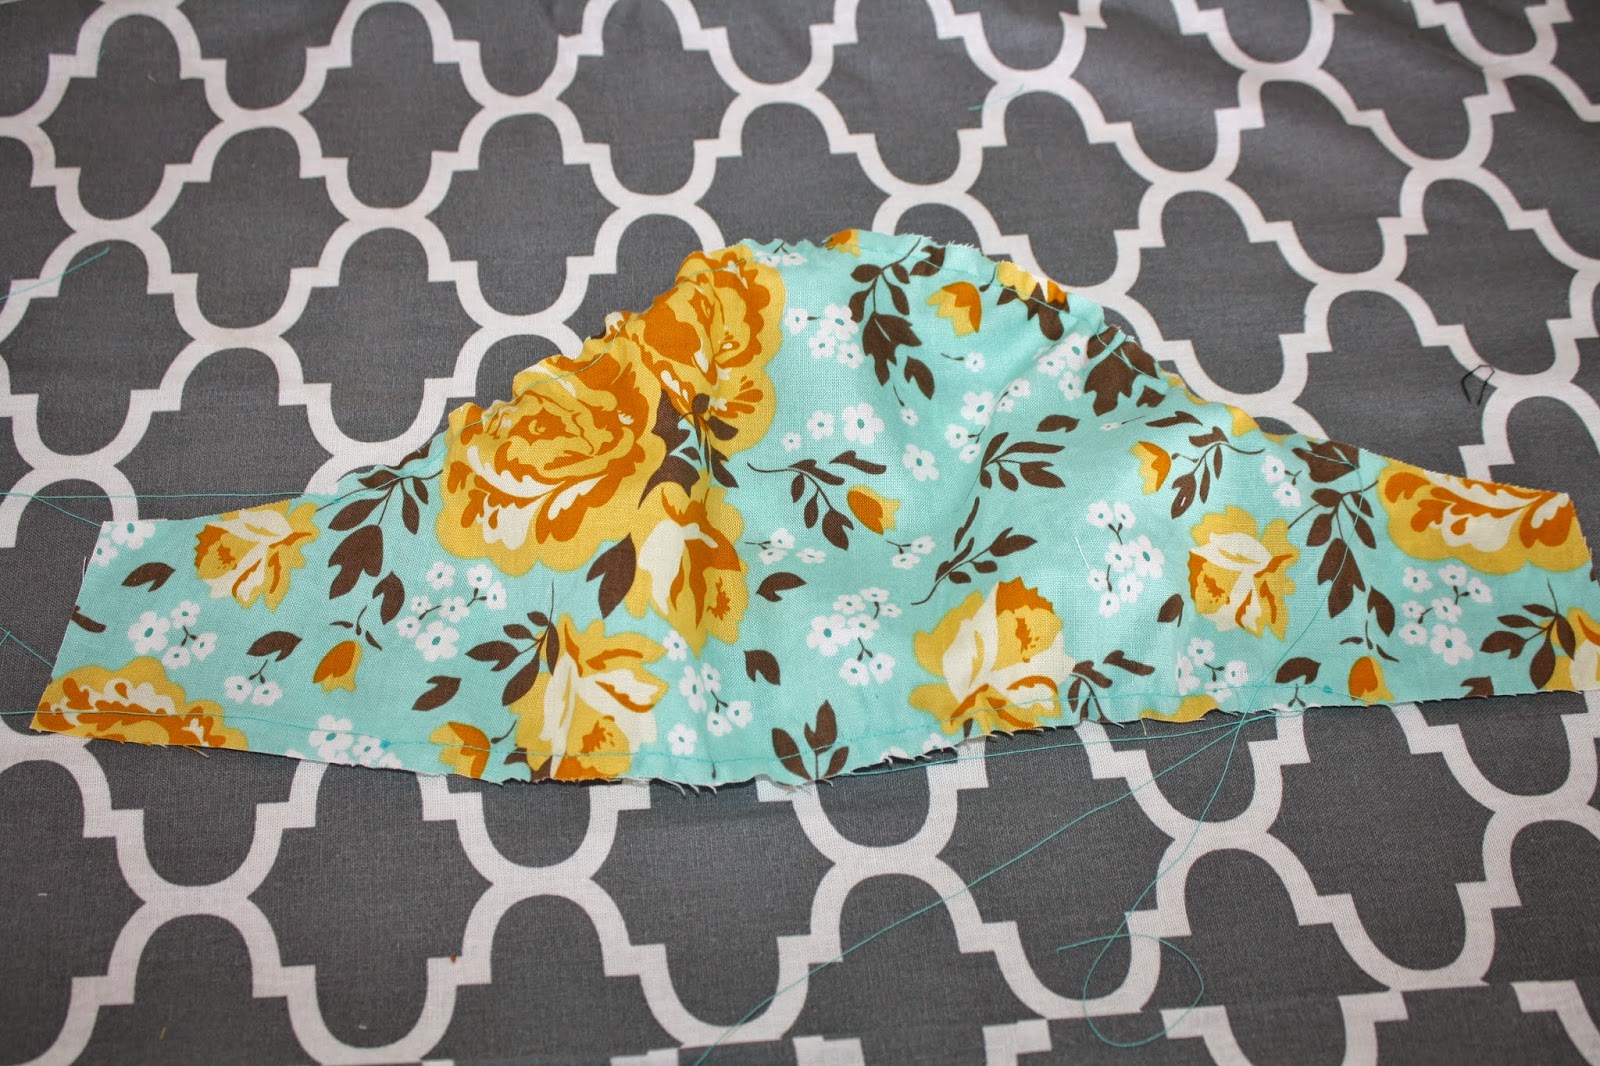
2. Take the top of the sleeve and match the center of it to the shoulder seams, pin in place. Gather sleeve to fit armscye and pin along the both sides.  Stitch in place, finish seam, then press seam towards the sleeve. 

3. Fold the front bodice and back bodice with right sides facing and matching up under arm seam, pin in place. 

4. Stitch side, then finish seam. I used a serge seam so I pressed my seam to the back of the dress bodice. 

We all done with today's lesson, come back tomorrow to finish up the little girl's dress!

* If you would like to enter the prize drawing, please make sure you submit a picture of your completed lesson two to the Facebook Album by 12:00 noon CT, Monday, March 30th.  Also, if you have any questions the Facebook Group is a great place to ask.

Sharon

Tuesday, March 24, 2015

Sew-Along #23 - Addison and Addison Mini Dress - Lesson #1

The Addison and Addison Mini Dresses by Modkid

I hope you had as much fun sewing the Art Museum Vest and Trousers as I did! It is a wonderful pattern! Now on to our Easter Sew-Along for girls! This dress is not only perfect for Easter but also for any special event. Even better that it has a matching doll dress too. My daughter is all about her and her dolls matching. 
NOTE: Please read through both patterns directions for this sew-along. You will need them as well and keep your pattern handy while sewing both dresses. Also the girl size has  a 1/2" seam allowance and the doll has a different seam allowance of a 1/4".  
If you have any questions, suggestions, or tips to share; please make sure to post them on our Facebook group.  Also, if you would like to see any of the images larger that are posted in this blog, just click on them to enlarge. 

Let's get started!!

What Size to Make?

On the back of the pattern there is a size chart but there is a first released pattern and a newer updated pattern. The first released pattern cover looks like this one.

The second released pattern cover looks like this one. 

The size chart is correct on the second, newer released pattern, but is incorrect on the original (mustard background) pattern.  Below is the correct sizing chart.

Also the first released pattern bodice is an inch more narrow than the newer printed pattern. Which ever copy you have they are both the same great pattern and instructions! 


Tracing the Pattern:
  1. This is a paper pattern so we want to trace it out to keep the original pattern for future sizes we will want make. Take the paper pattern and lay it out flat on a large surface. You can use freezer paper, tracing paper or tissue paper. For all my smaller size girl and doll clothes I prefer the tissue paper. You can find it in the gift section at the any store. If the pattern piece is larger, like that of the skirt in this pattern, I tape together two pieces of the tissue paper to make it large enough to trace the pattern piece on.
  2. Find the size you will need to make. Find your right size on the pattern and lay the tracing paper over it, making sure that the tracing paper covers the whole area needing to be traced. All the lines on the pattern are different dots and dashes to make tracing the right size easier. I use my quilting ruler to keep those straight edges nice and straight.
  3. Be sure also to copy all the pattern markings as well (button placement, button holes, tab placement and notches). Do this for both the girl and doll sized patterns. 
  4. For the skirt I traced it twice, one marked with the tabs and 1" shorter for the over skirt and the second full length for the underskirt. This way I do not have to trim the 1" off of my pattern piece to cut out the over skirt and I have two separate pieces for each skirt. I think it is just easier this way.
    Here is the over skirt pattern piece with the 1" "shorter" line marked for cutting.

Cutting the Pattern Pieces: 

*If using fabric from the Littlest line, please make sure to read the note from Suzanne below.

Now onto cutting both of the dresses! For both girl and doll dresses you need to cut the following in the main color fabric. If you have a fabric that has a one way direction, be careful to cut each piece with the top of the fabric with the top of the pattern pieces.
  • the front and back bodice pieces.
  • the lining front and back bodice pieces.
  • the sleeves
  • the over skirt.

For the contrasting fabric cut out the following pattern pieces for both girl and doll.  For the Littlest fabrics you will want to cut the girl's underskirt out of the border, but the remaining pieces should be cut from the rest of the border print fabric.  * Please make sure to read the note regarding the Littlest fabric from Suzanne below.
  • sleeve bands
  • sash
  • waist band
  • skirt tabs
  • under skirt

Cut out interfacing pieces
  • one waist band piece
  • two tabs pieces
  • two button interfacing pieces

    Here is everything cut out!

Note from Suzanne: If you are using the Littlest fabrics please read.
Hi all, so you have chosen the gorgeous Art Gallery Boarder print from Littlest to use for your underskirt of the Addison.  We want to make sure we show off that beautiful print so we are going to make a couple simple alterations as we cut to ensure that happens!
First: When you cut your under-layer, line up your pattern and cut along the top of the grass line of your boarder print, not along the bottom edge of the fabric. We want those pretty flowers to show!
Second: When you cut your Top Skirt, cut it 2 inches shorter than your bottom skirt rather than just one.  You are then going to do a 2 inch hem on the top skirt.
Voila, a gorgeous boarder print that shows off for all the world to see.
Let me know if you have any questions and come back tomorrow for lesson 2 to start sewing on the girl's dress!!

* If you would like to enter the prize drawing, please make sure you submit a picture of your completed lesson one to the Facebook Album by 12:00 noon CT,
Friday, March 27th.  Also, if you have any questions the Facebook Group is a great place to ask.

Sharon

Thursday, March 19, 2015

Sew-Along #23 - Addison and Addison Mini Dress - Preparations

The Addison and Addison Mini Dresses by Modkid

Before we begin I would like to introduce to you our awesome instructor, Sharon Knowles. The Addison sew-along is the very first sew-along Sharon has done for Whimsical Fabric and we are super excited to have her on board with us.

Sharon has been sewing most of her life but started sewing clothes after their fourth child was born, their first girl after three boys. This is where Sharon fell in love with the art of sewing clothes. Sharon and her husband now have five children, four boys and one girl. She enjoys sewing for each of them very much.

Sharon also works for the wonderful Laura Johnson over at Ellie Inspired. She helps sew up samples, test patterns, and even had her first pattern released with Laura. Sharon states, "It truly is a dream job come true."

Please help me in welcoming Sharon to the Whimsical Fabric team.

Now, on to our preparations.

Items to Collect
  1. You must have the the Modkid paper pattern to be able to take part in this sew-along.  If you have not yet purchased this, please do so here. If you plan on making the Addison Mini doll dress, you will need that pattern also.
    http://www.whimsicaldesignsclothing.com/index.php?main_page=index&cPath=99_367_482
  2. If you do not have fabric for the project you will want to purchase that also.  At the time of this writing we do have fabric kits available.  We also have lots of fun fabric selections on our website. 
    http://www.whimsicaldesignsclothing.com/index.php?main_page=index&cPath=99_367_482&zenid=ru7ff8b7cmq2bld30b9lg729v3
  3. The girls dress requires three ¾" buttons and two ½" buttons. If you purchased a kit from us you will have received these in your kit. 
  4. The doll dress requires 5 tiny buttons. These buttons were supplied in all doll dress kits.
  5. The doll dress also needs about 7 inches of ¾" wide Velcro. Again, all doll kits came with this Velcro.
  6. About a quarter yard of lightweight fusible interfacing is required for the girls dress.  Once again, if you purchased a kit you will have received this.  If you did not, please make sure you have some on hand.
  7. You will need coordinating thread to complete this project.  The project kits did not come with thread, so please make sure you have some.  You will want to probably make sure you have matching thread for the topstitching you will be doing.
  8. And finally, you will need pins, a sewing machine, a good iron (a steam iron is preferable for sewing), a pair of fabric shears or a rotary cutter and mat (a rotary cutter and mat is a lifesaver!), a ruler, and a fabric pen or chalk. 

Optional Items to Collect - The following items are totally optional. 

  1. You also might want to trace the pattern pieces onto freezer paper.  It makes cutting out your fabric super simple.  If you desire to make freezer paper pattern pieces please make sure to have some freezer paper on hand.  You can find freezer paper at most grocery stores where the wax paper and aluminum foil. 
  2. A sharpie or other permanent marker for tracing your pattern pieces onto the freezer paper is helpful if you choose to do this step.  I recommend a black sharpie as the colored ones, though more fun, can tend to transfer onto your fabrics when you iron over them.

Things to Do
  1. Make sure to prewash and preshrink all of your fabrics.  I wash my fabrics on warm or hot and then I dry my fabrics in the dryer with no softeners.  I always preshrink in this way when I am using fabric for clothing construction. I would hate to work hard on something only to have it shrink and not fit when I was done. 
  2. I also prewash my fusible interfacing to preshrink it.  This will prevent any wrinkles or waves that might arise when you iron or launder your garment.  To prewash your interfacing simply soak it in a sink for about 5 minutes in very warm water.  You don't want the water too hot to avoid removing the iron-on finish, but you do want it warm enough to shrink the interfacing.  After soaking, just pat it with a clean towel and hang it to dry. 
  3. Press all of your fabrics (but not your fusible interfacing) well.  I try to do this straight out of the dryer so that the wrinkles come out easier.   
  4. Don't forget to join our Facebook Sew-Along Group so you can post your progress pictures. Everyone who posts completed lesson pictures, on time, to the Facebook Group, will be entered into drawings to win some awesome prizes!
Happy Sewing,
Danielle Storm
www.whimsicalfabric.com

Tuesday, March 17, 2015

Sew-Along #22 - Art Museum Vest and Trousers - Lesson #7

The Art Museum Vest and Trousers by Oliver+S
NOTE: Please make sure you read over the Art Museum pattern directions prior to starting this sew-along.  You should keep these directions open and where you can read them as you go through these lessons. You might want to carefully read through this lesson also before beginning.
If you have any questions, suggestions, or tips to share; please make sure to post them on our Facebook group.  Also, if you would like to see any of the images larger that are posted in this blog, just click on them to enlarge. 

This is the very last day of our Art Museum Sew along - I hope that you have been having fun, I can't wait to see all your finished creations!


Make your Belt Loops:
  1. Take your belt loop section - you are going to iron this the way you would bias tape.
  2. Press your outer edges in to the middle.
  3. Press in half.
  4. Top stitch along both edges.
  5. Cut your loop strip into six 3.5 inch sections. (Discard an extra you have left over.)

Attaching Your Waistband:
  1. Lay out your waistband facing (the cotton) and your main waist band (the yellow twill).
  2. Fold it in half matching the short ends and stitch together using a 1/2" SA.
  3. Press the SA open.
  4. Sew the bands together along the circle, right sides together.
  5. Press the seam allowance over to the lining side and understitch 1/8" from the seam on the lining side.
  6. Press the bottom edge of the lining up to the wrong side 1/4 inch and stitch in place.
  7. Pin your belt loops in place, centered on each notch along the top of the pants.
  8. Pin the unfolded edge of your waistband over the belt loops and pin in place.
  9. Stitch the waistband and belt loops to the pants - make sure to remove the pins as you sew.
  10. Trim your SA to 1/4inch and press the SA away from the pants.
  11. Flip the waistband up away from the pants and press well along the seam line.
  12. Tack your belt loops down 1/4 inch from the waist seam.
  13. Flip the waist band down and press along the seam, Pin in place along the waist seam.
  14. Stitch the waistband facing starting at the front right belt loop and stopping at the front left belt loop - you are going to stitch in the ditch from the right side so that there is no visible stitching on the front.
  15. Take your elastic (I love that the Whimsical Fabric kits always include the notions you need like elastic or interfacing!)  and cut a length approximately 5 inches smaller that your child's waist.  *My one pet peeve with O&S is that they do not include elastic measurements. You can always use the recommendation from another pants pattern you have, or cut it a bit long and then fit it to your child.
  16. You are going to feed your elastic through the opening left in the front between the two belt loops.  Attach a safety pin to one end and push it through.  Once you have it threaded through, stitch each of your ends in place at the center of the belt loop.  
  17. Stitch the opening closed from belt loop to belt loop making sure to back stitch at each end.
  18. Fold your belt loops down, turn the end under 1/4 and stitch at the waistband stitching line. Make sure you back stitch so that your stitching wont unravel with wear and washing.
  19. Your kit included an extra button.  If you would like, you can add a faux button hole and this extra button to your pants.
That's it!  You are done. Congratulations!! Now go try this awesome outfit on your handsome little man.  

Don't forget to make him a bow tie.  If you purchased a kit you will have received the hardware and fabric to make one.  You can find the tutorial for that here.


* If you would like to enter the prize drawing, please make sure you submit a picture of your completed lesson seven to the Facebook Album by 12:00 noon CT, Thursday, March 19th.  Also, if you have any questions the Facebook Group is a great place to ask.

Suzanne
#navbar-iframe{ display:none !important;}