The Bella Pants
The I just want to remind everyone that I am not following the exact order and directions in the pattern booklet. I do however encourage you to read the directions in your booklet all the way through before starting. I also want to remind everyone that if you would like to enlarge any of the images posted in this blog, just click on them. Finally; if you have any questions, suggestions, or tips to share; please make sure to post them on our Facebook group.
1. Sewing and Attaching the Ruffles - Double Ruffle Pants Only
Note: The way I construct and attach my ruffles is different from the pattern instructions. I find it much easier to gather and attach a strip of fabric than a loop of fabric. This is why I have left my inseam open.
a. Rolled Hem
Use your serger to create a rolled hem along one of the long edges of each of the bottom ruffle pieces. Make sure that you keep the width of your ruffle consistent, and that as you create the rolled hem you consistently trim of the same amount of fabric along the whole length. You DO NOT want the ruffle more narrow at one edge than the other or your pants will not line up and will look funny.

b. Traditional Hem
If you are not using a serger to create a rolled hem, but instead will be constructing a traditional hem, we will be doing that at the end of this lesson.
Next, with right sides together, pin the two ruffle pieces (top and bottom ruffles) together. Stitch together using a 3/8" seam allowance.
Do the same with the second set of ruffle pieces.


Next, you will be gathering your ruffle. Their are many ways to do this. You can gather using basting stitches like we did in steps E/F #9-10 here and then pulling the bobbin thread to gather like we did in step H #5 here.
I used my serger to gather my ruffles for this project. If you want to use your serger, simply set your differential feed to 2 and overlock the raw edge of your fabric down the length of the ruffle. Your fabric will softly gather under the presser foot.
Make sure that you are gathering the top edge of your ruffle, which should be your widest fabric on each ruffle.

Your finished ruffles should look something like this.
You will next want to attach your ruffles to your pant legs. Lay out one of your pant legs like so, with the right side up.

Note: If you used your serger to ruffle your fabric, you will most likely need to pull on the needle thread(s) to pull up your ruffle tighter, making it fit the pant leg. Do this carefully so you don't break any threads and work slowly ensuring that your ruffles are evenly distributed.


Using a basting stitch, stitch the ruffle onto the pant leg.

Overlock or zig-zag stitch the seam to finish it, being careful to not catch up any of the gathers and cause puckers.

Once ruffles have been attached to both legs and the seams have been finished, press the seams upward toward the pants using some good shots of steam. The crisper you get this crease the more professional your sewing will look. Topstitch 1/8" from the seam. Again, don't forget to lengthen your stitches when you topstitch.


2. Sewing Up The Inseam
Starting at the crotch, pin the inseam together being very careful to make sure that ALL seams line up. Pay very special attention to the seams as you want them all perfectly aligned.

Carefully stitch up the inseam using a 3/8" seam allowance. I usually start at the crotch and stitch down to the hem on one side, then flip and do the other side. This just helps to ensure that those seams all stay evenly aligned.
Once you have stitched the inseam go ahead and either overlock it or zig-zag stitch it to finish the seam.


Then stitch 1/8" from the edge at the top of your casing. Start at the center back seam and stitch all around the whole waistband.

Using a safety pin, insert your elastic into your waistband. Try your pants on your little model and decide how tight to pull your elastic. Secure your elastic together making sure it is not twisted anywhere in the casing. We use a zigzag stitch and stitch up and down on the elastic a few times to secure.


4. Hemming The Pants
The I just want to remind everyone that I am not following the exact order and directions in the pattern booklet. I do however encourage you to read the directions in your booklet all the way through before starting. I also want to remind everyone that if you would like to enlarge any of the images posted in this blog, just click on them. Finally; if you have any questions, suggestions, or tips to share; please make sure to post them on our Facebook group.
1. Sewing and Attaching the Ruffles - Double Ruffle Pants Only
Note: The way I construct and attach my ruffles is different from the pattern instructions. I find it much easier to gather and attach a strip of fabric than a loop of fabric. This is why I have left my inseam open.
a. Rolled Hem
Use your serger to create a rolled hem along one of the long edges of each of the bottom ruffle pieces. Make sure that you keep the width of your ruffle consistent, and that as you create the rolled hem you consistently trim of the same amount of fabric along the whole length. You DO NOT want the ruffle more narrow at one edge than the other or your pants will not line up and will look funny.

b. Traditional Hem
If you are not using a serger to create a rolled hem, but instead will be constructing a traditional hem, we will be doing that at the end of this lesson.
Next, with right sides together, pin the two ruffle pieces (top and bottom ruffles) together. Stitch together using a 3/8" seam allowance.
Do the same with the second set of ruffle pieces.

Finish edges by either overlocking or zig-zag stitching.

Open up the ruffles and press the seam on each towards the top (towards the wider, contrasting fabric).

Topstitch about 1/8 inch from the seam and catching the seam underneath. Don't forget to lengthen you stitches a bit.

Next, you will be gathering your ruffle. Their are many ways to do this. You can gather using basting stitches like we did in steps E/F #9-10 here and then pulling the bobbin thread to gather like we did in step H #5 here.
I used my serger to gather my ruffles for this project. If you want to use your serger, simply set your differential feed to 2 and overlock the raw edge of your fabric down the length of the ruffle. Your fabric will softly gather under the presser foot.
Make sure that you are gathering the top edge of your ruffle, which should be your widest fabric on each ruffle.
Serger gathering a single ruffle.

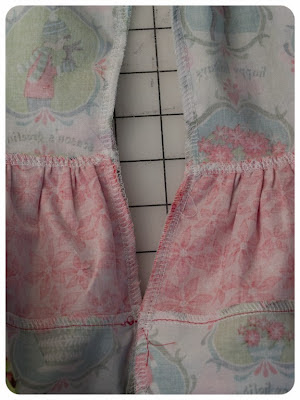
Your finished ruffles should look something like this.

You will next want to attach your ruffles to your pant legs. Lay out one of your pant legs like so, with the right side up.

Note: If you used your serger to ruffle your fabric, you will most likely need to pull on the needle thread(s) to pull up your ruffle tighter, making it fit the pant leg. Do this carefully so you don't break any threads and work slowly ensuring that your ruffles are evenly distributed.

With right sides together, carefully pin the gathered edge of your ruffle to the raw edge of your pant leg.

Using a basting stitch, stitch the ruffle onto the pant leg.

Overlock or zig-zag stitch the seam to finish it, being careful to not catch up any of the gathers and cause puckers.

Once ruffles have been attached to both legs and the seams have been finished, press the seams upward toward the pants using some good shots of steam. The crisper you get this crease the more professional your sewing will look. Topstitch 1/8" from the seam. Again, don't forget to lengthen your stitches when you topstitch.


2. Sewing Up The Inseam
Starting at the crotch, pin the inseam together being very careful to make sure that ALL seams line up. Pay very special attention to the seams as you want them all perfectly aligned.

Carefully stitch up the inseam using a 3/8" seam allowance. I usually start at the crotch and stitch down to the hem on one side, then flip and do the other side. This just helps to ensure that those seams all stay evenly aligned.
Once you have stitched the inseam go ahead and either overlock it or zig-zag stitch it to finish the seam.

On pants, I also always stitch an extra row or two of stitching to strengthen the crotch. Shorten your stitch length. I take mine from 2.5 down to 1.6. Then, starting about an inch or two away from the crotch, I stitch up through the crotch, and then back down the other side for another inch or two.

3. Creating The Waistband
The instructions tell you to fold over the waistband 1/4" and then 1.5" and to use 1" wide elastic. If you purchased a kit from us, we included 3/4" wide elastic instead of 1" wide. We also used the 3/4" wide on our pants.
To compensate for the narrower elastic we first folded our waistband edge 1/2", pressed well, and then 1.25" and pressed well. This created a more narrow casing to accommodate our narrower elastic, but placed the waistband at the same position on the pants as if we used 1" elastic.
I felt that the waistband was too low on my little girl and that she needed a higher rise that what the pattern was giving her. So, on the second pair of pants I folded the waistband over 1/4" and pressed, then 1.25" and pressed. This was better, but when I make the pants in the future, I am going to add some length to the rise. You may find that they are just perfect for your little one though, so experiment and see.
Fold over and press your fabric well to form your waistband casing.

Stitch 1/8" from the bottom edge of your casing leaving an opening in the back of the pants so you can insert your elastic.
Then stitch 1/8" from the edge at the top of your casing. Start at the center back seam and stitch all around the whole waistband.

Using a safety pin, insert your elastic into your waistband. Try your pants on your little model and decide how tight to pull your elastic. Secure your elastic together making sure it is not twisted anywhere in the casing. We use a zigzag stitch and stitch up and down on the elastic a few times to secure.

Pulling your elastic flat, stitch up the opening in the back of your pants being careful to not stitch through the elastic.

To keep the waistband elastic from twisting in the casing I always stitch in the ditch along the side seams to tack down the elastic. You could also do it in the front if you really wanted to make sure it didn't move.
If adding a label and size tag to your pants, now is the time to do it. I just center mine on the back waistband and stitch into place. This creates another spot that keeps the elastic from twisting in the casing.

4. Hemming The Pants
a. Rolled Hem
If you created a rolled hem for the bottom ruffle of you pants and you have thread tails hanging off your inseam, you will need to take care of those now. I like to use a large upholstery needle and pull my thread tails up through my overlock stitches. Then, starting at the rolled hem, I topstitched for about 1/4" while making sure all threads were secured under the seam and did not show.
b. Traditional Hem
If you did not create a rolled hem from the bottom ruffle of your pants you will need to hem your pants now.
Fold under and press well 1/4" on each pant leg. Then fold under and press well another 1/4".

Starting at the inside seams, topstitch 1/8" from the top edge of the fold. I find it easiest to stitch on the inside of the pants so I make sure I am catching the edge.

Congratulations on your new Bella pants. Some little girl is going to love them.


Thanks for sewing with me,
Danielle Storm
www.whimsicalfabric.com
No comments:
Post a Comment