Tuesday, March 10, 2015

Sew-Along #22 - Art Museum Vest and Trousers - Lesson #2

The Art Museum Vest and Trousers by Oliver+S

Today we are starting with our vest.  You are going to learn some awesome techniques in this pattern - and I promise, none of them are hard, they just take a bit of patience and time.
NOTE: Please make sure you read over the Art Museum pattern directions prior to starting this sew-along.  You should keep these directions open and where you can read them as you go through these lessons. You might want to carefully read through this lesson also before beginning.
If you have any questions, suggestions, or tips to share; please make sure to post them on our Facebook group.  Also, if you would like to see any of the images larger that are posted in this blog, just click on them to enlarge. 

Today we will be doing the initial prep and the welt pockets - ready.....set......GO!

The Vest:
  1. Take your cut vest pieces and lay them out in front of you - make sure that all of your markings have been transferred to your fabric.
  2. Start by sewing your dart. Fold the fabric right sides together with the dots of the dart matching, pin.  Place a pin at the top of the dart and sew from the top of the dart down to the bottom in a straight line - if you are new, feel free to draw that line prior to sewing.
  3. Press the dart toward the side seam first from the wrong side, then flip your fabric over and press again for a clean finish (use spray starch as needed).
  4. Cut your interfacing according to the instructions.
  5. I like to do all my interfacing at the same time, so fuse the button hole interfacing to the WRONG side of your vest front (make sure the shiny side of the interfacing is placed shiny side down).
  6. Take your other pieces of interfacing and fuse them to your welt pocket piece and to the wrong side of the vest front over the markings (this will run over the darts that you already sewed).
The Welt Pockets:
  1. Breath, take a sip of wine - not the whole glass, just a sip!
  2. If you didn't fuse the welt pocket interfacing above, do so now.
  3. There should be interfacing on both the welt pocket and on the vest where the welt will be sewn - this is going to allow you to get a nice crisp welt opening.
  4. On the welt pocket, connect the dots of the marking with a straight line along the top and a straight line along the bottom.
  5. Place the welt pocket on the vest, right sides together, matching the markings.
  6. Pin in place.
  7. Sew along the straight lines - you want to make sure to start and stop exactly at the dots on each line.  To make this easier, I like to lower my needle down right in the center of the dot and then start sewing. (I sew a couple stitches forward and then back tack.)
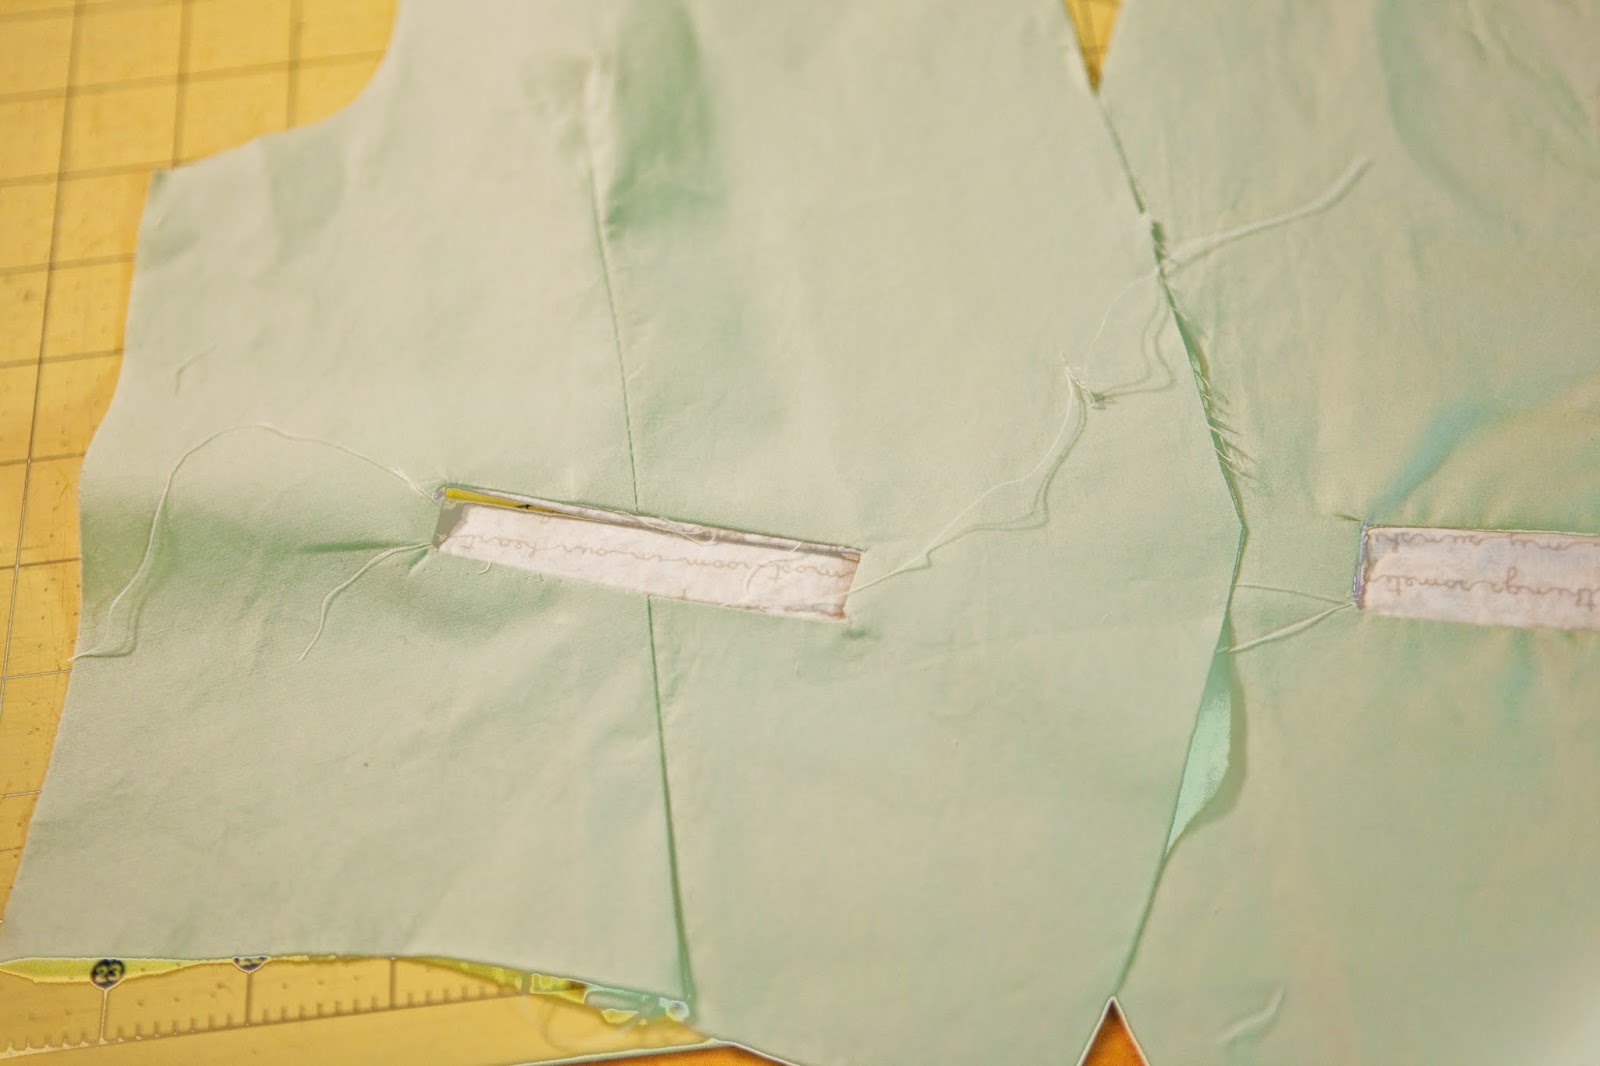
  8. Once your lines are sewn, you will want to draw a straight line down the center of the space between the two lines.
  9. You will draw a V in to the center line on each end.
  10. Cut along this line, cut all the way to the stitching, but not through it.
  11. Turn your welt pocket through the opening and to the wrong side of the vest.
  12. You are going to want to pull the fabric taught to create crisp edges around the welt opening.
  13. Press first from the wrong side, then flip to the right side and press carefully - you will probably need to pull  the fabric in the corners to make them lay flat.
  14. Press well with lots of steam and spray starch to set the folds.
  15. From the wrong side, fold your fabric up until the fabric folds exactly at the top of the welt opening, press well.
  16. To set the pocket folds, you are going to sew along the ends where the triangles are - set your needle down at the top of the crease and sew down, repeat for the other side.
  17. Now that you have the welt opening, you are going to make the pocket - I'm going to diverge from the pattern slightly.
  18. Sew the bottom edge of the pocket bag to the bottom edge of the welt pocket, right sides together.
  19. Open the fabric and press the seam flat.
  20. Fold the pocket bag back to match the top of the welt pocket and sew in place.
  21. Press the fold.
  22. Sew both sides of the pocket bag.
  23. Repeat for the other side.
That is it - we are done for the day!!!!  How do you feel about welt pockets now???  They are a bit finicky, but not really that hard and they are an awesome detail to add to any garment.  If you feel like you need more practice - don't worry, you'll get to do more on the pants!

* If you would like to enter the prize drawing, please make sure you submit a picture of your completed lesson two to the Facebook Album by 12:00 noon CT, Thursday, March 12th.  Also, if you have any questions the Facebook Group is a great place to ask.

Make sure to come back tomorrow for Lesson 3!
Suzanne

Monday, March 9, 2015

Sew-Along #22 - Art Museum Vest and Trousers - Lesson #1

The Art Museum Vest and Trousers by Oliver+S
  
How excited are you?!?!!?  An awesome sewing pattern for BOYS for EASTER!!!  Or for Spring, and summer, or for fall, or for Christmas, or for any time you can possibly put your boys in awesome pants and an adorable vest and tie.
NOTE: Please make sure you read over the Art Museum pattern directions prior to starting this sew-along.  You should keep these directions open and where you can read them as you go through these lessons. You might want to carefully read through this lesson also before beginning.
If you have any questions, suggestions, or tips to share; please make sure to post them on our Facebook group.  Also, if you would like to see any of the images larger that are posted in this blog, just click on them to enlarge. 

Ok - so let's start!


Printing

  1. This pattern prints in B&W, so make sure to set your printer to the grey scale or B&W setting to save on ink.
  2. Make sure that you hit 'scaling none' or 100% for printing - DO NOT select 'fit to page'.

Pattern Assembly
  1. You are going to  match up the numbers in the circles to create the pieces.  *Note that this pattern does not print as a solid grid!
  2. Stack your pattern pieces together with all the Pants patterns in one pile and all the Vest pattern pieces in another.
  3. As needed cut apart the pieces and rotate to fit together.
    *See on the right hand side that that one A 14 is flipped upside down - that means this piece needs to be cut off and flipped around - all your numbers and letters will have the same orientation in your pattern piece.

  4. Once all your pieces are taped together, you can either cut out your needed size (this is what I love about PDF pattern, tape and cut and go) OR you can trace out the size you need on freezer paper or tracing paper. *Tip:  To make cutting easier - trace your size with a highlighter, marker, or other crayon to make visually following your line ever easier.

Cutting Your Fabric


      Vest:
  1. For the Vest you have two fabrics - your main fabric will be your fronts and ties, and your contrasting fabric will be the back panel, the welt pockets, and the entire lining.
  2. Cut out your pieces (note that the back is cut on the fold.)
  3. Make sure to transfer all the notches from your paper pattern to the fabric (you can use a fabric marker, chalk, pins, or cut in notches to transfer the markings.)
  4. Place all you pieces for the vest together (if you ordered a kit from Whimsical Fabric, you can place everything in your handy-dandy zippered bag.)
     Pants:
  1. Ok first you need to look at what fabric you are using.  If you are using a Print or Cord, listen to me very carefully (if you are using a fabric with NO direction - skip to the next step).  Pick your direction right now.  MARK the top of your fabric - I just use a pin to do this.  Make sure that every single pattern piece that you cut has the top of the grain line facing the top of your fabric.  If you are using Cord, then you have picked a fabric with NAP.  Nap essentially means that your fabric will look different depending on which direction you hold it.  SO right now, you need to pet your fabric - yep, go ahead and pet it.  You will notice that the pile wants to go in one direction and your hand will move smoothly along it.  When you go the other direction it will have resistance against your hand and will look like the pile is being pushed 'up'.  You want your fabric to go with the smooth pile going down (so you would run your hand smoothly from the top of the pants to the hem). 
  2. Pile all your pieces together and set aside in a safe place. *I like to pile all my front pieces together and all my back pieces together so that there is less likelihood of mixing them up!
  3. Cut out all of the pieces (except the waistband facing) from your main fabric.
    *if you want contrasting pockets or waist band or belt loops plan that out in advance - it could be really cool!
    For Asher's Pants, I flipped the outer waistband and the lining so that his pants have a pop of color (it also helps my husband know whose pants are whose since Asher's are a size smaller.)
  4. The waist band lining piece you will cut from a contrasting fabric. (You'll want a cotton here.) If you purchased a fabric kit you should have enough left over fabric from the vest for this.
  5. Make sure to transfer all the notches from your paper pattern to the fabric (you can use a fabric marker, chalk, pins, or cut in notches to transfer the markings.)
There you go... everything is printed and cut out.  Please let me know if you have any questions in the cutting process.  In the next lesson we will start sewing the Vest!

* If you would like to enter the prize drawing, please make sure you submit a picture of your completed lesson one to the Facebook Album by 12:00 noon CT, Wednesday, March 11th.  Also, if you have any questions the Facebook Group is a great place to ask.

Make sure to come back tomorrow for Lesson 2!
Suzanne 

Saturday, March 7, 2015

Sew-Along #22 - Art Museum Vest and Trousers - Preparations

The Art Museum Vest and Trousers by Oliver+S

Before we begin I would like re-introduce our wonderful instructor, Suzanne Winter.  Suzanne has been gracious enough to lead quite a few of our sew-alongs over the years.  
Suzanne has a wealth of sewing knowledge to share and is an amazing sew-along instructor.
In addition to being the mom of three adorable children age 4 and under, Suzanne is also the designer behind the hot new pattern company, Winter Wear Designs.
 
Please help me in welcoming Suzanne back for what is going to be another awesome sew-along.

Now, on to our preparations.

Items to Collect
  1. You must have the the Oliver+S Art Museum pattern to be able to take part in this sew-along.  If you have not yet purchased this, please do so here.
    http://www.whimsicaldesignsclothing.com/index.php?main_page=index&cPath=99_367_482
  2. If you do not have fabric for the project you will want to purchase that also.  At the time of this writing we do have fabric kits available.  We also have lots of fun fabric selections on our website. 
  3. The pattern is a PDF pattern.  You will need a printer, paper, and tape to print and put together your pattern pieces.  We will go over how to piece your pattern together in the first sew-along lesson.
  4. The trousers require ¾" wide elastic for the waistband.  If you purchased a kit, you will have received the elastic you need.  If not, please make sure to have some on hand.
  5. The trousers and vest require 6-8 ¾" buttons. Again, if you purchased a kit from us you will have received them in your kit. 
  6. We will not be teaching how to create the Dapper bow tie since we just taught that in our November SAL.  You can follow along with those instructions here if you would like to make one.  You will also need to own the Dapper pattern, which is located here.
  7. If making the Dapper bow tie you will also need to have a bow tie hardware kit.  The Art Museum sew-along kits all came with a bow tie hardware kit.  If you didn't purchase a kit and need to purchase a hardware set, we sell them here.
  8. About half a yard of lightweight fusible interfacing is required for this pattern.  Once again, if you purchased a kit you will have received this.  If you did not, please make sure you have some on hand.
  9. You will need coordinating thread to complete this project.  The project kits did not come with thread, so please make sure you have some.  You will want to probably make sure you have matching thread for the topstitching you will be doing.
  10. And finally, you will need pins, a sewing machine, a good iron (a steam iron is preferable for sewing), a pair of fabric shears or a rotary cutter and mat (a rotary cutter and mat is a lifesaver!), a ruler, and a fabric pen or chalk. 

Optional Items to Collect - The following items are totally optional. 

  1. Spray starch will be very helpful during this sew-along.  If you do not own any you might want to purchase some ASAP.
  2. You also might want to trace the pattern pieces onto freezer paper.  It makes cutting out your fabric super simple.  If you desire to make freezer paper pattern pieces please make sure to have some freezer paper on hand.  You can find freezer paper at most grocery stores where the wax paper and aluminum foil. 
  3. A sharpie or other permanent marker for tracing your pattern pieces onto the freezer paper is helpful if you choose to do this step.  I recommend a black sharpie as the colored ones, though more fun, can tend to transfer onto your fabrics when you iron over them.

Things to Do
  1. Make sure to prewash and preshrink all of your fabrics.  I wash my fabrics on warm or hot and then I dry my fabrics in the dryer with no softeners.  I always preshrink in this way when I am using fabric for clothing construction. I would hate to work hard on something only to have it shrink and not fit when I was done. 
  2. I also prewash my fusible interfacing to preshrink it.  This will prevent any wrinkles or waves that might arise when you iron or launder your garment.  To prewash your interfacing simply soak it in a sink for about 5 minutes in very warm water.  You don't want the water too hot to avoid removing the iron-on finish, but you do want it warm enough to shrink the interfacing.  After soaking, just pat it with a clean towel and hang it to dry. 
  3. Press all of your fabrics (but not your fusible interfacing) well.  I try to do this straight out of the dryer so that the wrinkles come out easier.   
  4. Make sure to download the pattern and tutorial onto your computer, tablet, or smart phone. Your pattern will be located in your order history on our site.  Log into your account, then click on the My Account at the very top right hand side of our site.  You will then see a list of your orders.  Click on the correct order and a download link will be available. 
  5. Don't forget to join our Facebook Sew-Along Group so you can post your progress pictures. Everyone who posts completed lesson pictures, on time, to the Facebook Group, will be entered into drawings to win some awesome prizes!
Happy Sewing,
Danielle Storm
www.whimsicalfabric.com

Friday, January 30, 2015

Sew-Along #21 - Dress No.17 & Leggings No.8 - Lesson #4

All right my knit sewing addicts.... after what you have sewn over the last 3 days, these leggings are going to be a breeze.   If you are struggling with anything, just ask me and I will be happy to help.

If you have any questions, suggestions, or tips to share; please make sure to post them on our Facebook group.  Also, if you would like to see any of the images larger that are posted in this blog, just click on them to enlarge. 
NOTE: Please make sure you read over the E+M Patterns Leggings Tutorial prior to starting this lesson.  You should keep this tutorial open and where you can read it as you go through this lesson.  
 Leggings:

1. Lay your leggings pieces out in front of you.

2. You will notice that there are two different curves  - one is the front curve and one is the back curve.  Each piece is an entire leg with just an inseam and no outseam.
Tip: Want to never get your front and back curves mixed up???  The Back curve will always be higher and deeper - but to help your brain, mark the back with a pin.
3. The Pattern has you hem now, so we will hem now, but I think you will get a more professional look if you wait and hem at the end.
a.) Go ahead and serge or finish the raw edge of your pants.

b.) Turn the bottom up 1/2 inch and press.

c.) Stitch along the raw edge of the turned up bottom to complete your hem.
4. Lay the pieces right sides together with the curves matched up.

5. Pin and sew both curves.

6. Press your seam allowance to the side and top stitch the seam to give the leggings more strength (no popped stitched here!)

7. Match up the front and back seams so that the inseams of the pants lines up.

8. Pin the inseam together making sure to match the top of the inseam where the seams meet.

9. Sew together.
If you serged, make sure that you leave an inch of the tail.
Fold the tail back onto the seam allowance and stitch it in place with a zig zag stitch - this will prevent the seam from unraveling.


Look at that - leggings!  Now we just need a waist band.

10. Once again, start by serging or finishing the raw edge of the top of the pants. I just feel this gives a more professional finish.

11. Turn the top edge down to the inside/wrong side of the pants 1 and 1/4inch.
I like to go ahead and stitch the sizing tag in now so that I don't forget!!!!
Tip: To get an even turn, use a slide ruler to evenly mark how much you need to turn down .
12. Press in place and pin.

13. Stitch along the serged edge leaving a one inch opening in the back - you need this opening to thread your elastic through.

14. Take your elastic and cut it to the length for your size.
Tip: If your child is extra slim, make sure to cut the elastic for the size that their waist measurement uses.
15. Take a safety pin and attach it to the elastic.

16. Thread the safety pin through the opening and through the entire casing.
Tip: To keep your end from popping into the casing, pin the end to the opening.
17. Pull both ends of the elastic through the opening and stitch the ends together.

18. Close the opening by sewing from one edge to the other, make sure to back stitch at both ends. 

19. Secure your elastic in place by stitching in the ditch of the front and back seams (this means doing a straight stitch right along the seam line so that your stitching won't show.

Voila!!!!!!!

Now go put them on your cutie!!!!
Suzanne 


* If you would like to enter the prize drawing, please make sure you submit a picture of your completed lesson one to the Facebook Album by 12:00 noon CT, Monday, February 2nd.  Also, if you have any questions the Facebook Group is a great place to ask.
#navbar-iframe{ display:none !important;}