Wednesday, July 9, 2014

Sew-Along #15 - Sketchbook Shirt + Shorts - Lesson #2

The Sketchbook Shirt + Shorts

If you have any questions, suggestions, or tips to share; please make sure to post them on our Facebook group.

Note: If you would like to see any of the images larger just click on them.  

Please read the directions in your Sketchbook pattern all the way through before you begin.  It's also a good idea to read through this sew-along lesson before starting.

Today we start working on the oxford.  I think I've already mentioned that I love oxfords.... I make a lot of them!  But I'll confess a secret - I typically up-cycle them so that I don't have to sew all those button holes and buttons.  I love saving time!!!!  But in this class I'm teaching you every step, and don't let button holes scare you - I don't have a fancy machine and I can still whip them out pretty fast.  To all of you who have programmable button hole stitches I send you a big slobbery raspberry bpbpbpbpbpbpppppppp! (it is just my jealousy coming through - love you all!)

Okay - we have all of our pieces cut and laid out.  Today we are going to focus on the back yoke, the front placket, and pocket.  Make sure your iron is hot and you have all your materials ready.

(*I may occasionally go out of order from the written instructions, but only in order to complete one logical stage at a time.)

Let's Get Started:
  • Before we start sewing different pieces together, we are going to stay stitch the neck line on both of the front and both of the back yoke pieces.  *This prevents the neck line from stretching out when we attach the collar later on.
Front Placket:
  • Cut a 1 inch wide strip of fusible interfacing the same length as your placket.

  • Press this in place 1/2 inch in from the edge of the placket (make sure the shinny side is face down on the WRONG side of your fabric.)
  • Press the placket in half.

  • Unfold your placket and press the edge 1/2 inch toward the center.

  • Line up the raw edge of your placket with the raw edge of your shirt, right sides together.
     
  • Pin in place and stitch.

  • Press the placket away from the shirt with the seam allowance facing the placket.

  • Flip the placket back toward the shirt along the center fold line and press in place.
  • You will secure the placket by edge stitching 1/16 from the seam - move your needle all the way to the left or right to achieve this small stitch allowance (*this stitching is visible, so I recommend using matching thread - I used navy thread so that it would show better in this tutorial and because I like contrasting top stitching, but it means that every flaw will show.)

  • Edge stitch the folded edge of the placket to complete.

  • Repeat on the other side.

Pocket
  • Take your pocket piece and lay it out - make sure that you have transferred your markings from the pattern onto the fabric.
  • Turn the top edge to the WRONG side 1/2inch and press.

  • Turn that edge to the RIGHT side 1inch and press.
  • Stitch along the sides from the top of the pocket to the folded edge using a 1/2 seam allowance, make sure to back stitch at each end.

  • Turn the fold out to the right side and push out the corners using a chopstick or turning tool.  

  • Press the top edge.  The sides are being pulled in 1/2"  - press these as well, and fold the bottom up a 1/2 inch and press.

  • Top stitch the top fold along the inner folded edge.

  • To get clean bottom corners, turn the bottom corner in to create a diagonal and press.

  • Re-fold your side and bottoms in and press well giving you a very clean corner.

  • You will line up the pockets with the markings for your size.

  • Pin in place.

  • Sew the pocket along the outer side edges and bottom edge, plant your needle and pivot to turn the corners.

  • I chose to do two rows of stitching for an added detail, and to do an angled stitch at the corner - these details are optional, but I feel give more of that professional finish.

Now let's  get started on the Back Yoke:
  • Set your front aside and take your 2 back yokes and your main back piece and lay them out on your work space.
  • Take your main back piece and fold it in half WRONG sides together.  You are going to pin it together at the point that you transferred markings from your pattern.

  • Sew a baste stitch along your marking line.

  • Lay your back out flat with the right side facing up.
  • Match the center of your fold with the stitching line and press the pleat flat - this creates what is called a 'Box' pleat.

  • Baste along the top edge of your pleat to hold it in place
In attaching the Yoke, we are going to encase the back and shoulder seams, creating a beautifully finished interior.  This might sound complicated, but really it isn't!
  • Take both of those back yokes, and lay them out Right Sides Together
  • Take your Back piece and sandwich it between the two yokes - it will be right side together to one yoke and right to wrong sides together with the other yoke.

  • Pin in place and sew them together.

  • Press your seam allowance up toward the yoke.
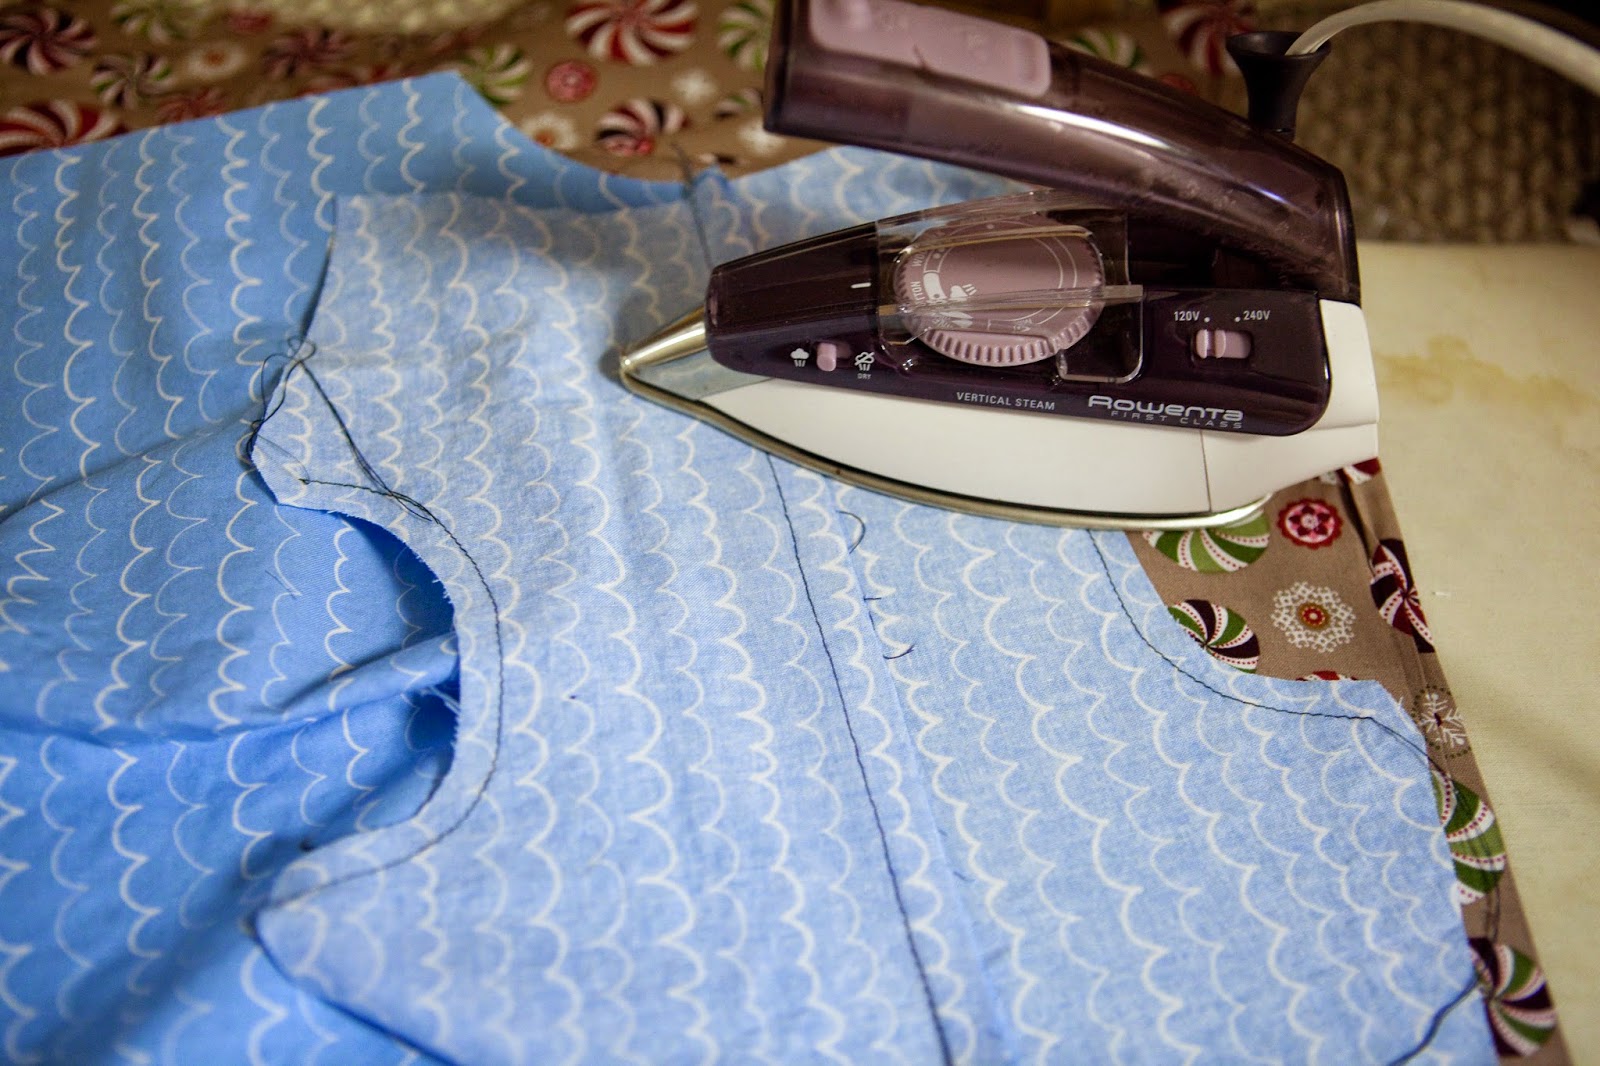
  • Flip your outer yoke up and press the seam well.
That is it for today - tomorrow we will start making this look like a SHIRT!

* If you would like to enter the prize drawing, please make sure you submit a picture of your completed Lesson 2 to the Facebook Album by 12:00 noon CT, Friday, July 11th.

Suzanne

Tuesday, July 8, 2014

Sew-Along #15 - Sketchbook Shirt + Shorts - Lesson #1

The Sketchbook Shirt + Shorts

If you have any questions, suggestions, or tips to share; please make sure to post them on our Facebook group.

Note: If you would like to see any of the images larger that are posted in this blog, just click on each.  This might be helpful on some steps. 
 
Please read the directions in your Sketchbook pattern all the way through before you begin.  It's also a good idea to read through this sew-along lesson before starting.

How excited are you?!?!!?  Another great sewing pattern for BOYS!!!  Yes, yes, you can do this for girls as well - follow the tips at the bottom of this section if you want to make your girls some board shorts!  I just love my boys in Oxford shirts year round, they just look pulled together - even if they are hanging from a tree, or covered in mud, or dripping food down their fronts.... they still look so cute ;o)

The Sketchbook Set:


Okay - so let's start by printing your pattern!

Pattern Printing:
You do not need to print the instructions if you have an e-reader, or smart phone - saving paper is always great.
  • This pattern prints in B&W, so make sure to set your printer to the grey scale or B&W setting to save on ink.
  •  Make sure that you hit 'scaling none' or 100% for printing - DO NOT select 'fit to page'

Pattern Assembly:
  • You are going to  match up the numbers in the circles to create the pieces.  *Note that this pattern does not print as a solid grid!
  • As needed cut apart the pieces and rotate to fit together
    *see on the right hand side that that one A 14 is flipped upside down - that means this piece needs to be cut off and flipped around - all your numbers and Letters will have the same orientation in your pattern piece.


  • Once all your pieces are taped together, you can either cut out your needed size (this is what I love about PDF pattern, tape and cut and go) OR you can trace out the size you need on freezer paper or tracing paper. *Tip:  To make cutting easier - trace your size with a highlighter, marker, or other crayon to make visually following your line ever easier.
  • Stack your pattern pieces together with all the pants patterns in one pile and all the shirt pattern pieces in another. (I like to keep my paper pattern pieces stacked with my fabric so that nothing gets mixed up.)

Cutting Your Fabric:
Shirt
  • Lay your pattern on the fabric so that you are following the same direction with all pieces - you don't want part of your shirt to be upside down!
  • Cut out your pieces (note that the back is cut on the fold, but the front is not)
  • You need 2 of the sleeves - the easiest thing you can do is fold your fabric in half and cut your pattern (this will give you mirror images).  If you are cutting a single layer of fabric, you will need to cut one with the pattern printing facing up at you and a 2nd one with the pattern printing facing down.
  • Make sure to transfer all the notches from your paper pattern to the fabric (you can use a fabric marker, chalk, pins, or cut in notches to transfer the markings)
  • Place all you pieces for the shirt together and set to the side (if you ordered a kit from Whimsical Fabric, you can place everything in your handy-dandy drawstring bag)
I have shown both the regular collar: middle, and the band collar: far left - you only need one of these!
Pants
The initial notes are for standard cutting, I will have some notes for cutting for girls at the end!
  • Okay, first you need to look at what fabric you are using.  If you are using a print or cord, please listen to me very carefully (if you are using a fabric with NO direction - skip to the next step).  Pick your direction right now.  MARK the top of your fabric - I just use a pin to do this.  Make sure that every single pattern piece that you cut has the top of the grain line facing the top of your fabric.  If you are using cord, then you have picked a fabric with NAP.  Nap essentially means that your fabric will look different depending on which direction you hold it.  SO, right now, you need to pet your fabric - yep, go ahead and pet it.  You will notice that the pile wants to go in one direction and your hand will move smoothly along it.  When you go the other direction it will have resistance against your hand and will look like the pile is being pushed 'up'.  You want your fabric to go with the smooth pile going down (so you would run your hand smoothly from the top of the pants to the hem).  
  • Cut out all of the pieces from your main fabric. *If you want contrasting pockets or a contrasting waist band, plan that out in advance - it could be a really cool accent!
  • Make sure to transfer all the notches from your paper pattern to the fabric (you can use a fabric marker, chalk, pins, or cut in notches to transfer the markings)

  • Pile all your pieces together and set aside in a safe place. 
shorts
 (I decided to make my shorts pocket lining match the shirt
 - you could also do a contrasting piece for the facing for a pop of interest.) 
  
FOR GIRLS:
  • Make sure you double and triple check the measurement chart INCLUDING the finished measurements for the garment.  These shorts have a decent amount of ease in them and have a full elastic waist band or a 3/4 band.  If your daughter is slim I would recommend going down a size (just watch your length) - it will keep a more feminine silhouette. 
  • Consider adding some details: embroidery or 'bling' along the front edge, or a decorative stitch along the pocket curve.
There you go... everything is printed and cut out.  Please let me know if you have any questions in the cutting process.  In the next lesson we will start sewing the shirt!

* If you would like to enter the prize drawing, please make sure you submit a picture of your completed Lesson 1 to the Facebook Album by 12:00 noon CT, Thursday, July 10th.

Suzanne

Monday, July 7, 2014

Sew-Along #15 - Sketchbook Shirt + Shorts - Preparations

The Sketchbook Shirt + Shorts by Oliver+S

Before we begin the sew-along on Wednesday, July 9th, you'll want to gather a few items and do a few things to prepare.

Items to Collect
  1. You must have the Sketchbook pattern by Oliver+S to complete this project.  If you have not yet purchased it, please do so here.
  2. If you do not have fabric for the project you will want to purchase that also.  At the time of this writing we do have a some fabric kits available.  We also have lots of fun fabric selections on our website.  
  3. You will need coordinating thread to complete this project.  The project kits did not come with thread, so please make sure you have some.  
  4. You will also need 3/8" or 1/2" buttons.  The kits did not come with buttons so make sure to have some on hand.
  5. The shirt requires fusible interfacing.  The kits do come with fusible interfacing, so you are all set if you purchased or are purchasing a kit.
  6. The shorts require 3/4" wide elastic.  The kits have the elastic included, so again, if you purchased or are purchasing a kit, you are good.
  7. Spray starch will be helpful to have on hand for this project.  You can pick some up at any local grocery store.
  8. And finally, you will need pins, a sewing machine, a good iron (a steam iron is preferable for sewing), a pair of fabric shears or a rotary cutter and mat, a ruler, and a fabric pen or chalk.  

Things to Do
  1. Make sure to prewash and preshrink all of your fabrics.  I wash my fabrics on warm/hot and then I dry my fabrics in the dryer with no softeners.  I always preshrink this way when I am using fabric for clothing construction.  I would hate to work hard on something only to have it shrink and not fit when I was done.
  2. Prewash your fusible interfacing to preshrink it.  This will prevent any wrinkles or waves that might arise when you launder your garment.  To prewash your interfacing simply soak it in a sink for about 5 minutes in very warm water.  You don't want the water too hot to avoid removing the iron-on finish, but you do want it warm enough to shrink the interfacing.  After soaking, just pat it with a clean towel and hang it to dry.
  3. Press your fabrics well.  I try to do this straight out of the dryer so that the wrinkles come out easier.  
  4. If you haven't already, join our Facebook Sew-Along Group so you can post your progress pictures.
Happy Sewing,
Danielle Storm
www.whimsicalfabric.com

Sunday, June 1, 2014

Sew-Along #14 - Frannie Dress - Lesson #4

The Frannie Dress

Welcome to the Frannie Dress sew-along.  I want to remind everyone that I am not a "professional" seamstress, nor was I formally taught.  I'm just a girl who loves fabric, sewing, and pretty much everything related to those two things.  If you have any questions, suggestions, or tips to share; please make sure to post them on our Facebook group.

Please read the directions in your Frannie Dress pattern all the way through before you begin.  It's probably a good idea to read through this lesson once before you begin also.

I also want to remind everyone that if you would like to see any of the images posted in this blog larger, just click on them.  It might be helpful on some steps.  Let's begin now.

Day 4 - Adding the Back Closure Button, Creating a Button Loop, and Closing Up the Lining.

1. Sew a button onto the top of the back dress opening.  I sewed mine here on the left side, but convention is to sew it on the right side.  You can add more buttons to the back opening if you like.  Kits came with just one button, but the choice is totally up to you.

2. We are now going to sew a button loop for your back closure.  I'm first going to show you how I originally learned to sew these.  Then, I'm going to share a series of videos that show you what I feel is an easier way to make the button loop.  Do not fret if your button loop isn't perfect.  You will get better at this the more often you make them.  Let's jump in.
Note: It will probably be helpful to click on the pictures to be able to see the steps in more detail.
A. I used 4 LONG strands of sewing thread for my button loop.  Thread these on your needle and tie a knot in the end so you will be sewing with a total of 8 strands of thickness.  You can probably get by with as few as 2 strands (4 when doubled), but I like my loops strong.  If you are using embroidery floss you may get by with even less.

B. Go up through the hole in your lining and out the edge of your seam opposite your button.  You want to come out near the top of where your button is on the the other side.  Secure the knot on the inside between the dress and the lining. 

C. Measure about how long you want your button loop to be by wrapping it around your button.

D. Then, go back into the dress and out the original hole with your needle.

E. Pull your threads until the loop is the size you just measured and determined you desired.  You can try it on the button to make sure.

F. When you have the loop the size you want and all the threads are lined up together, wrap the loose thread around your index finger like shown below.

G. Now, poke the needle through your button loop from back to front.

H. Next, slide your needle under the thread on your finger.

I. Pull the thread. 

J. Keep pulling and slide the knot down to the base of your loop until it is tight.

K. It should look like this.

L. Repeat steps F thru J until you have covered the whole loop with your stitches. 

M. When you have your loop finished, push the needle back in between the dress and the lining and knot your threads.

Below are three videos that also explain how to accomplish the same task of creating a button loop, but in a little different way.  This is how I prefer to make them now as it is really quick.  The only suggestion I would make is to keep the thread tails after your knot longer.  They will be hidden inside the dress and the knot is more secure if they are longer.


3. The very last step for your dress is to close up your opening in the lining.  I like to use a ladder stitch as I feel it is strong enough and hides the hole well.  You can use whatever method you prefer.

That's it!  You just made a Children's Corner Frannie!  Wasn't that awesome!  Thank you so much for joining me.  It's been a total pleasure to teach one of my all time favorite patterns.


Our youngest, Miss Sydney, in her very first Frannie I made for her first birthday.

Miss Sydney today.  Oh how fast they grow!
 

* If you would like to enter the prize drawing, please make sure you submit a picture of your completed lesson four to the Facebook Album by 12:00 noon CT, Thursday, June 5th. Also, if you have any questions the Facebook Group is a great place to ask.

Thanks for sewing with me,
Danielle Storm
www.whimsicalfabric.com
#navbar-iframe{ display:none !important;}